
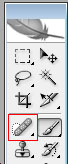
Cleaning up small and large skin blemishes in Photoshop is an incredibly easy process. It’s actually quite fun to do as well because you have complete control over how much you clean up the skin in the photograph. Unlike retouching the entire area of skin, cleaning up blemishes requires no Photoshop filters or layer masks. There is a great tool in Photoshop called the “spot healing brush” and it looks like this.
All you need to do is select this tool and use the “alt” key to select a sample of good skin. Ensure your brush size is set to just larger than the size of the blemishes. You can change your brush size by clicking on the drop down button in the upper left side of the screen.
Once you are ready to get rid of the small and large blemishes in the skin, simply start clicking away. The spot healing brush is great because unlike the stamp tool is blends in both the texture and color in a seamless fashion leaving virtually no sign of the blemishes in the first place.
Look at the image at the top of this blog post to see both the before and after pictures of the skin with blemishes and then without blemishes.