Tag: retouching

How To Remove Wrinkles in Photoshop

Removing wrinkles from a person in a photograph is a fairly easy process. There are different ways of getting rid of wrinkles in a photograph but the best way (and the easiest way) I’ve found is to use the “spot healing brush tool” (see below). Other ways leave noticeable blur marks and are more time consuming and less accurate.

Follow these steps to get started with removing wrinkles from your subjects face or body in your photographs.

1. Open Photoshop and open the image you want to edit

2. Right click on the background under the layers window and click “duplicate layer”. You now have two layers.

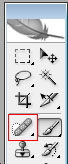
3. Ensure your second layer is the active layer and click on “spot healing brush tool” in the sidebar.

spot brush tool

4. Find an area of skin close the wrinkles that shares the same color and light attributes. Click “alt + left click” now move the spot healing brush tool over the wrinkles and either drag it along in the direction of the wrinkles or just “dab” it on the wrinkles one click at a time. If you make a mistake simply just click the “undo” button under “edit – undo”.

During this stage it’s important to ensure you’ve selected the right brush size. If the brush is too large, it may create noticeable marks on your photograph. For the image above I used a brush size of 7 (you can change this in the upper left hand corner of Photoshop).

It’s important to enlarge the photograph so you can see the small details of the wrinkles. It’s easy work, but to get it done perfectly you must spend some time trying different approaches and brush strokes to removing the wrinkles.

In the image above (top of blog post) I removed the majority of the wrinkles in the man’s face, especially around his eyes. Notice the changes are subtle as to make the photograph still appear natural. You can’t remove all of the wrinkles from the body or face of a 40 or 50 year old without the image looking unnatural.

Good luck with you photo re-touching!

Retouching Skin in Photoshop. Making Bad Skin Look Good

Retouching Skin in Photoshop. Making Bad Skin Look Good

Here is a quick Photoshop tutorial on how to make bad skin look great. Retouching skin is not a simple task. You can easily overdo it and make the skin look unnaturally airbrushed and almost cartoonish. That being said, with some care and a few practice runs you'll be touching up skin in your photographs with Photoshop in no time.

Step 1:
Open your photograph in Photoshop

Step 2:
Right click on your background image in you layers window and click "duplicate layer". You'll now have a clone of your background. This is important for both masking your image and adding the right skin texture later on.

Step 3:
This is where you make most of the changes to your subjects skin. Make sure your second layer is active and go to your "filters' button at the top of the Photoshop window. Click "filters -- Blur -- Surface Blur". Ensure that "preview" function is activated so you can see the changes that you're making to the skin tone immediately. There are no ideal settings for this filter. simply play around until you feel comfortable with having cleaned up any sking blemishes in your subjects face or body.

Step 4:
You will have lost some detail in important areas such as the eyes of your subject as well as any areas with hair. This is easily fixable by ensuring your second layer is active and clicking on "layer -- layer mask -- reveal all" (found at the top of the Photoshop window). You need to use this mask to expose the textures in the eyes and the hair. To do this simply choose black as your foreground color and paint with the "brush tool" over the objects eyes and hair. The original texture of the image will become visible.

Step 5:
However, you'll probably notice that your image has a slightly plasticized look to the skin. Although the skin blemishes are fixed, the image now looks unnatural. In order to fix this you need to expose some of the background skin texture. To do this simply ensure your second layer is active and then use the "opacity" level in the layers window to expose some of the original skin texture. Usually a setting above 50% is desirable because it allows you to maintain the effects of the cleaned up skin while at the same time making the photograph look natural.

More Photoshop Tips
More photography videos.
More photography resources.
More photography articles.
Start learning photography today!