Photography Classes Online – Icon Photography School › Forums › Photography Lessons › Lesson 3 › Lesson 3
- This topic has 1 reply, 2 voices, and was last updated 14 years, 8 months ago by
Duncan Rawlinson.
-
AuthorPosts
-
November 30, 2009 at 9:04 pm #18041
Yelena
ParticipantUnfortunately, I don’t have manual control over my camera. That is my result.
December 2, 2009 at 5:06 am #19481Duncan Rawlinson
KeymasterGreat work with this assignment.
You’ve done a great job forcing a shallow depth of field considering your camera lacks manual control over this feature. As you’re aware, changing your focus to “manual” and using a strong foreground object helps you force a shallow depth of field. Your camera will focus on the foreground object and blur the background.
You have a lot of strong design elements in this photograph. For starters, your color palette is spectacular. You’ve used highly saturated complimentary colors which gives the image a dramatic and lively look. The color palette is also simplified down to 2 main colors; red and green. This helps you further isolate your area of interest without having to worry about a cluttered color palette distracting your audience from the essential parts of your image.
The vibrant red flower in the foreground not only acts as a ‘stopper”, which helps hold your audience’s attention when they are not looking at the rest of the image, but is also abides by the rule of thirds. This helps give your photograph an informal balance, which is generally more interesting and dramatic than an image that uses formal balance.
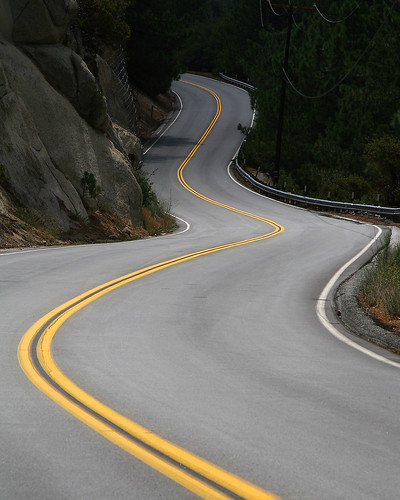
Next, your use of the road as a leading line is spectacular. This line helps draw your audience’s attention into the composition. It’s a very easy photograph to navigate. You haven’t made it to the lesson on lines yet, so I’m not sure if you know what a leading line is, but essentially it’s the use of a line to draw the viewer’s eye into the frame. Roads, fences, rails or any other object with a strong sense of line can be used as a leading line. For example, look at the following images:
http://farm1.static.flickr.com/198/457222437_5333a0f9de.jpg
http://www.blorge.com/images/KnowYourLines_CF84/ChineseWall214.jpg
http://www.jbgphotography.co.uk/images/landscape_photography/landscape_photographer_chester.jpg
As you can see, the object can be anything but it generally helps if it originates in the bottom right or left of the frame. This helps gives the viewer the impression of “being there”.
Great work on your first assignment! I look forward to seeing your next photograph.
-
AuthorPosts
- You must be logged in to reply to this topic.