Photography Classes Online – Icon Photography School › Forums › Photography Lessons › Lesson 4 › Lesson 4
- This topic has 3 replies, 2 voices, and was last updated 13 years, 4 months ago by
Duncan Rawlinson.
-
AuthorPosts
-
March 11, 2011 at 2:54 am #18314
Frederick
ParticipantSorry, Here are my re-posts for Lesson 4.
Fred.
March 11, 2011 at 10:51 pm #20115Duncan Rawlinson
KeymasterHey Fred,
Can you tell me what filter(s) you used here so I can critique this properly?
Thanks!
March 12, 2011 at 4:12 am #20114Frederick
ParticipantI used a polarizing filter.
Fred.
March 13, 2011 at 9:49 pm #20116Duncan Rawlinson
KeymasterHey Fred,
Thanks for fixing the posts and letting me know about what filter you used.
I like to keep this forum very well organized. In the future just hit the “new topic” button under each lesson to submit your assignment. (Not very well designed I know, but I have to work with the tools I have!)
So onto the critique:
Using a polarizing filter is great for landscape photos. There is nothing I can fault you with on that front. The add contrast and make your skies look better. Sometimes it’s hard to tell if a filter was even used at all so it’s hard to critique these.
However there are some issues with your photos on a more basic level:
[attachment=1:398z4yml]washington.jpg[/attachment:398z4yml]
1 Horizon Lines
Try to make sure you’re shooting level when you compose photographs like this. Even the slightest bit of a tilt in your horizon will do a few things. For one, it will make people concisouly or subconciously thing there is something wrong with the photo. And two, people will know you’re not serious about your work. Having crooked horizon lines is very common, but you should try to avoid it. Get a tripod with a level or at the very least fix it in post.2 Distracting Elements
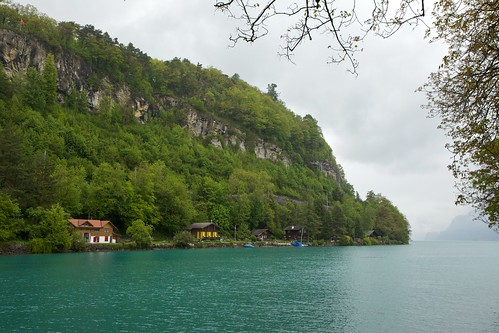
This is another very comon problem. Sometimes these little tree branches are a bonus and they can help fill the frame a little.I did this recently in a somewhat mediocre photograph of a lake in switzerland:

Interlaken by thelastminute, on FlickrJust be careful to ensure they add value by either filling out the frame or adding an element of interest. Don’t use them if you can avoid it.
3 Noise
If you look at this photography closely you’ll notice there is lots of noise in the image. This is a result of using a high ISO because it’s quite dark. If you have a tripod and a shutter release (or you camera’s built in timer) you should be able to shoot at lower ISOs and get less noise.4 Sensor Dust
Looks your your sensor is dirty. You might want to get that checked out be a professional. (Or if you know how you can clean it yourself, just be careful here. one scratch and your CCD is toast!)[attachment=0:398z4yml]buildings.jpg[/attachment:398z4yml]
1 Exposure
The sky in this image is overexposed. It’s probably because your camera was metering off the buildings themselves. Next time you may have to set the exposure to be somewhat in between the two.2 Distracting Elements
See what I mentioned above3 Crooked
This is the same as horizon lines I mentioned above. Buildings should stand up straight where possible.4 Dead Guy
Is this guy dead?! 😮No seriously, this is something you can work with next time. Get right up close to the guy and use him as a foreground element for your cityscape shot.
Above all else this assignment was about getting you to get out there with a filter or two. You’ve done that, so you’ve completed the assignment.
The main point I want to stress here is that I want you to work hard on your images.
Don’t just submit them for the sake of completing the assignment, make each photograph stand on it’s own. Make each photo a strong piece on it’s own.
I’m glad to see you progressing through the course.
Are you enjoying it?
Having any issues?
Lemme know.
Thanks.
-
AuthorPosts
- You must be logged in to reply to this topic.