Photography Classes Online – Icon Photography School › Forums › Photography Lessons › Lesson 4 › Lesson 4 – Manipulate Reality: Film, Lenses, Filters & More
- This topic has 1 reply, 2 voices, and was last updated 14 years, 1 month ago by
Duncan Rawlinson.
-
AuthorPosts
-
June 17, 2010 at 8:31 pm #18152
Steven
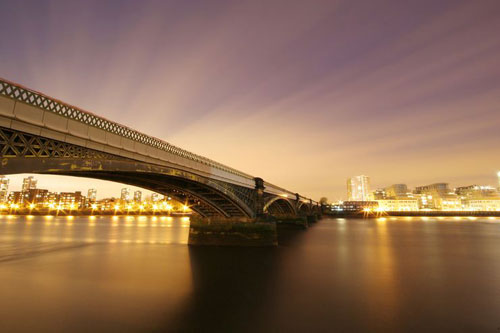
ParticipantInteresting assignment. I used a polarizing filter that really made the clouds pop out. A few items where I need some help:
Does keeping the rock in the bottom left corner help or hurt? I think it adds depth. What do you think?
How do I get better definition under the arches of the bridge? I used Photoshop to some extent. But using the Highlights/Shadows function seemed to make the whole picture wash out.
June 25, 2010 at 7:43 pm #19608Duncan Rawlinson
KeymasterWonderful assignment!
I think this is your strongest assignment yet. You’ve been quite brave with the amount of space you’ve decided to use for this assignment, but it’s paid off in the end.
I also like to hear that you’re asking the right questions (i.e. bridge shapes, foreground object etc).
For starters, I think the small rock in the foreground helps your composition because it adds depth. In fact, I think you could have gone even further with your foreground object by using more rock or even placing something small (i.e. a handful of colorful weeds) in the foreground. Remember, that sometimes you may be able to “enhance an environment” by slightly changing it, or by changing the positioning of the objects in the environment. So let’s say you’ve found a great background, you might be able to find little things laying around that would help you design your foreground. For instance, using the “weeds” idea above, you could prop up a handful of weeds in a little jar or using rocks and as long as you don’t frame in the jar or rocks, the weeds will look like they are part of the environment.
Or reposition things in the environment around. For example, look at the photographs I’ve provided links to below. Maybe these foreground objects were not in their current position when the photograph was taken. Maybe, instead the photographer found the object and then moved them to build a strong foreground object for a background they liked. Then again, maybe not, but even still, the idea is relevant nevertheless.
http://www.photoanswers.co.uk/upload/5663/images/foreground%20interest.jpg
or
http://digital-photography-school.com/wp-content/foreground-3.jpg
As far as bringing out the arcs in the bridge, you simply need to get closer the bridge’s base so you’re not taking a “profile” of the bridge (i.e. 180 degrees). The closer you get to pointing in the same degree of the bridge, the stronger the architectural features of the bridge will pop out.
Try to position yourself somewhere around 30 degrees away from under the bridge. This will give you a result which shows both under the bridge as well as a slight profile of the arcs. For example:
http://www.vagabondish.com/wp-content/uploads/bridge.jpg
If you move further away, say 60 degrees, you’ll get more of the arcs but you’ll start to loose the details under the bridge. Since there are usually interesting lines under a bridge I would generally opt for a 30 degree point of view to ensure I include a little bit of that feature as well.
Overall, great work on this assignment. I look forward to seeing your next assignment.
-
AuthorPosts
- You must be logged in to reply to this topic.