Photography Classes Online – Icon Photography School › Forums › Photography Lessons › Lesson 7 › Lighting
- This topic has 5 replies, 2 voices, and was last updated 13 years, 5 months ago by
Duncan Rawlinson.
-
AuthorPosts
-
February 5, 2011 at 7:02 am #18288
100219
ParticipantEnjoy
February 7, 2011 at 5:06 am #20055Duncan Rawlinson
KeymasterYou’re skipping ahead!! 😉
Can you please wait until we’ve been through each assignment and discussed your work before moving onto the next assignment.
Check back on the critique of your last assignment and let me know.
Thanks!
February 12, 2011 at 5:10 am #20056ParticipantSorry, I did get ahead of myself however when I out taking photos, I am usually taking a few and found some that suited this topic. I will wait from now on until i have received your feedback before moving onto the next topic.
Cheers Paul
February 13, 2011 at 8:22 pm #20057KeymasterHey Paul!
Would you like me to critique these two photographs or another set?
Lemme know.
Thanks!
February 14, 2011 at 4:28 am #20058ParticipantPlease critique these ones.
Cheers
February 14, 2011 at 9:38 pm #20059KeymasterHey Paul,
Thanks for updating your signature and avatar!
Now onto your photos.
As I mentioned in the previous lesson I want you to try to shoot photos that stand up on their own, and not just meet the criteria of the assignment.
Your first image is very hard light!
In the future if you want more control in these situations you may want to invest in a neutral density filter:
http://en.wikipedia.org/wiki/Neutral_density_filterThe photo itself is not that great on it’s own but I think I know what you we’re trying to do. You we’re trying to shoot an s curve.
S-cuves in photography are great.
Look at these examples:
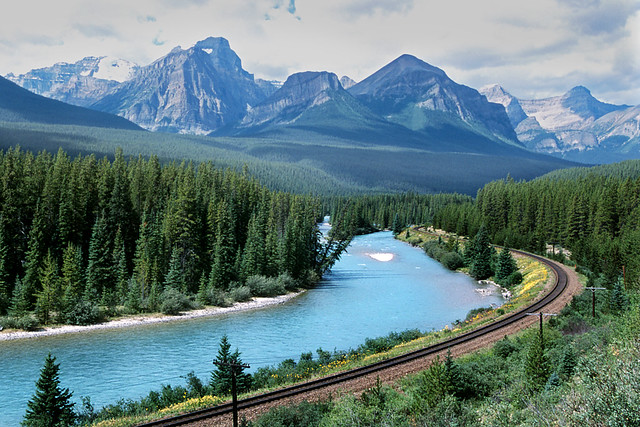
Morant’s Curve – Digitized Velvia Slide film by Alan Vernon., on Flickr
#435 S-curve by Mikael Miettinen, on Flickr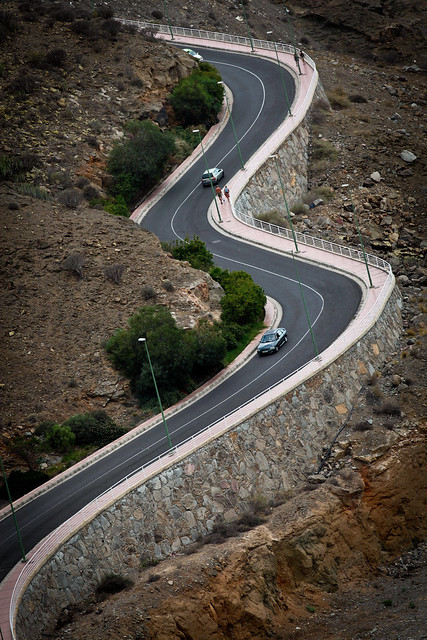
Winding road by Håkan Dahlström, on FlickrThere is something inherently dynamic about them that draws you in with an S curve…
I think that might be what you wanted to achieve here. Sometimes you have to be above your subject to get the real S effect…
Your soft light image:
Your usage of “frame within a frame” technique is nice and this is very nice soft light. So you’ve completed the assignment!
Here are a couple more examples of a the frame within a frame technique. Sometimes it really works.
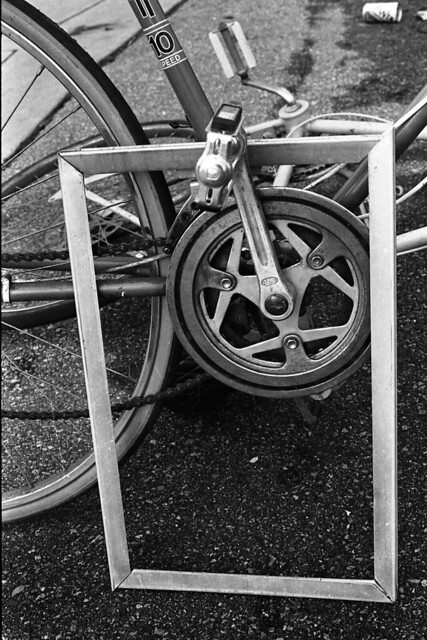
A Frame within a frame–get it? by Elessar, on Flickr
Car frame by The U.S. Army, on FlickrIn your case to improve the image i would have just included the door and not that extra sliver of light.
Overall you’ve done well here to understand the lighting aspect of this assignment even though these will certainly not be your strongest images. But I think you already know that.
-
AuthorPosts
- You must be logged in to reply to this topic.