Tag: photoshop

Adobe Lightroom Classic 12.3 Update: Enhance Your Images with AI-Powered Denoise, New Masking Features, and More

Adobe has released a major update to Lightroom Classic in April 2023, version 12.3. This update introduces several new features and enhancements that make editing and managing your photos more efficient and powerful.

AI-Powered Denoise

One of the standout features in this release is the AI-powered Denoise tool, which efficiently removes noise from Bayer or X-Trans RAW images while preserving finer details. Users can access the Denoise tool from the Detail panel or the Enhance menu. The Denoise tool features an intensity slider to control the amount of noise reduction, and users can preview changes before processing the image. The enhanced image is saved as a new DNG file with an "Enhance-NR" badge for easy identification.

New Masking Features

The update also brings new masking features that allow users to automatically select facial hair, clothes, and more with the People mask. Additionally, Lightroom Classic now supports Curve in masking, allowing users to make precise local adjustments without affecting the rest of the image. Users can create and edit masks in the Develop module, making local adjustments with the Curve tool and local Histogram.

Quickly Identify Tools Used in Editing

In the Develop module, eye indicators have been added to all Edit panels, Healing, Redeye, and Masking tools. This makes it easy to track edits and tools used to quickly edit an image. Users can press and hold the eye indicator to temporarily hide the settings of a particular panel, instantly viewing changes made to an image. Holding the Alt or Option key reveals panel switches, allowing users to turn off or reset edits within panels.

Edit in Photoshop

The update also makes it easier to edit Lightroom Classic photos in Adobe Photoshop. Users can choose the version of Photoshop they want to use and open photos as Smart Objects or Smart Object Layers. Lightroom Classic automatically imports new photos saved in Photoshop into its catalog.

Support for New Cameras and Lenses

Lightroom Classic 12.3 adds support for new cameras and lenses, with full lists of supported profiles available in the Supported Camera Models and Supported Lens Profiles articles.

Other Enhancements

Additional improvements include enhanced scrolling performance in the Library module, mask names added to History steps when mask settings are changed, new Adaptive Presets for the Adaptive: Portrait group, and an updated embedded browser framework for Map and Web modules.

The April 2023 release of Lightroom Classic (version 12.3) brings powerful new features and enhancements, allowing users to make more precise edits, manage their images more efficiently, and seamlessly integrate with Adobe Photoshop.
How To Automatically Remove Objects from Photos in Photoshop

Removing unwanted items from photos can be a tedious and time-consuming task. However, Adobe Photoshop makes it easy to automatically remove objects from photos. In this tutorial, we'll discuss the steps you need to take to automatically remove objects from photos in Adobe Photoshop. Let's get started!

Step 1: Open the Photo in Photoshop

The first step is to open the photo in Photoshop. To do this, simply open the Adobe Photoshop program and click on the "File" menu. Then, click "Open" and select the photo you want to work with. Once you have opened the photo, you should see it displayed in the main Photoshop window.

Step 2: Select the Object You Want to Remove

Now that the photo is open in Photoshop, you need to select the object you want to remove. To do this, use the selection tools in Photoshop. You can use the lasso, magic wand, or any other selection tool to select the object. Once you have selected the object, it should be highlighted in the photo.

Step 3: Use the Content-Aware Fill Tool

Now that you have selected the object you want to remove, it's time to use the Content-Aware Fill tool. To use the tool, simply select it from the toolbar, then click and drag the mouse over the area where the object was. The Content-Aware Fill tool will automatically remove the object and fill in the area with the surrounding pixels.

Step 4: Adjust the Results

Once the object has been removed, you may need to make some adjustments to the results. To do this, use the "Edit" menu in Photoshop and select "Adjustments". This will bring up a panel of adjustment tools that you can use to tweak the results. You can adjust the color, contrast, brightness, and more to get the perfect result.

Step 5: Save the Photo

Once you are happy with the results, it's time to save the photo. To do this, simply click on the "File" menu and select "Save". Enter a name for the file, select a location to save it, and click "Save". Your photo should now be saved with the object removed.

Congratulations! You have now completed the steps to automatically remove objects from photos in Photoshop. By following the steps outlined in this tutorial, you should be able to quickly and easily remove unwanted objects from your photos.

Happy Editing!!!

How To Get Rid of Gray Hair in Photoshop

Removing gray hair using Photoshop is a great way to give yourself a digital hair dye. As with most Photoshop techniques, the trick is to make your changes without making the photograph appear unnatural. In the above photograph notice how I removed most of the gray hair from the man’s head but there are still small highlights of grey hair. This ensures that the photograph remains realistic looking.

1. To do this yourself you simply need to click on the "burn" tool

Photoshop burn tool

2. Now ensure your "range" is set to "midtones" (since gray hair is a midtone) and set your exposure to about "20%". This ensures your changes to the hair color look natural. If you set your exposure higher the changes will be much more dramatic. In the end it’s up to your artistic preference. If you set it to 20% you can do multiple brush overs to get the desired color.

range

That’s how you get rid of gray hair in Photoshop.

Here is another method:

Step 1: Prepare the Image

Before you begin using Photoshop to eliminate gray hair, you need to prepare the image. To do this, open the image you want to edit in Photoshop. Once the image is open, make sure to zoom in to the area that contains the gray hair. This will make the editing process easier.

Step 2: Create a New Layer

Creating a new layer will help you keep the original image intact. To create a new layer, go to the Layers panel and click the “Create a new layer” icon. Name the layer “Gray Hair” and click “Ok”.

Step 3: Select the Gray Hair

Once you have created a new layer, it’s time to select the gray hair. To select the gray hair, use the Quick Selection Tool. Simply click and drag over the gray hair to select it. When you are finished, the gray hair should be completely surrounded by the selection.

Step 4: Change the Color of the Gray Hair

Now that you have selected the gray hair, it’s time to change its color. To do this, go to the Image menu and select “Adjustments”. From the Adjustments menu, select “Hue/Saturation”. This will open the Hue/Saturation window. In the Hue/Saturation window, adjust the hue and saturation of the gray hair until it is the desired color. When you are finished, click “Ok”.

Step 5: Blur the Edges of the Gray Hair

Now that you have changed the color of the gray hair, you need to blur the edges of it. To do this, select the Blur Tool from the Tools panel. Then, simply brush over the edges of the gray hair to blur them. Make sure to not go too far or the gray hair will become blurry.

Step 6: Create a Mask

The next step is to create a mask for the gray hair. To do this, go to the Layer menu and select “Add Layer Mask”. This will add a mask to the layer that contains the gray hair. Now, using the Brush Tool, brush over the areas of the image that you want to remain unchanged. This will help you blend the gray hair into the rest of the image.

Step 7: Sharpen the Gray Hair

Once you have created the mask, you need to sharpen the gray hair. To do this, select the Unsharp Mask filter from the Filter menu. This will open the Unsharp Mask window. In the Unsharp Mask window, adjust the Amount, Radius, and Threshold until the gray hair looks sharp. When you are finished, click “Ok”.

Step 8: Save the Image

Once you have edited the gray hair, it’s time to save the image. To save the image, go to the File menu and select “Save As”. In the Save As window, choose a name for the image and make sure to select the correct file format. When you are finished, click “Save”.

Conclusion

By following these steps, you have successfully used Adobe Photoshop to eliminate gray hair from an image. It’s important to remember that the process may take some time and patience, but the results will be worth it. With a few simple steps, you can easily get rid of gray hair in Photoshop.

See also:
Retouching Skin In Photoshop.
How To Retouch Portraits In Photoshop.
Learn more about Photoshop

How To Remove Wrinkles in Photoshop

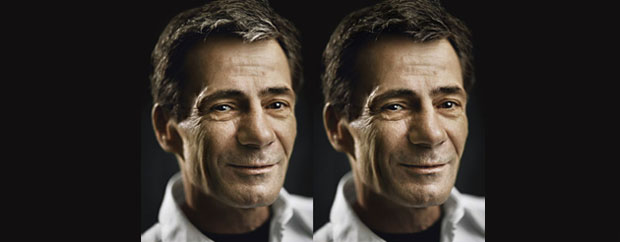
Removing wrinkles from a person in a photograph is a fairly easy process. There are different ways of getting rid of wrinkles in a photograph but the best way (and the easiest way) I’ve found is to use the “spot healing brush tool” (see below). Other ways leave noticeable blur marks and are more time consuming and less accurate.

Follow these steps to get started with removing wrinkles from your subjects face or body in your photographs.

1. Open Photoshop and open the image you want to edit

2. Right click on the background under the layers window and click “duplicate layer”. You now have two layers.

3. Ensure your second layer is the active layer and click on “spot healing brush tool” in the sidebar.

spot brush tool

4. Find an area of skin close the wrinkles that shares the same color and light attributes. Click “alt + left click” now move the spot healing brush tool over the wrinkles and either drag it along in the direction of the wrinkles or just “dab” it on the wrinkles one click at a time. If you make a mistake simply just click the “undo” button under “edit – undo”.

During this stage it’s important to ensure you’ve selected the right brush size. If the brush is too large, it may create noticeable marks on your photograph. For the image above I used a brush size of 7 (you can change this in the upper left hand corner of Photoshop).

It’s important to enlarge the photograph so you can see the small details of the wrinkles. It’s easy work, but to get it done perfectly you must spend some time trying different approaches and brush strokes to removing the wrinkles.

In the image above (top of blog post) I removed the majority of the wrinkles in the man’s face, especially around his eyes. Notice the changes are subtle as to make the photograph still appear natural. You can’t remove all of the wrinkles from the body or face of a 40 or 50 year old without the image looking unnatural.

Good luck with you photo re-touching!

Removing Skin Blemishes With Photoshop

Cleaning up small and large skin blemishes in Photoshop is an incredibly easy process. It’s actually quite fun to do as well because you have complete control over how much you clean up the skin in the photograph. Unlike retouching the entire area of skin, cleaning up blemishes requires no Photoshop filters or layer masks. There is a great tool in Photoshop called the “spot healing brush” and it looks like this.

photoshop shop healing brush

All you need to do is select this tool and use the “alt” key to select a sample of good skin. Ensure your brush size is set to just larger than the size of the blemishes. You can change your brush size by clicking on the drop down button in the upper left side of the screen.

Once you are ready to get rid of the small and large blemishes in the skin, simply start clicking away. The spot healing brush is great because unlike the stamp tool is blends in both the texture and color in a seamless fashion leaving virtually no sign of the blemishes in the first place.

Look at the image at the top of this blog post to see both the before and after pictures of the skin with blemishes and then without blemishes.

Retouching Skin in Photoshop. Making Bad Skin Look Good

Retouching Skin in Photoshop. Making Bad Skin Look Good

Here is a quick Photoshop tutorial on how to make bad skin look great. Retouching skin is not a simple task. You can easily overdo it and make the skin look unnaturally airbrushed and almost cartoonish. That being said, with some care and a few practice runs you'll be touching up skin in your photographs with Photoshop in no time.

Step 1:
Open your photograph in Photoshop

Step 2:
Right click on your background image in you layers window and click "duplicate layer". You'll now have a clone of your background. This is important for both masking your image and adding the right skin texture later on.

Step 3:
This is where you make most of the changes to your subjects skin. Make sure your second layer is active and go to your "filters' button at the top of the Photoshop window. Click "filters -- Blur -- Surface Blur". Ensure that "preview" function is activated so you can see the changes that you're making to the skin tone immediately. There are no ideal settings for this filter. simply play around until you feel comfortable with having cleaned up any sking blemishes in your subjects face or body.

Step 4:
You will have lost some detail in important areas such as the eyes of your subject as well as any areas with hair. This is easily fixable by ensuring your second layer is active and clicking on "layer -- layer mask -- reveal all" (found at the top of the Photoshop window). You need to use this mask to expose the textures in the eyes and the hair. To do this simply choose black as your foreground color and paint with the "brush tool" over the objects eyes and hair. The original texture of the image will become visible.

Step 5:
However, you'll probably notice that your image has a slightly plasticized look to the skin. Although the skin blemishes are fixed, the image now looks unnatural. In order to fix this you need to expose some of the background skin texture. To do this simply ensure your second layer is active and then use the "opacity" level in the layers window to expose some of the original skin texture. Usually a setting above 50% is desirable because it allows you to maintain the effects of the cleaned up skin while at the same time making the photograph look natural.

More Photoshop Tips
More photography videos.
More photography resources.
More photography articles.
Start learning photography today!