Forum Replies Created
-
AuthorPosts
-
Duncan Rawlinson
KeymasterThanks for submitting your assignment. I’m glad you took the time to think about this.
It’s sort of unusual to have to write a little thing like this before your move on. It may be obvious but you’re fully appreciate this later on.
There are a few key takeaways here.
One thing is that you have immediately stumbled on one of the great lessons that can be learned in photography and that is, learn from painters. Painters have been working on composition and color for thousands of years so your instincts here are amazing! There is a great deal to be gained from just looking at what the masters of painting do and don’t do with color and composition and gesture.
I’m fact here is an entire lecture on this very subject:
Now beyond this I think you’ve already established that you like portraits and landscapes which is great because these the most common types of photos.
I also notice another key insight you made. That your aunt worked hard on her art. You used the words love, patience, care, and detail. All of those make for a good photographer.
Your instincts are great and I’m glad you’re on your way. Keep it up!
Thanks for submitting your assignment.
KeymasterHi Jessica,
I’m having trouble locating your second assignment.
Can you let me know where it is?
Thanks.
KeymasterHi Jessica,
First things first. Thank you for enrolling in the course and thanks for submitting your first assignment. I am happy that you’re embarking on your journey of learning in photography.
Let’s briefly take a look at the EXIF data of your images so we can see what settings you and your camera used to make these photos.
If you’re not familiar with EXIF data take a look at this page. In simple terms it’s just all the settings that we’re used to make a photo.
http://photographyicon.com/wp-content/uploads/2015/02/100_0576.jpg
Date Time Original: 2015:02:23 17:29:12
Exposure Time: 1/50
F Number: f / 9.80
Exposure Program: Manual
ISO Speed Ratings: 100
Metering Mode: Pattern
Flash: Flash fired, compulsory flash mode
Focal Length: 7.30mm
White Balance: Auto white balance
Make: EASTMAN KODAK COMPANY
Model: KODAK EasyShare Z5010 Digital Camera
Exif Version:
Flashpix Version:
Color Space: 1
Pixel X Dimension: 3216
Pixel Y Dimension: 4288
Maker Note: 5060
Date Time Digitized: 2015:02:23 17:29:12
Subsec Time Original: 000
Subsec Time Digitized: 000
Shutter Speed Value: 5.60
Aperture Value: 6.50
Brightness Value: 4
Max Aperture Value: 3.60
Light Source: Unknown
Exposure Index: 100
Sensing Method: One-chip color area sensor
File Source: DSC
Scene Type: Directly photographed
Custom Rendered: Normal process
Focal Length In 35mm Film: 41mm
Scene Capture Type: Standard
Gain Control: Low gain up
Contrast: Normal
Saturation: Normal
Sharpness: Normal
Subject Distance Range: Unknown
InteroperabilityIFDPointer: 8872
ExifIFDPointer: 2362
Orientation: 1
YCbCr Positioning: 2
X Resolution: 480
Y Resolution: 480
Resolution Unit: 2
Date Time: 2015:02:23 17:35:11
Software: Microsoft Windows Photo Viewer 6.1.7600.16385http://photographyicon.com/wp-content/uploads/2015/02/100_0574.jpg
Date Time Original: 2015:02:23 17:27:37
Exposure Time: 1/50
F Number: f / 8.70
Exposure Program: Manual
ISO Speed Ratings: 100
Metering Mode: Pattern
Flash: Flash fired, compulsory flash mode
Focal Length: 4.50mm
White Balance: Auto white balance
Make: EASTMAN KODAK COMPANY
Model: KODAK EasyShare Z5010 Digital Camera
Exif Version:
Flashpix Version:
Color Space: 1
Pixel X Dimension: 4288
Pixel Y Dimension: 3216
Maker Note: 14916
Date Time Digitized: 2015:02:23 17:27:37
Subsec Time Original: 000
Subsec Time Digitized: 000
Shutter Speed Value: 5.60
Aperture Value: 6
Brightness Value: 4
Max Aperture Value: 3.20
Light Source: Unknown
Exposure Index: 100
Sensing Method: One-chip color area sensor
File Source: DSC
Scene Type: Directly photographed
Custom Rendered: Normal process
Focal Length In 35mm Film: 25mm
Scene Capture Type: Standard
Gain Control: Low gain up
Contrast: Normal
Saturation: Normal
Sharpness: Normal
Subject Distance Range: Unknown
InteroperabilityIFDPointer: 18728
ExifIFDPointer: 14246
Orientation: 1
YCbCr Positioning: 2
X Resolution: 480
Y Resolution: 480
Resolution Unit: 2
Date Time: 2015:02:23 17:27:37I like that you’re using manual exposure program mode here and I like that you chose to use a flash because that environment looks very dark. I also like that you’ve done a couple of simple things here.
For one thing you moved the object and brought it much closer. This is great. Take a look at this example.
Getting close is simply the best and easiest thing you can do to improve your photographs. When I say get close I don’t mean zoom in either, I mean getting physically closer. If you take anything away from this first lesson it should be to be close to your subject and to fill your frame with it.
As you progress through the course you will also become more familiar with light and the quality of light. In this case it’s a very dark environment. This is particularly interesting because it may not have felt too dark to you. The human eye is absolutely amazing because it’s attached to a your brain. The combination is extremely powerful. So powerful that we often don’t even notice the light in our environment as your brain just handles everything automatically.
As a photographer you will have to learn that your camera is nowhere near as good as a human eye and you’ll have to use settings accordingly when shooting or change the light or environment. In this case what you could have done is use a tripod and a longer exposure and no flash. This is because your object was not moving. In this way you could have a different, less harsh look to the image.
There is nothing wrong with using a flash to get a nice image in low light but for something like this that isn’t moving you could use the aforementioned technique.
One thing you can do as an experiment is set your camera on a tripod or just on a flat surface and shoot the exact same thing but change just one variable at a time to learn what happens. For example, see what happens when you set everything to manual and expose correctly but just change ISO, or just change, shutter. If this sounds too complicated don’t worry you’ll get the hang of it as you go.
As easier way to do this is to play with the simulators in the student workspace. So go check that out as well.
Whatever you do just have fun and play. There is no need to get bogged down with your learning just experiment and play around. This is the beauty of digital, you can shoot and shoot and shoot to your heart’s content.
One thing I will tell you is one of my favorite quotes about photography:
“Your first 10,000 photographs are your worst.” –Henri Cartier-Bresson
So don’t be discouraged, just keep going! Some people often get discouraged in their early photography learning because they’re photos don’t look as good as the professionals. I tell them, would you expect to be as good as professional basketball player without practice and experience?!
So good job here and keep working.
Remember you can email office@photographyicon.com any time with questions. Whether it’s something you don’t understand or if you need a recommendation for camera gear.
See you on the next assignment!
KeymasterHi Charles,
I see what you’ve done here and the colors are nice but can you re-shoot this assignment with something a little bit less abstract? I’d like to ensure you understand the assignment.
Thanks!
KeymasterHi Jess,
If you really want to take your photography seriously start using Adobe Lightroom. It might be confusing at first but it’s in your best interest to learn a program like that. If you look at this page there is a series of free video tutorials on how to use adobe lightroom: http://tv.adobe.com/product/lightroom/
With lightroom you can manage, edit, print, and share your photos all in one application. It really is the best photography software.
Picmonkey probably does it for SEO reasons. I don’t think there is a way to disable it but honestly I really don’t know.
If you have any questions just write back here or email office@photographyicon.com
Thanks!
KeymasterHi Jess,
Thanks for submitting your assignment. It’s nice to have you back!
First thing first here is the EXIF data on your image:
http://photographyicon.com/wp-content/uploads/2015/01/DSC_06391.jpg
DSC_06391.jpg
Date Time Original: 2014:12:27 11:37:33
Exposure Time: 1/125
F Number: f / 13
Exposure Program: Manual
ISO Speed Ratings: 100
Metering Mode: Pattern
Flash: Flash did not fire
Focal Length: 34mm
White Balance: Auto white balance
Make: NIKON CORPORATION
Model: NIKON D5100
Exif Version:
Flashpix Version:
Color Space: 1
Pixel X Dimension: 4928
Pixel Y Dimension: 3264
CompressedBitsPerPixel: 2
Maker Note: 876
User Comment: Jess Betzel Photography
Date Time Digitized: 2014:12:27 11:37:33
Subsec Time: 10
Subsec Time Original: 10
Subsec Time Digitized: 10
Exposure Bias: 1.33
Max Aperture Value: 4.60
Light Source: Unknown
Sensing Method: One-chip color area sensor
File Source: DSC
Scene Type: Directly photographed
CFA Pattern: 860
Custom Rendered: Normal process
Exposure Mode: 1
Digital Zoom Ration: 1
Focal Length In 35mm Film: 51mm
Scene Capture Type: Standard
Gain Control: None
Contrast: Normal
Saturation: Normal
Sharpness: Normal
Subject Distance Range: Unknown
InteroperabilityIFDPointer: 37214
ExifIFDPointer: 228
GPSInfoIFDPointer: 37244
Orientation: 1
YCbCr Positioning: 2
X Resolution: 300
Y Resolution: 300
Resolution Unit: 2
Date Time: 2014:12:27 11:37:33
Software: Embettered by PicMonkey. http://www.picmonkey.coOne thing to note is that did you see how that company you used added their website to your image’s exif data?! That’s quite spammy of them isn’t it?! I suspect you used that picmonkey thing to add the purple border or your watermark?
I would highly recommend buying adobe lightroom and adobe photoshop. With those two applications a photographer can do literally anything you would ever need!
In terms of the assignment I like what you’ve done here and the colors work. Adding the purple border is not necessary here because the image is already chalk full of purple. That is unless of course your client requests that.
If anything a quick retouching of the spots on your subjects’ hands here would be a good idea.
Also for something like this your background is key. In this case it makes the entire image feel slanted down and to the right. In other words even if you can’t see the horizon in your images you’ll want to ensure it doesn’t detract from the image.
I’m personally not a fan of watermarks at all but here is an interesting way to add them to your images:
Overall you’ve done well here but remember that simplicity really works. In this case your colors are good but the forest in the background detracts from the image.
Keep it up and see you on the next assignment.
KeymasterHi Darcee,
Thanks for submitting your first assignment here at the Icon Photography School.
I generally tell most students that if they want they can do the course over email if you don’t feel like using the student forum to upload assignments so just keep that in mind. All you’d have to do is email your assignments to office@photographyicon.com
Now onto the assignment.
First here is there EXIF data for your images.
( If you don’t know what EXIF data is just take a quick peek at this: http://photographyicon.com/exif/ )
http://photographyicon.com/wp-content/uploads/2014/12/DSCF2330.jpg
Date Time Original: 2014:12:15 17:04:55
Exposure Time: 1/89
F Number: f / 4.10
Exposure Program: Aperture priority
ISO Speed Ratings: 100
Metering Mode: Pattern
Flash: Flash did not fire, compulsory flash mode
Focal Length: 8.45mm
White Balance: Auto white balance
Make: FUJIFILM
Model: FinePix S4830/Walmart
Exif Version:
Flashpix Version:
Color Space: 1
Pixel X Dimension: 4608
Pixel Y Dimension: 3456
CompressedBitsPerPixel: 4
Maker Note: 876
Date Time Digitized: 2014:12:15 17:04:55
Shutter Speed Value: 6.50
Aperture Value: 4.07
Brightness Value: 5.56
Max Aperture Value: 3.26
Light Source: Unknown
Focal Plane X Resolution: 7463
Focal Plane Y Resolution: 7463
Focal Plane Resolution Unit: 3
Sensing Method: One-chip color area sensor
File Source: DSC
Scene Type: Directly photographed
Custom Rendered: Normal process
Scene Capture Type: Standard
Sharpness: Normal
Subject Distance Range: Unknown
InteroperabilityIFDPointer: 26984
ExifIFDPointer: 314
Orientation: 1
YCbCr Positioning: 2
X Resolution: 72
Y Resolution: 72
Resolution Unit: 2
Date Time: 2014:12:15 17:04:55
Software: Digital Camera FUJIFILM FinePix S4830/Walmart Ver1.00
Copyright:http://photographyicon.com/wp-content/uploads/2014/12/DSCF2331.jpg
Date Time Original: 2014:12:15 17:05:26
Exposure Time: 1/2000
F Number: f / 3.40
Exposure Program: Aperture priority
ISO Speed Ratings: 100
Metering Mode: Pattern
Flash: Flash did not fire, compulsory flash mode
Focal Length: 5mm
White Balance: Auto white balance
Make: FUJIFILM
Model: FinePix S4830/Walmart
Exif Version:
Flashpix Version:
Color Space: 1
Pixel X Dimension: 4608
Pixel Y Dimension: 3456
CompressedBitsPerPixel: 4
Maker Note: 876
Date Time Digitized: 2014:12:15 17:05:26
Shutter Speed Value: 11
Aperture Value: 3.53
Brightness Value: 9.49
Max Aperture Value: 3.26
Light Source: Unknown
Focal Plane X Resolution: 7463
Focal Plane Y Resolution: 7463
Focal Plane Resolution Unit: 3
Sensing Method: One-chip color area sensor
File Source: DSC
Scene Type: Directly photographed
Custom Rendered: Normal process
Scene Capture Type: Standard
Sharpness: Normal
Subject Distance Range: Unknown
InteroperabilityIFDPointer: 26984
ExifIFDPointer: 314
Orientation: 1
YCbCr Positioning: 2
X Resolution: 72
Y Resolution: 72
Resolution Unit: 2
Date Time: 2014:12:15 17:05:26
Software: Digital Camera FUJIFILM FinePix S4830/Walmart Ver1.00
Copyright:Now you’ve done well here to find an unusual perspective and look at the world from a different point of view. That’s the goal, always be looking at things in a different way and capturing that with your images.
Getting close and filling your frame with whatever you are photographing is essential to making nice photographs.
In this case you have done that. You’re close and your frame is quite full.
There are a few things to notice here.
For one you have clipped off one side of the lightbulb. Generally speaking you never want to clip off parts of the most interesting thing in your frame. In other words if you’re taking a picture of a person’s face you wouldn’t cut off half of their face at the edge of the frame. Try to just remember to keep the interesting bits in and the boring stuff out.
Another quick note here is that the image is not balanced well. There is lots of stuff on the left and not so much stuff on the right. This is ok if you’re doing it for a reason or using negative space to accentuate something but in this case the image is just lopsided.
From a technical perspective there are a few things you can learn here.
Notice how everything is yellowish? This is because your camera’s automatic white balance setting can’t figure out what you’re shooting.
In this case you could just set your camera literally to the lightbulb white balance setting (tungsten) and the image wouldn’t be so yellowish.
White balance is important because your camera can’t tell what it’s photographing. Cameras don’t have brains like us humans. Our brains can immediately figure out what colors things should be whereas your camera often has to be told what the color temperature of the light is. This is done by white balance. Try playing around with this setting. The general rule is match your white balance setting to the light source. Cloudy day outside? Use the cloudy white balance setting. Shooting in fluorescent light? Use the fluorescent setting…
Eventually with a little more experience you’ll find ways to use white balance creatively.
For now just experiment with it and play around. You’ll learn what it does quickly.
Just remember, cameras are dumb and you need to help them be less dumb!
That’s probably enough to digest for this one. Job well done here. You’re playing with light, experimenting with composition and you’re on your way.
And remember you can always email office@photographyicon.com with any photography related questions. Whether you need gear recommendations or just have a technical question.
Thanks and see you on the next assignment!
KeymasterHere is a remarkably detailed look at focus stacking (Maybe too detailed)
KeymasterMacro lenses present some serious depth of field challenges. You may have to try and use the Focus Stacking technique (quite advanced).
Does that help?
KeymasterOne final note here, I updated the lesson for this assignment and added a great video on this very topic.
KeymasterActually now that I think about this I suspect you’re using a macro lens and that explains the shallow depth of field. Please disregard what I said about the minimum focus distance!
Onward!
KeymasterHi Maxine,
Thanks for submitting another assignment.
Here is the EXIF data:
http://photographyicon.com/wp-content/uploads/2014/12/MG_6452.jpgDate Time Original: 2014:12:05 00:52:11
Exposure Time: 1.6
F Number: f / 18
Exposure Program: Manual
ISO Speed Ratings: 800
Metering Mode: Pattern
Flash: Flash did not fire, compulsory flash mode
Focal Length: 100mm
White Balance: Auto white balance
Make: Canon
Model: Canon EOS 6D
LensInfo: 100/1 100/1 0/0 0/0
LensModel: EF100mm f/2.8L Macro IS USM
LensSerialNumber: 000004dbe4
Lens: EF100mm f/2.8L Macro IS USM
Exif Version:
Date Time Digitized: 2014:12:05 00:52:11
Subsec Time Original: 00
Subsec Time Digitized: 00
Shutter Speed Value: -0.68
Aperture Value: 8.34
Max Aperture Value: 3
Focal Plane X Resolution: 1520
Focal Plane Y Resolution: 1520
Focal Plane Resolution Unit: 3
Custom Rendered: Normal process
Exposure Mode: 1
Scene Capture Type: Standard
Saturation: Normal
ExifIFDPointer: 208
X Resolution: 240
Y Resolution: 240
Resolution Unit: 2
Date Time: 2014:12:04 23:54:29
Software: Adobe Photoshop Lightroom 5.7 (Macintosh)
DateCreated: 2014-12-05T00:52:11.00http://photographyicon.com/wp-content/uploads/2014/12/MG_6454.jpg
Date Time Original: 2014:12:05 00:52:11
Exposure Time: 1.6
F Number: f / 18
Exposure Program: Manual
ISO Speed Ratings: 800
Metering Mode: Pattern
Flash: Flash did not fire, compulsory flash mode
Focal Length: 100mm
White Balance: Auto white balance
Make: Canon
Model: Canon EOS 6D
LensInfo: 100/1 100/1 0/0 0/0
LensModel: EF100mm f/2.8L Macro IS USM
LensSerialNumber: 000004dbe4
Lens: EF100mm f/2.8L Macro IS USM
Exif Version:
Date Time Digitized: 2014:12:05 00:52:11
Subsec Time Original: 00
Subsec Time Digitized: 00
Shutter Speed Value: -0.68
Aperture Value: 8.34
Max Aperture Value: 3
Focal Plane X Resolution: 1520
Focal Plane Y Resolution: 1520
Focal Plane Resolution Unit: 3
Custom Rendered: Normal process
Exposure Mode: 1
Scene Capture Type: Standard
Saturation: Normal
ExifIFDPointer: 208
X Resolution: 240
Y Resolution: 240
Resolution Unit: 2
Date Time: 2014:12:04 23:54:29
Software: Adobe Photoshop Lightroom 5.7 (Macintosh)
DateCreated: 2014-12-05T00:52:11.00This is a much better example of what the assignment is asking for. So job well done here! Way to go!
There are a few things to note here.
Take a look at the details in the darks vs the highlights in these images.
Your sensor can only capture some much whereas your brain and your eyes work together to see all of it. It’s interesting to compare the histograms as well from this perspective.
Also take note of which image is more pleasing to the eye. Clearly in this instance the softer light image is more pleasing. So always think about what you’re trying to achieve. Do you want the image to be pleasing or harsh? Soft or hard?
Sometimes you have no choice so you have to work with what you get. Other times you can control for everything. When you know what you’re dealing with you can shoot accordingly.
Another thing here is that you should have wide depth of field than what I’m seeing with such a slow shutter and high fstop. I may be wrong but I feel like everything here should be in focus given the settings you used in both images. I suspect you’re bumping up against your lens’ minimum focus distance here.
Take a look at the barrel of your lens. If there are distance markers on it take note of the shortest distance. If anything is closer to your lens than this distance if will be blurry. So maybe that happened here?
Overall you’ve done a much better job here.
One thing to remember though is to manually set your white balance. I suspect the color for these would be dramatically different and possibly more appealing if the white balance was controlled.
KeymasterHi Maxine,
Thanks for submitting another lesson.
Here is the EXIF data for these images.
http://photographyicon.com/wp-content/uploads/2014/11/IMG_6252.jpg
Date Time Original: 2014:11:22 04:35:18
Exposure Time: 1.6
F Number: f / 9
Exposure Program: Aperture priority
ISO Speed Ratings: 400
Metering Mode: Pattern
Flash: Flash did not fire, compulsory flash mode
Focal Length: 100mm
White Balance: Auto white balance
Make: Canon
Model: Canon EOS 6D
LensInfo: 100/1 100/1 0/0 0/0
LensModel: EF100mm f/2.8L Macro IS USM
LensSerialNumber: 000004dbe4
Lens: EF100mm f/2.8L Macro IS USM
Exif Version:
Color Space: 1
Date Time Digitized: 2014:11:22 04:35:18
Subsec Time Original: 00
Subsec Time Digitized: 00
Shutter Speed Value: -0.68
Aperture Value: 6.34
Max Aperture Value: 3
Focal Plane X Resolution: 1520
Focal Plane Y Resolution: 1520
Focal Plane Resolution Unit: 3
Custom Rendered: Normal process
Scene Capture Type: Standard
Saturation: Normal
ExifIFDPointer: 208
X Resolution: 240
Y Resolution: 240
Resolution Unit: 2
Date Time: 2014:11:22 03:44:21
Software: Adobe Photoshop Lightroom 5.7 (Macintosh)
DateCreated: 2014-11-22T04:35:18.00http://photographyicon.com/wp-content/uploads/2014/11/IMG_6253.jpg
Date Time Original: 2014:11:22 04:35:40
Exposure Time: 1/179
F Number: f / 9
Exposure Program: Aperture priority
ISO Speed Ratings: 400
Metering Mode: Pattern
Flash: Flash fired, compulsory flash mode
Focal Length: 100mm
White Balance: Auto white balance
Make: Canon
Model: Canon EOS 6D
LensInfo: 100/1 100/1 0/0 0/0
LensModel: EF100mm f/2.8L Macro IS USM
LensSerialNumber: 000004dbe4
Lens: EF100mm f/2.8L Macro IS USM
Exif Version:
Color Space: 1
Date Time Digitized: 2014:11:22 04:35:40
Subsec Time Original: 00
Subsec Time Digitized: 00
Shutter Speed Value: 7.49
Aperture Value: 6.34
Max Aperture Value: 3
Focal Plane X Resolution: 1520
Focal Plane Y Resolution: 1520
Focal Plane Resolution Unit: 3
Custom Rendered: Normal process
Scene Capture Type: Standard
Saturation: Normal
ExifIFDPointer: 208
X Resolution: 240
Y Resolution: 240
Resolution Unit: 2
Date Time: 2014:11:22 03:44:25
Software: Adobe Photoshop Lightroom 5.7 (Macintosh)
DateCreated: 2014-11-22T04:35:40.00http://photographyicon.com/wp-content/uploads/2014/11/IMG_6254.jpg
Date Time Original: 2014:11:22 04:36:05
Exposure Time: 1/179
F Number: f / 9
Exposure Program: Aperture priority
ISO Speed Ratings: 400
Metering Mode: Pattern
Flash: Flash fired, compulsory flash mode
Focal Length: 100mm
White Balance: Auto white balance
Make: Canon
Model: Canon EOS 6D
LensInfo: 100/1 100/1 0/0 0/0
LensModel: EF100mm f/2.8L Macro IS USM
LensSerialNumber: 000004dbe4
Lens: EF100mm f/2.8L Macro IS USM
Exif Version:
Color Space: 1
Date Time Digitized: 2014:11:22 04:36:05
Subsec Time Original: 00
Subsec Time Digitized: 00
Shutter Speed Value: 7.49
Aperture Value: 6.34
Max Aperture Value: 3
Focal Plane X Resolution: 1520
Focal Plane Y Resolution: 1520
Focal Plane Resolution Unit: 3
Custom Rendered: Normal process
Scene Capture Type: Standard
Saturation: Normal
ExifIFDPointer: 208
X Resolution: 240
Y Resolution: 240
Resolution Unit: 2
Date Time: 2014:11:22 03:44:29
Software: Adobe Photoshop Lightroom 5.7 (Macintosh)
DateCreated: 2014-11-22T04:36:05.00http://photographyicon.com/wp-content/uploads/2014/11/IMG_6255.jpg
Date Time Original: 2014:11:22 04:36:27
Exposure Time: 1/179
F Number: f / 9
Exposure Program: Aperture priority
ISO Speed Ratings: 400
Metering Mode: Pattern
Flash: Flash fired, compulsory flash mode
Focal Length: 100mm
White Balance: Auto white balance
Make: Canon
Model: Canon EOS 6D
LensInfo: 100/1 100/1 0/0 0/0
LensModel: EF100mm f/2.8L Macro IS USM
LensSerialNumber: 000004dbe4
Lens: EF100mm f/2.8L Macro IS USM
Exif Version:
Color Space: 1
Date Time Digitized: 2014:11:22 04:36:27
Subsec Time Original: 00
Subsec Time Digitized: 00
Shutter Speed Value: 7.49
Aperture Value: 6.34
Max Aperture Value: 3
Focal Plane X Resolution: 1520
Focal Plane Y Resolution: 1520
Focal Plane Resolution Unit: 3
Custom Rendered: Normal process
Scene Capture Type: Standard
Saturation: Normal
ExifIFDPointer: 208
X Resolution: 240
Y Resolution: 240
Resolution Unit: 2
Date Time: 2014:11:22 03:44:33
Software: Adobe Photoshop Lightroom 5.7 (Macintosh)
DateCreated: 2014-11-22T04:36:27.00As I mentioned previously I want to push you a little harder than other students.
I don’t usually do this but take a look at this assignment by John:
He has done exceedingly well at showing he understands the quality of light as discussed in this assignment.
Your assignment does meet the criteria for this assignment but I want to be honest here. These photographs are just not that interesting. I’m not sure whether it’s the dust on the glass or what it is but I just don’t like them. What’s more they just aren’t that different from each other.
Now please don’t take this personally, this is just me pushing you harder! I promise.
If you want to reshoot this that would be fine with me. The main thing is that you understand what the different types are light are.
Let me know what you think.
KeymasterHi Maxine,
These are both nice images although one meets the criteria for assignment 6 better than the other.
First here is the EXIF data for the images:
http://photographyicon.com/wp-content/uploads/2014/11/IMG_6100.jpg
Date Time Original: 2014:11:12 17:22:27
Exposure Time: 1/6
F Number: f / 9
Exposure Program: Aperture priority
ISO Speed Ratings: 400
Metering Mode: Pattern
Flash: Flash did not fire, compulsory flash mode
Focal Length: 100mm
White Balance: Auto white balance
Make: Canon
Model: Canon EOS 6D
LensInfo: 100/1 100/1 0/0 0/0
LensModel: EF100mm f/2.8L Macro IS USM
LensSerialNumber: 000004dbe4
Lens: EF100mm f/2.8L Macro IS USM
Exif Version:
Color Space: 1
Date Time Digitized: 2014:11:12 17:22:27
Subsec Time Original: 00
Subsec Time Digitized: 00
Shutter Speed Value: 2.58
Aperture Value: 6.34
Max Aperture Value: 3
Focal Plane X Resolution: 1520
Focal Plane Y Resolution: 1520
Focal Plane Resolution Unit: 3
Custom Rendered: Normal process
Scene Capture Type: Standard
Saturation: Normal
ExifIFDPointer: 208
X Resolution: 240
Y Resolution: 240
Resolution Unit: 2
Date Time: 2014:11:12 21:12:49
Software: Adobe Photoshop Lightroom 5.6 (Macintosh)
DateCreated: 2014-11-12T17:22:27.00http://photographyicon.com/wp-content/uploads/2014/11/IMG_6127.jpg
Date Time Original: 2014:11:12 17:46:04
Exposure Time: 1/40
F Number: f / 7.10
Exposure Program: Aperture priority
ISO Speed Ratings: 800
Metering Mode: Pattern
Flash: Flash did not fire, compulsory flash mode
Focal Length: 100mm
White Balance: Auto white balance
Make: Canon
Model: Canon EOS 6D
LensInfo: 100/1 100/1 0/0 0/0
LensModel: EF100mm f/2.8L Macro IS USM
LensSerialNumber: 000004dbe4
Lens: EF100mm f/2.8L Macro IS USM
Exif Version:
Color Space: 1
Date Time Digitized: 2014:11:12 17:46:04
Subsec Time Original: 00
Subsec Time Digitized: 00
Shutter Speed Value: 5.32
Aperture Value: 5.66
Max Aperture Value: 3
Focal Plane X Resolution: 1520
Focal Plane Y Resolution: 1520
Focal Plane Resolution Unit: 3
Custom Rendered: Normal process
Scene Capture Type: Standard
Saturation: Normal
ExifIFDPointer: 208
X Resolution: 240
Y Resolution: 240
Resolution Unit: 2
Date Time: 2014:11:12 21:16:54
Software: Adobe Photoshop Lightroom 5.6 (Macintosh)
DateCreated: 2014-11-12T17:46:04.00This image:
http://photographyicon.com/wp-content/uploads/2014/11/IMG_6100.jpgHas a much simpler background and is a simpler image overall. Whereas the other image has a butterfly with more interesting wings the image has a more clutter background. Whatever the case you’ve under stood the assignment much better this time around. So job well done.
Although, there is always room for improvement!
In these two images you’ll notice that there are portions of the creature’s wings that are out of focus. It’s hard to tell whether this is motion blur or your depth of field is too shallow. Either way you generally want to avoid blurring out parts of the most interesting thing in the frame. In other words if you are trying to feature a particular thing using shallow depth of field, you should make all of said thing be in clear focus. This just takes practice and work on your part to bette understand the relationship between your lens and camera settings with respect to depth of field. Of course like all things photographic, this is another piece of advice thats entirely subjective. Like the rule of thirds this only applies if you want it to apply and you think that looks right. All I can say is that from my experience you’ll want to follow this notion.
All in all these are two nice images. The image of the darker butterfly feels ever so slightly underexposed to me though.
Remember to think about what metering mode you are using. Sometimes you have to compensate for your camera’s lack of a brain!
Nice work here and see you on the next assignment.
KeymasterHi Maxxine,
Since you are one of the better students I’d like to push you a little harder here.
Your images are not quite as simple and elegant as they could be for this assignment.
I would like you to re-shoot this one.
Here are a couple examples of a similar subject with a different approach:
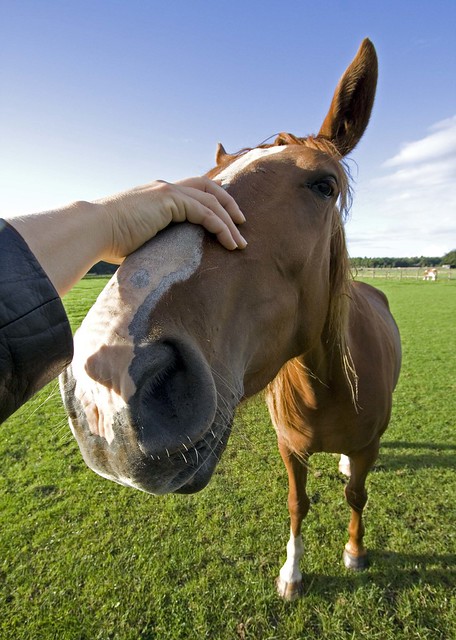
photo by pixel_addict

photo by vixl
Notice how the frame is filled and there is almost nothing extraneous?
Please try this one again.
Thank you!
-
AuthorPosts