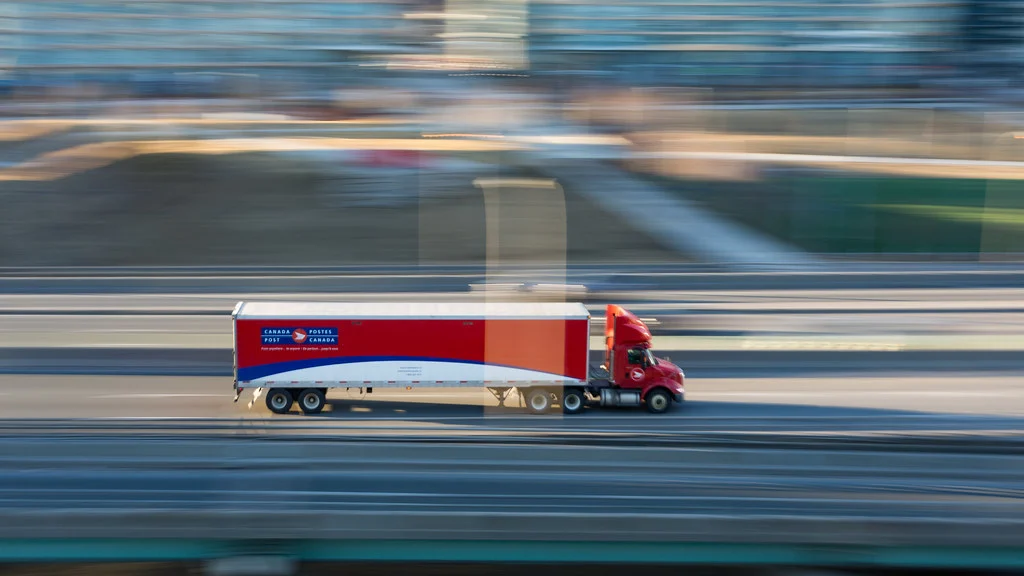
Panning is a photography technique where you track a moving subject with your camera during a slow shutter speed exposure. When done correctly, the subject appears relatively sharp while the background streaks into horizontal motion blur. This creates a powerful sense of speed and movement that a frozen-action shot cannot convey.
Panning is widely used in sports photography, motorsport coverage, street photography, and wildlife photography. It is one of those techniques that is simple to understand but takes practice to master. Expect a low keeper rate at first, but the images that work are worth the effort.
How Panning Works
In a normal photograph, the camera is stationary and a fast shutter speed freezes movement. Panning reverses the equation: the camera moves with the subject. Because the camera follows the subject at roughly the same speed, the subject stays in approximately the same position on the sensor throughout the exposure, so it renders sharply. The stationary background, meanwhile, moves across the sensor and blurs into streaks.
The technique requires a shutter speed slow enough for the background to blur but fast enough that the subject does not become unrecognizably soft. Finding this sweet spot depends on how fast the subject is moving and how far away it is.
Camera Settings
Switch to Shutter Priority mode (Tv or S) so you control the shutter speed while the camera handles aperture and ISO. Set your ISO to its lowest value (100 or 200) to keep the shutter speed slow without overexposing.
Starting shutter speeds by subject type:
- Race cars / fast vehicles: 1/60 to 1/125 second
- Cyclists: 1/30 to 1/60 second
- Runners / joggers: 1/15 to 1/30 second
- Walking people: 1/8 to 1/15 second
- Birds in flight: 1/30 to 1/60 second
These are starting points. Slower shutter speeds produce more background blur but make it harder to keep the subject sharp. Faster shutter speeds give a sharper subject with less blur. Experiment within the range to find what works for your situation.
Use continuous autofocus (AI Servo on Canon, AF-C on Nikon/Sony) so the camera tracks the subject as you pan. Set the AF area to a single point or a small zone and keep it on the subject. Some photographers prefer manual focus, pre-focusing on the spot where the subject will pass, but continuous AF has become reliable enough in modern cameras that it is the easier option for most situations.
Set your drive mode to continuous/burst shooting. This lets you fire multiple frames during each pan, increasing your chances of getting a sharp result.
Panning Technique Step by Step
1. Position yourself parallel to the path of motion. Stand alongside a road, track, or trail where the subject will pass. The most effective panning happens when the subject moves across your field of view (left to right or right to left), not toward or away from you.
2. Pre-compose the shot. Decide where in the frame you want the subject and pick a point in the background where you will start tracking. Leave room in front of the subject (in its direction of travel) for the composition to feel balanced.
3. Start tracking early. Pick up the subject in your viewfinder well before it reaches your shooting zone. Match its speed smoothly. The key is to be already moving at the right speed before you press the shutter.
4. Press the shutter while tracking. Do not stop or slow down your panning motion when you press the shutter button. This is the most common mistake beginners make. Continue the smooth tracking motion throughout the entire exposure.
5. Follow through. Just like a golf swing or a baseball throw, continue panning after the shutter closes. Stopping abruptly during the exposure introduces a jerk that blurs the subject.
Tips for Better Results
Use your body, not just your arms. Plant your feet, rotate from the hips, and keep your arms locked in a stable position relative to your torso. Arm-only panning introduces vertical bobbing that smears the subject.
Use image stabilization. If your lens or camera has image stabilization (IS, VR, IBIS, OSS), turn it on but switch it to the mode that compensates only for vertical movement. On Canon lenses, this is IS Mode 2. On Nikon, set VR to Sport. This lets the stabilization smooth out vertical shake while allowing the horizontal panning motion.
Shoot at the same level as the subject. Getting low for cars, cyclists, or animals exaggerates the sense of speed because the background elements are closer and blur more.
Choose a colorful or detailed background. A plain wall will not produce interesting blur. Crowds, trees, buildings, advertisements, and parked cars all create colorful streaks that add energy to the image.
Use a monopod. For heavy lenses or long sessions, a monopod provides vertical stability while still allowing smooth horizontal rotation.
Creative Variations
Slow pans: Extremely slow shutter speeds (1/4 second or longer) create abstract, painterly results where even the subject shows some blur. Only the basic shape and colors are recognizable, creating an impressionistic effect similar to intentional camera movement.
Zoom panning: While tracking the subject, simultaneously zoom your lens in or out during the exposure. This adds radial streaks radiating from the subject. It is extremely difficult to execute well but produces unique results.
Vertical panning: Track a subject that moves vertically (a skateboarder on a ramp, a bird taking off, a skier descending) with an upward or downward pan. The same principles apply, just rotated 90 degrees.
Rear-curtain sync with flash: Combine a slow shutter speed pan with a flash set to rear-curtain sync. The flash fires at the end of the exposure, freezing the subject sharply while the ambient exposure creates motion blur. This produces a ghosting effect with a sharp overlay.
Common Mistakes
- Stopping the pan when pressing the shutter: The most common error. Keep moving smoothly through the entire exposure and follow through afterward.
- Shutter speed too fast: If the background is not blurred, your shutter speed is too fast. Slow it down until you see streaks.
- Shutter speed too slow: If the subject is completely blurred, the shutter speed is too slow or your tracking was not smooth enough. Speed up the shutter or practice the tracking motion.
- Vertical bobbing: Rotating from the hips and locking your arms helps eliminate the up-and-down movement that creates vertical blur on the subject.
- Subject too far away: Distant subjects move more slowly across the frame, requiring extremely slow shutter speeds to produce visible background blur. Get closer for more dramatic results.
Expect a keeper rate of around 10 to 20 percent when you are starting out, improving to 30 to 50 percent with practice. Shoot in burst mode and take many attempts at each pass. Panning is a skill that improves dramatically with repetition. Practice at a busy road or cycling path, and within a few sessions you will develop the muscle memory for smooth, consistent tracking.