Concert photography is one of the most technically demanding genres in photography. You are working in darkness punctuated by rapid, unpredictable bursts of colored light. Stage lighting changes color, intensity, and direction several times per second. The performers are moving. The crowd is moving. You often have just three songs (the standard photo pit access for most major shows) to capture everything you need. There is no second chance, no “do over,” and usually no flash allowed. Despite all these constraints, concert photography produces some of the most electrifying, emotionally charged images in photography.
Understanding Venue Lighting Challenges
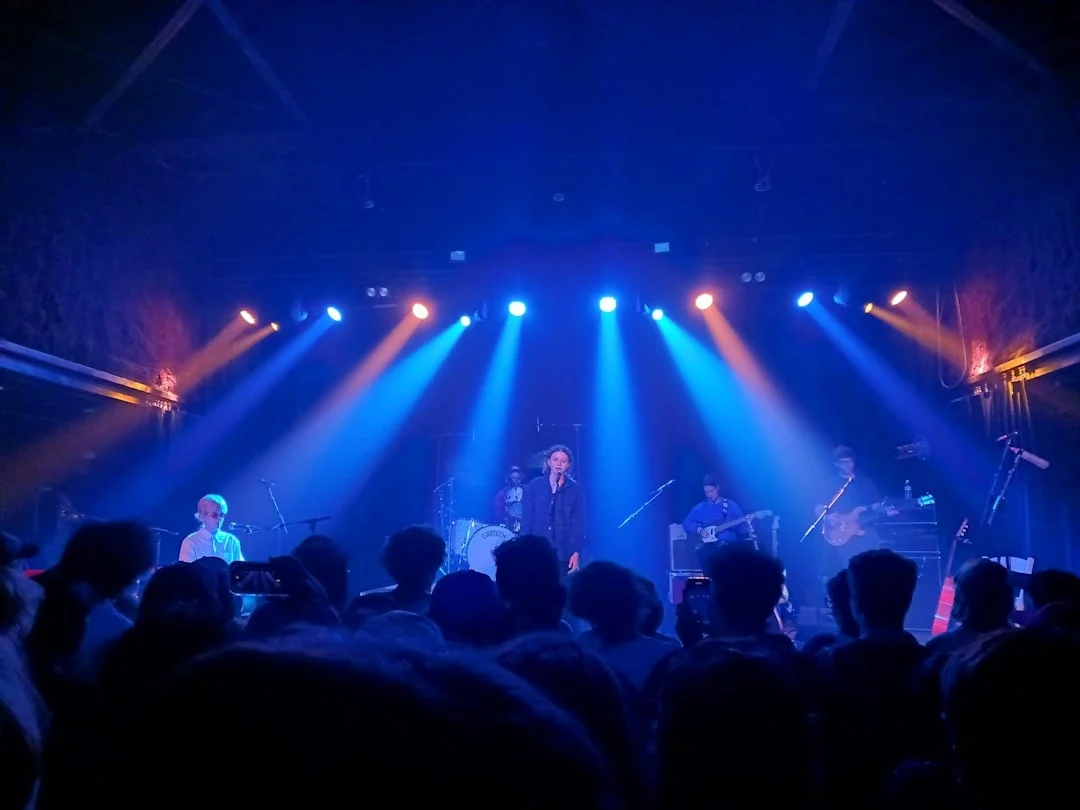
Stage lighting is designed to look dramatic to the audience, not to be easy for photographers. The challenges are significant and specific to this genre.
- Extremely low overall light: Ambient light levels are very low. Most of the light comes from the stage, which is directional and uneven.
- Rapidly changing colors: Modern LED stage lighting can shift from deep blue to bright red to green in fractions of a second. Your camera’s White Balance system cannot keep up.
- Extreme contrast: A spotlight on the performer creates blinding brightness surrounded by near-total darkness. The Dynamic Range exceeds what any sensor can capture in a single exposure.
- Mixed color temperatures: Stage lights may include tungsten spots, LED panels, moving heads, lasers, and fog machine effects, each with different color temperatures.
- Backlight dominance: Many lighting designers light from behind and above, creating dramatic stage effects but leaving the performer’s face in shadow.
Camera Settings for Concert Photography
Concert photography pushes your camera to its limits. You need every photon you can collect. Here are the settings that work in the vast majority of venues.
| Setting | Recommended | Why |
|---|---|---|
| Aperture | f/1.4 to f/2.8 (as wide as your lens allows) | You need maximum light gathering. This is the single most important setting. |
| Shutter Speed | 1/160s to 1/250s | Fast enough to freeze performer movement. Go as low as 1/80s if the performer is relatively still. |
| Iso | 1600-6400 (sometimes higher) | High ISO introduces noise but is necessary. Modern cameras handle ISO 3200-6400 well. |
| Mode | Manual Mode or Aperture Priority | Manual gives full control in unpredictable light. Aperture priority with exposure comp also works. |
| Metering Modes | Spot or center-weighted | Evaluative metering is fooled by dark backgrounds. Spot meter on the performer. |
| White Balance | Auto (adjust in post) | Stage colors change too fast for any preset. Shoot RAW and correct later. |
| Focus | Continuous AF (AF-C), single point or small zone | Track the moving performer. A single AF point gives you control over exactly what is in focus. |
The key trade-off is Noise vs. motion blur. A higher ISO lets you use a faster shutter speed, freezing the performer but adding noise. A lower ISO reduces noise but requires a slower shutter, risking blur. In practice, slight noise is preferable to motion blur in almost every situation. A noisy sharp image is usable. A clean blurry image is not.
Lens Choices by Venue Size
The right lens depends on the venue size and your access position.
| Venue Type | Recommended Lenses | Notes |
|---|---|---|
| Small clubs (100-500 capacity) | 24-70mm f/2.8, 35mm f/1.4, 50mm f/1.4 | You are very close to the stage. Wide to normal focal lengths dominate. |
| Medium venues (500-3,000 capacity) | 24-70mm f/2.8, 70-200mm f/2.8 | A mid-range zoom covers most situations from the photo pit. |
| Large arenas (3,000+ capacity) | 70-200mm f/2.8, 24-70mm f/2.8 | More telephoto reach needed. The performer is farther away. |
| Outdoor festivals | 70-200mm f/2.8, 24-70mm f/2.8, possibly 300mm+ | Stages are large and you may be farther from the action. |
Fast Prime Vs Zoom Lens lenses (f/1.4 or f/1.8) are extremely useful for small venues. A 35mm f/1.4 or 50mm f/1.4 gathers two stops more light than an f/2.8 zoom, which is the difference between ISO 6400 and ISO 1600, or between 1/60s and 1/250s. In the darkest venues, fast primes make shots possible that zoom lenses simply cannot achieve.
Shooting Without Flash
Most concert venues and virtually all professional touring acts prohibit flash photography. This is not a suggestion. Using Flash Photography at a concert will get your credentials revoked, get you ejected from the photo pit, and potentially end your relationship with the publicist, venue, and artist. Never use flash unless you have explicit written permission from the production manager.
The no-flash rule is actually a creative advantage. Stage lighting, when captured well, creates images with dramatic color, mood, and atmosphere that flash would destroy. Flash flattens the scene, overpowers the stage lights, and produces generic-looking images. Learning to work with available stage light is what makes concert photography distinctive and exciting.
Positioning: Photo Pit, Crowd, and Balcony
The Photo Pit
The photo pit is the narrow space between the stage and the security barrier. This is where credentialed photographers work during the first three songs (the standard access window). The pit gives you the closest possible position to the stage, typically at or slightly below stage level.
- Move quickly and claim a good position before the set starts. Center stage and the ends of the stage near monitors are prime spots.
- Keep your gear close to your body. The pit is crowded with photographers, security, and cables.
- Shoot from a low angle (kneeling or crouching) to place the performer against the stage lights and ceiling rather than the dark gap behind the monitors.
- Do not block other photographers. Be aware of your position and your elbows.
- You typically have three songs. Use the first song to find your settings and composition. The second and third songs are for your best shots.
From the Crowd
Many excellent concert photos are taken from the audience. Without pit access, position yourself as close to the stage as possible. Elevated positions (balconies, raised sections, VIP platforms) provide excellent angles that look down onto the stage, capturing both the performer and the crowd. Shooting from the crowd includes the energy and atmosphere of the audience in a way that pit photos often miss.
Balcony and FOH (Front of House)
Some photographers shoot from the sound mixing position (FOH) or from a balcony. These positions are farther from the stage but offer a straight-on, elevated perspective. A 70-200mm f/2.8 lens is essential from these distances. The advantage is a stable, uncrowded position where you can shoot throughout the entire performance rather than just three songs.
Anticipating the Moments
The best concert photographs capture peak emotional moments: the singer leaning into the crowd, the guitarist mid-solo, the drummer’s sticks frozen at the apex of a crash. Anticipation is everything because the lighting changes so fast that you need to be shooting at the right moment when the light happens to be good.
- Watch the performer during the first song. Learn their movement patterns. Do they favor one side of the stage? Do they gesture at specific points in songs?
- Track the lighting. Many shows run on a programmed lighting sequence. Notice when the front wash comes on (good for faces) versus when the backlighting dominates.
- Shoot in bursts during well-lit moments. The lighting may be good for only one or two seconds before it changes.
- Capture interactions between band members, between the performer and the crowd, and quiet, reflective moments between songs.
Dealing with Stage Lighting Colors
Modern concert lighting uses the full spectrum of colors, and this creates significant post-processing challenges. Deep red and deep blue lighting are the hardest to work with. Red light tends to oversaturate and lose detail. Blue light makes skin look cadaverous. Green casts are unflattering. White and warm-toned stage lights produce the most natural-looking images.
Shoot in Raw Vs Jpeg to give yourself maximum flexibility in post. You cannot truly “fix” a completely red-lit image, but you can desaturate selectively, adjust the hue, or convert to Black And White Photography Guide. Many concert photographers convert problematic color images to black and white, which eliminates the color issue entirely and often produces the strongest images.
Noise Reduction and Post-Processing
High ISO shooting produces noisy images. Effective Noise management in post-processing is essential for concert photography. Modern noise reduction tools (in Lightroom For Beginners, dedicated noise reduction software, or AI-based tools) can clean up ISO 6400 images impressively.
- Apply luminance noise reduction carefully. Too much destroys detail and creates a “plastic” look.
- Color noise (chroma noise) is more distracting than luminance noise. Prioritize removing color noise.
- Sharpening after noise reduction helps restore detail. Apply to the subject, not the background.
- A slight Exposure Compensation (overexposure by 1/3 to 1/2 stop) at capture and then pulling back in post produces cleaner results than underexposing and pushing. Noise is concentrated in shadows.
- Accept some grain. Concert photos with a bit of grain look authentic. Over-processed, perfectly smooth concert images look artificial.
Etiquette, Access, and Building Your Career
Concert photography is a competitive field with specific professional norms. Understanding the etiquette and access system is essential for building relationships and getting assignments.
- Respect the three-song rule. When your time is up, leave the pit promptly. Lingering causes problems.
- Understand that photo releases often restrict usage. Read every contract or release you sign. Some restrict images to editorial use only.
- Build relationships with publicists, venue managers, and other photographers. This industry runs on relationships and reputation.
- Start by shooting local bands and small venues. Build your Photography Portfolio with strong work from accessible events.
- Publish your work on a website and social media. Tag the bands and venues. This visibility helps when requesting credentials for bigger shows.
- Be professional. Arrive on time, follow the rules, deliver images promptly if on assignment, and be respectful to everyone.
Small Venues vs. Large Arenas
The approach to concert photography changes dramatically based on venue size. In small clubs (under 500 capacity), you are often standing at stage level, sometimes less than 3 feet from the performer. Wide-angle and normal lenses dominate. The challenge is too much proximity. You cannot step back far enough for a full-body shot. Distortion from ultra-wide lenses at close range is a real concern. The advantage is unmatched intimacy. Sweat, expression, guitar strings vibrating, vocal cords straining. These details are only visible from inches away.
In large arenas and outdoor festivals, the challenge inverts. Distance becomes the problem. Even from the photo pit, the stage may be enormous, with performers moving across a wide area. A 70-200mm f/2.8 lens is the minimum reach. Some photographers bring 300mm or longer. The lighting is often more elaborate and dramatic in larger venues, with massive LED screens, pyrotechnics, and complex moving light rigs. These elements become part of the composition rather than just illumination.
Theater-sized venues (500 to 3,000 capacity) are often the sweet spot. The performer is close enough for intimate shots but far enough for full-stage compositions. The lighting is usually professional quality. The pit is manageable. If you are building your concert photography skills, mid-sized venues offer the best balance of challenge and opportunity.
Understanding Image Rights and Contracts
Concert photography has a complicated relationship with Photography Copyright. Some artists and management companies require photographers to sign contracts granting the artist rights to the images, sometimes without compensation. These contracts vary widely. Some are reasonable (granting the artist non-exclusive license to use images for promotional purposes). Others are overreaching (demanding all rights and prohibiting the photographer from publishing their own work).
Read every contract or photo release before signing. Understand what rights you are granting. Some photographers refuse to sign overreaching contracts and simply do not photograph those artists. Others negotiate terms. Knowing your rights as a photographer and understanding the legal landscape helps you make informed decisions. If you are shooting on assignment for a publication, the publication’s legal team may handle contract review.
Common Mistakes
- Using flash when it is prohibited: The fastest way to lose credentials and your reputation. Never use flash without explicit permission.
- Shooting in JPEG: Unpredictable, extreme lighting demands the flexibility of RAW files. Always shoot RAW at concerts.
- Using too slow a shutter speed: The performer is blurred. 1/160s minimum for moving performers. Faster for energetic performances.
- Chimping every shot in the pit: You have three songs. Do not waste them looking at the back of your camera. Shoot continuously and review later.
- Standing in one spot: Move through the pit during your three songs. Different positions give different backgrounds, lighting angles, and compositions.
- Over-processing noise: Aggressive noise reduction at high ISO destroys detail and looks worse than the noise itself.
Try This
- Attend a free local concert or open mic night. Practice shooting in low light with high ISO and wide aperture. No credentials needed.
- Photograph a performer in mixed lighting at a bar or small venue. Practice adjusting white balance in post-processing to find a natural look despite colored stage lights.
- Shoot a full set from the audience. Practice anticipating moments, tracking lighting patterns, and capturing the energy of both performer and crowd.
- Convert your best concert images to black and white. Notice how eliminating color focuses attention on expression, gesture, and light.
Frequently Asked Questions
How do I get a photo pass for a concert?
Contact the band’s publicist, the venue’s PR department, or the promoter. Identify yourself, provide your portfolio or publication, and request a photo credential. Having an assignment (even from a blog or online publication) strengthens your request. Start with smaller acts and local venues where credentials are easier to obtain.
What is the three-song rule?
The three-song rule is the industry standard for photo pit access at most professional concerts. Photographers are allowed in the pit for the first three songs of the set, then must leave. This protects the visual experience for paying audience members and limits the number of images in circulation. Some acts have different rules (no pit access, one song, or full-set access). Always confirm the specific rules for each show.
Which is more important: a fast lens or a camera with good high ISO?
Both matter, but a fast lens gives you a larger advantage. The difference between f/2.8 and f/1.4 is two full stops of light. That is equivalent to going from ISO 6400 to ISO 1600, which is a massive improvement in image quality. If you can invest in one thing, make it a fast prime lens (35mm or 50mm f/1.4). A camera body with excellent high-ISO performance (modern Full Frame Vs Crop Sensor bodies excel here) is the second priority.
How do I handle deep red and blue stage lighting?
Deep red and blue are the most challenging stage colors. In red light, detail in skin and clothing tends to disappear into a saturated red mass. In blue light, everything looks cold and lifeless. The best approach is to desaturate the problematic color in post-processing or convert to black and white. Wait for moments when the lighting shifts to white or warm tones for your strongest color images.
Can I shoot concerts with a crop sensor camera?
Full Frame Vs Crop Sensor cameras are generally better for concerts because their larger sensors produce less noise at high ISO settings. However, excellent concert photography is absolutely possible with a crop sensor camera, especially in well-lit venues. Pair a crop sensor body with a fast prime lens (f/1.4 or f/1.8) to compensate for the smaller sensor’s noise disadvantage.