The angle you choose when photographing a subject changes everything. It changes the story, the emotion, the sense of power or vulnerability, and the overall visual impact. Yet most photographers default to a single angle: eye level, standing up, camera straight ahead. Learning to work with different angles and perspectives is one of the fastest ways to make your photography more dynamic, more creative, and more professional.
This guide covers every major shooting angle, explains the psychological and visual effect each one creates, and shows you when to use them. Whether you shoot portraits, landscapes, street scenes, or architecture, understanding angles will give you a bigger toolkit for visual storytelling.
Eye Level: The Neutral Starting Point
Eye-level photography means positioning your camera at the same height as your subject’s eyes. For adults, that is roughly five to six feet off the ground. For children, pets, and smaller subjects, it means crouching or kneeling to meet them where they are.
Eye level feels natural and familiar because it replicates how we normally see the world. This makes it excellent for creating a sense of connection and equality between the viewer and the subject. Portrait photographers use eye level constantly because it produces the most honest, relatable result. There is no distortion of facial features, no sense of looking up or down, just a direct and intimate encounter.
The danger of eye level is that it can feel predictable if every single image in your portfolio is shot from this position. It is the safest choice, but safety does not always make for the most compelling photograph. Think of eye level as your home base. You should always consider it, but you should also be willing to leave it.
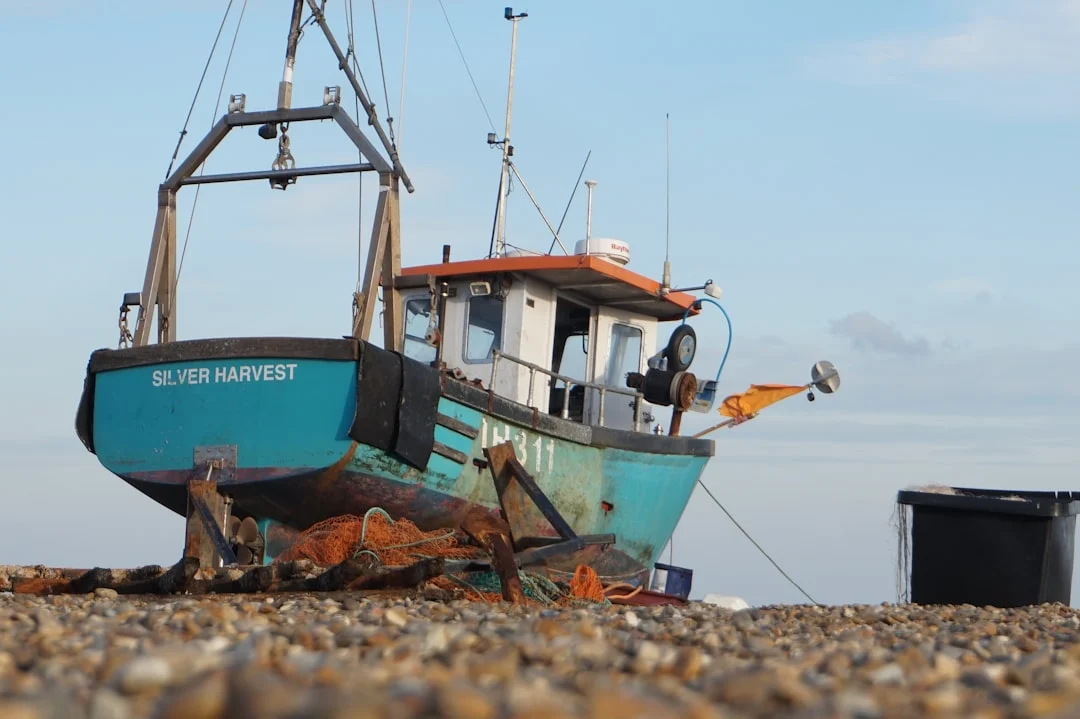
Low Angle: Power, Drama, and Grandeur
A low angle means positioning your camera below your subject and shooting upward. The lower you go, the more dramatic the effect. At its most extreme (sometimes called a worm’s-eye view), you are practically on the ground, looking straight up.
Low angles make subjects appear larger, taller, and more powerful. This is why filmmakers shoot heroes and villains from low angles during key moments. In photography, the same psychology applies. A portrait shot from slightly below creates a sense of confidence and authority. A building photographed from ground level appears to tower over the viewer. A tree shot from its base seems to stretch endlessly toward the sky.
Low angles also change the background of your image. Instead of cluttered backgrounds at eye level, shooting upward often gives you clean sky or canopy, which simplifies the composition and makes your subject stand out. This is a useful trick for street photography and portraits in busy environments.
Be cautious with low angles for portrait subjects, however. Shooting up at someone from very close range can exaggerate the chin and nostrils, which is rarely flattering. A slight low angle from a few steps back is usually more effective than an extreme upward tilt from close range.
High Angle: Vulnerability, Context, and Overview
A high angle means positioning your camera above your subject and shooting downward. This is the opposite of the low angle, and it produces the opposite psychological effect. Subjects shot from above appear smaller, more vulnerable, or more approachable.
High angles are incredibly useful for providing context. When you photograph a street market from an elevated position, you capture the entire scene: the stalls, the crowds, the layout of the space. When you photograph a child from a standing adult’s perspective (looking down), you emphasize their smallness and innocence.
In food photography, a high angle (sometimes called a flat lay) is one of the most popular perspectives. Looking down at a table setting reveals the arrangement, colors, and composition in a way that eye-level cannot. This works because food is typically arranged on a flat surface, and the overhead view shows everything at once.
High angles also work well when the ground itself is part of the subject. Patterns in pavement, shadows stretching across a courtyard, or autumn leaves on a forest floor all reveal their full beauty when photographed from above.
Bird’s-Eye View: The Aerial Perspective
The bird’s-eye view takes the high angle to its extreme. You are looking straight down from a significant height, sometimes from a building, a cliff, or a drone. The subject becomes a pattern, a texture, or an abstract shape rather than a recognizable three-dimensional object.
This perspective is disorienting in the best possible way. It strips away the familiar viewpoint and forces the viewer to see the world differently. Streets become geometric lines. Crowds become dots. Farmland becomes patchwork. Swimming pools become bright blue rectangles set in gray urban grids.
Drone photography has made the bird’s-eye view much more accessible. But even without a drone, you can achieve this perspective from tall buildings, bridges, overlooks, or elevated walkways. The key is to look for scenes where the overhead view reveals something you cannot see from ground level, whether that is a hidden pattern, a sense of scale, or an abstract composition.
Dutch Angle: Tension and Unease
The Dutch angle (also called a Dutch tilt or canted angle) involves deliberately tilting your camera so the horizon line runs diagonally across the frame. The result feels unsettled, dynamic, and slightly chaotic.
This technique comes from German Expressionist cinema of the 1920s (the “Dutch” in the name is actually a corruption of “Deutsch”). Filmmakers used it to convey psychological unease, tension, or a distorted reality. In photography, it serves similar purposes.
A Dutch angle can add energy to an otherwise static scene. It can make architecture feel more dynamic. It can create a sense of urgency in street photography or event coverage. Some photographers use it to add a creative edge to editorial portraits.
The warning with Dutch angles is that they are easy to overuse. A portfolio full of tilted images feels gimmicky rather than intentional. Use the Dutch angle sparingly and purposefully. Ask yourself whether the tilt adds to the story or is just a crutch to make an uninteresting composition seem more exciting. If the image would be stronger level, keep it level.
Choosing the Right Angle for Your Subject
Different subjects respond to different angles. Knowing which angle tends to work best for common subjects speeds up your decision-making in the field.
People. Eye level or slightly above is generally the most flattering angle for human subjects. Shooting slightly above slims the face and makes the eyes appear larger. Low angles can make a subject look heroic or authoritative, but watch for nostril and chin distortion at close range. Very high angles can make a person look small, which works for children but is usually unflattering for adults.
Animals and pets. Get down to the animal’s eye level. Shooting a dog or cat from human standing height makes them look small and disconnected. Get on the floor, lie on your stomach, and meet them at their eye level. The resulting images feel intimate and engaging because they show the world from the animal’s perspective.
Architecture. Low angles emphasize height and grandeur. Straight-on shots highlight symmetry and detail. High vantage points reveal the layout and relationship between buildings. For interiors, shooting from a lower position (roughly waist height) often makes rooms feel more spacious and inviting than a standing eye-level shot.
Food. The three standard food angles are overhead (flat lay), 45 degrees, and straight-on. Flat lay works for arranged plates and tablescapes. The 45-degree angle mimics how a diner actually sees their meal. Straight-on works for tall subjects like stacked burgers, layered drinks, and tall cakes. The height and shape of the food should guide your angle choice.
Flowers and plants. Eye level with the flower (which often means getting very low) produces images with a personal, intimate quality. Shooting down on a flower bed reveals pattern and color. Shooting up through translucent petals against a bright sky creates a dramatic backlit effect.
Common Mistakes
Understanding angles is one thing. Using them well is another. Here are the most frequent mistakes photographers make when experimenting with perspectives.
- Defaulting to eye level for everything. The single biggest missed opportunity. Challenge yourself to shoot from at least two different angles for every subject. You will often find that your best image is not the first one you took from standing height.
- Using extreme angles without purpose. A dramatic low angle or overhead shot needs a reason. If the angle does not enhance the subject, story, or mood, it just looks awkward. Always ask: what does this angle add?
- Forgetting about depth of field changes. Different angles change the distance relationship between foreground and background elements. A low angle looking up might place a nearby subject very close to your lens while the background is at infinity, requiring a narrow aperture for front-to-back sharpness.
- Ignoring background changes. Your angle determines your background. A slight change in height can mean the difference between a clean sky background and a cluttered mess of telephone wires and rooftops. Before you press the shutter, check what is behind your subject from your chosen angle.
- Distorting faces with close-range low angles. Wide-angle lenses at close range from a low angle produce unflattering distortion of human features. For portraits, step back and use a slightly longer focal length when shooting from below.
Try This: Practical Exercises
These exercises will help you break out of your default shooting angle and discover how perspective transforms ordinary subjects.
Exercise 1: The Five-Angle Challenge. Choose a single subject. It can be anything: a building, a person, a flower, a parked bicycle. Photograph it from five different angles: eye level, low angle, high angle, bird’s eye (or as close as you can get), and Dutch angle. Review all five images and notice how each angle tells a different story about the exact same subject. This exercise permanently rewires how you see photographic possibilities.
Exercise 2: The Ground-Level Walk. Take a walk with your camera and commit to shooting everything from ground level for the entire session. Get on your belly or hold the camera at ground level and use the flip screen (or shoot blind and review). You will discover a world you have been walking over your entire life. Puddles become mirrors. Curbs become cliffs. Insects become monsters. This is one of the most eye-opening exercises you can do.
Exercise 3: Match the Mood. Choose an emotion, like strength, loneliness, joy, or vulnerability, and photograph a single subject in a way that communicates that emotion purely through angle. Do not change the lighting, location, or subject. Only change your camera position. This exercise teaches you the emotional language of perspective and makes your compositional choices far more intentional.
Mastering camera angles is not about memorizing rules. It is about developing an instinct for how position and perspective shape the viewer’s experience. Once you start consciously choosing your angle rather than defaulting to what is comfortable, every photograph you take becomes a deliberate creative decision. That is the difference between taking a picture and making one.