Architecture photography captures the beauty, scale, and detail of the built environment. Whether you are photographing a towering skyscraper, a centuries-old cathedral, or a simple rural barn, the principles remain the same: careful attention to perspective, light, and composition will transform ordinary buildings into compelling images.
This guide covers everything you need to create striking architectural photographs, from choosing your vantage point to managing tricky exposure situations. These techniques work with any camera and any type of building, so you can start practicing right away.
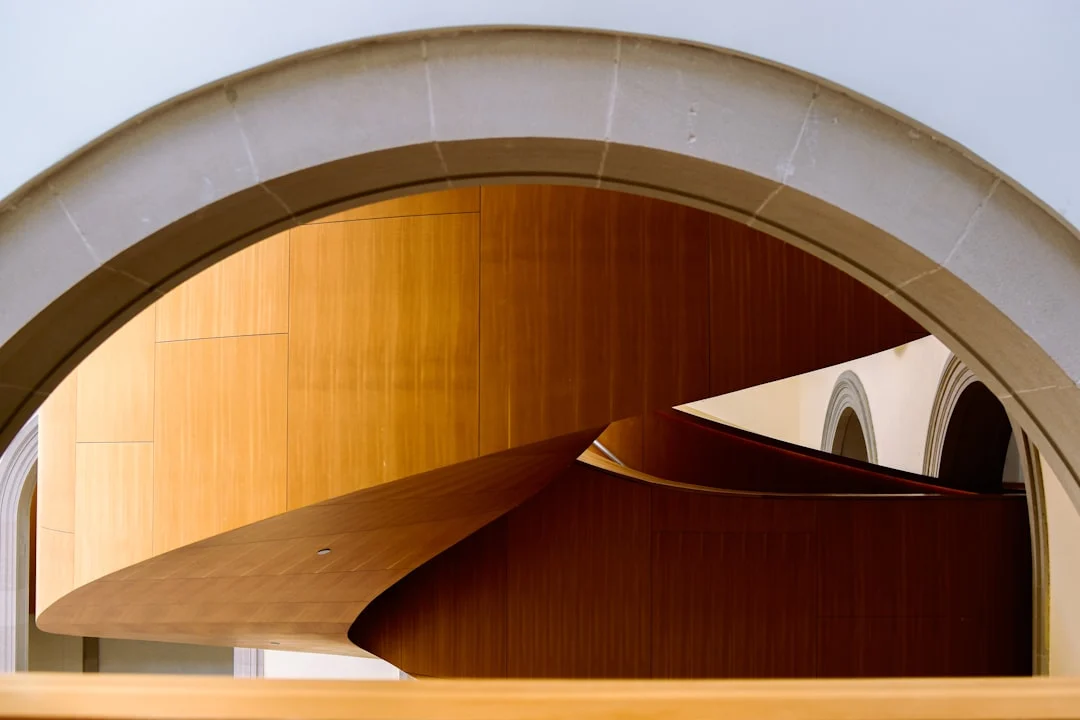
Choosing Your Perspective and Vantage Point
The angle from which you photograph a building dramatically changes how it feels in the final image. Most people photograph architecture from eye level while standing directly in front of the structure. While this is a natural starting point, it rarely produces the most interesting results.
Try shooting from a low angle to emphasize height and grandeur. Position yourself close to the base and point your camera upward to create a sense of towering power. Conversely, finding an elevated vantage point, such as a nearby parking garage, bridge, or hilltop, lets you show a building in the context of its surroundings.
Walk around the entire building before you start shooting. The front facade may be the most obvious subject, but side angles, rear views, and corner perspectives often reveal interesting geometric relationships. The best architectural photographers spend more time scouting than shooting.
Working with Wide-Angle Lenses
Wide-angle lenses are the most common choice for architecture because they allow you to capture entire buildings from relatively close distances. Focal lengths between 16mm and 35mm (on a full-frame camera) are popular for this genre.
However, wide-angle lenses introduce distortion, especially at the edges of the frame. Straight lines near the borders can appear to curve outward (barrel distortion), and buildings can look like they are leaning backward when you tilt the camera up. Understanding and managing this distortion is a core skill in architecture photography.
To minimize distortion, keep your camera as level as possible. If you need to include the top of a tall building, step farther back rather than tilting up. You can also correct distortion in post-processing using lens profile corrections, which are available in most editing software.
Managing Converging Verticals
Converging verticals, where the sides of a building appear to lean inward toward the top, are the most common technical challenge in architecture photography. This happens whenever you point your camera upward at a building, and it looks unnatural in most images.
There are several ways to address converging verticals. The simplest approach is to keep your camera perfectly level. You may need to include more foreground than you want and then crop in post-processing. Another option is to use the perspective correction tools in your editing software to straighten the vertical lines after the fact.
Some photographers use tilt-shift lenses, which physically shift the lens relative to the sensor to correct perspective in-camera. These are specialized tools, but they produce the cleanest results. Regardless of your approach, paying attention to vertical lines will immediately improve your architecture work.
Interior vs. Exterior Photography
Interior and exterior architectural photography require different approaches. Exteriors benefit from shooting during specific times of day when the light enhances the building’s features. The warm, directional light during golden hour adds depth and texture to facades, while long exposures at twilight can capture a building with both interior lights glowing and a colorful sky.
Interior photography often involves managing extreme contrast between bright windows and dark room interiors. Bracketing your exposures and blending them later is one solution. You can also shoot when the interior and exterior light are more balanced, typically during overcast conditions or twilight.
For interiors, pay attention to straight lines and symmetry. Position yourself centrally in a room when possible, and keep horizontal and vertical lines aligned with the edges of your frame. Small adjustments to your tripod position can make a significant difference in the final result.
Lighting for Architecture
Light transforms architecture more than almost any other subject in photography. The same building can look flat and uninteresting at noon but dramatic and sculptural in early morning or late afternoon light. Understanding how light direction, quality, and color affect buildings is essential.
Side lighting, where the sun hits the building at an angle, creates shadows that reveal texture and depth in the facade. Front lighting illuminates the building evenly but can look flat. Backlighting can create dramatic silhouettes, especially with distinctive rooflines or spires.
Overcast days are excellent for interiors and for photographing buildings with highly reflective surfaces like glass and steel. The even, diffused light eliminates harsh reflections and hot spots. For exteriors with stone, brick, or concrete, directional sunlight usually produces more interesting results.
Using Long Exposures for Clean Scenes
Busy streets and crowds of tourists can distract from architectural subjects. A long exposure technique can solve this problem. By using a neutral density filter and an exposure of 30 seconds or longer, moving people become invisible (or appear as ghostly blurs), leaving the building as the clear focal point.
This technique requires a sturdy tripod and a remote shutter release or your camera’s self-timer. Choose a small aperture (f/8 to f/16) for maximum sharpness across the frame, and add a neutral density filter to extend the exposure time. The result is a clean, people-free architectural image that would be impossible with a single short exposure.
Composition and Symmetry
Architecture naturally lends itself to strong composition. Leading lines are everywhere in buildings: hallways, staircases, rows of columns, and rooflines all guide the viewer’s eye through the image.
Symmetry is particularly powerful in architecture. Position yourself on the center axis of a building or corridor and align everything precisely. Even small deviations from perfect symmetry are noticeable and distracting. Use your camera’s grid overlay to help align the shot.
Patterns and repetition are another strength of architectural subjects. Rows of windows, repeating arches, or uniform floor tiles create rhythm in your images. Look for these patterns and use them as the primary subject, or break the pattern with a single contrasting element for visual tension. Consider the golden ratio when placing key elements within your frame.
Black and White Architecture
Black and white photography is a natural fit for architecture. Removing color forces the viewer to focus on shape, form, texture, and tonal contrast. Concrete, steel, and stone buildings often look more powerful in monochrome than in color.
When shooting with black and white conversion in mind, look for scenes with strong contrast between light and shadow. Dramatic skies with bold clouds add visual interest above the building. Pay attention to the tonal range within the scene, as mid-gray images can look flat without enough contrast.
Common Mistakes in Architecture Photography
Ignoring converging verticals. Tilting the camera up without correcting for perspective distortion makes buildings look like they are falling backward. Keep the camera level or fix the distortion in post-processing.
Shooting only in harsh midday light. Flat, overhead light removes the shadows that give buildings depth and dimension. Return during golden hour or blue hour for more compelling light.
Including distracting elements. Trash cans, parked cars, utility poles, and construction equipment can clutter an otherwise clean architectural composition. Adjust your angle, reframe, or return at a different time to minimize distractions.
Using too wide a lens too close. Extreme wide-angle shots from close range create severe distortion that makes buildings look unrealistic. Step back and use a moderate wide-angle instead for more natural-looking proportions.
Frequently Asked Questions
What is the best focal length for architecture photography?
A focal length between 16mm and 35mm on a full-frame camera (or 10-24mm on a crop sensor) works well for most architectural subjects. This range lets you capture entire buildings while keeping distortion manageable. A 24mm lens is a versatile starting point.
Do I need a tripod for architecture photography?
A tripod is highly recommended, especially for interiors, long exposures, and twilight shooting. It also helps you compose precisely and keep the camera perfectly level. For quick exterior shots in good light, handheld shooting is fine.
How do I photograph buildings in a city without including people?
Visit early in the morning when foot traffic is minimal. Alternatively, use a long exposure technique with a neutral density filter to blur moving people out of the frame. Exposures of 30 seconds or longer typically make pedestrians invisible.
Is architecture photography the same as real estate photography?
They overlap in technique, but they have different goals. Real estate photography aims to make a property look appealing to potential buyers, emphasizing space and livability. Architecture photography focuses on the artistic and structural qualities of the building itself, prioritizing form, light, and design.