The blue hour is the brief window of twilight before sunrise and after sunset when the sky takes on a deep, saturated blue tone. This cool, even light creates a mood that no other time of day can match. Buildings glow with warm artificial lights against the blue sky, water turns silky and reflective, and the world feels suspended between day and night.
Unlike the golden hour, which bathes everything in warm, directional light, the blue hour offers soft, diffused illumination that wraps around subjects without harsh shadows. This makes it one of the most rewarding times to photograph cityscapes, landscapes, seascapes, and architecture.
When Does the Blue Hour Happen?
The blue hour occurs in two windows each day: roughly 20 to 40 minutes before sunrise, and 20 to 40 minutes after sunset. The exact timing and duration depend on your latitude and the time of year. Near the equator, blue hour is short. At higher latitudes during summer, it can stretch considerably longer.
The name is slightly misleading because it rarely lasts a full hour. Plan to be in position and ready to shoot at least 30 minutes before sunset (for the evening session) so you can capture the transition from golden hour through blue hour. The best blue hour light often lasts only 15 to 20 minutes before the sky becomes too dark or too light.
Weather apps and photography planning tools like PhotoPills can help you predict the exact timing for your location. Partly cloudy skies can enhance the blue hour by adding texture and color variation overhead, though heavy overcast may block the blue tones entirely.
Camera Settings for Blue Hour
Blue hour photography almost always requires a tripod because the light levels are low. With a tripod, you can use settings optimized for image quality rather than handheld stability.
Start with these baseline settings and adjust as the light changes:
- Mode: Manual or Aperture Priority
- Aperture: f/8 to f/11 for landscapes and cityscapes (maximum sharpness across the frame)
- ISO: 100 to 400 (keep it low for clean files since you are on a tripod)
- Shutter speed: 1 to 30 seconds depending on the available light
- White balance: Daylight or around 4000K to 5000K to preserve the blue tones. Auto white balance may neutralize the blue cast you want to keep.
- Focus: Manual focus or autofocus locked on your subject. Switch to manual after focusing to prevent the camera from hunting in low light.
- File format: RAW for maximum flexibility in post-processing
As twilight deepens, you will need to progressively increase your exposure. Either lengthen the shutter speed or raise the ISO. A remote shutter release or your camera’s self-timer helps avoid camera shake during long exposures.
Best Subjects for Blue Hour Photography
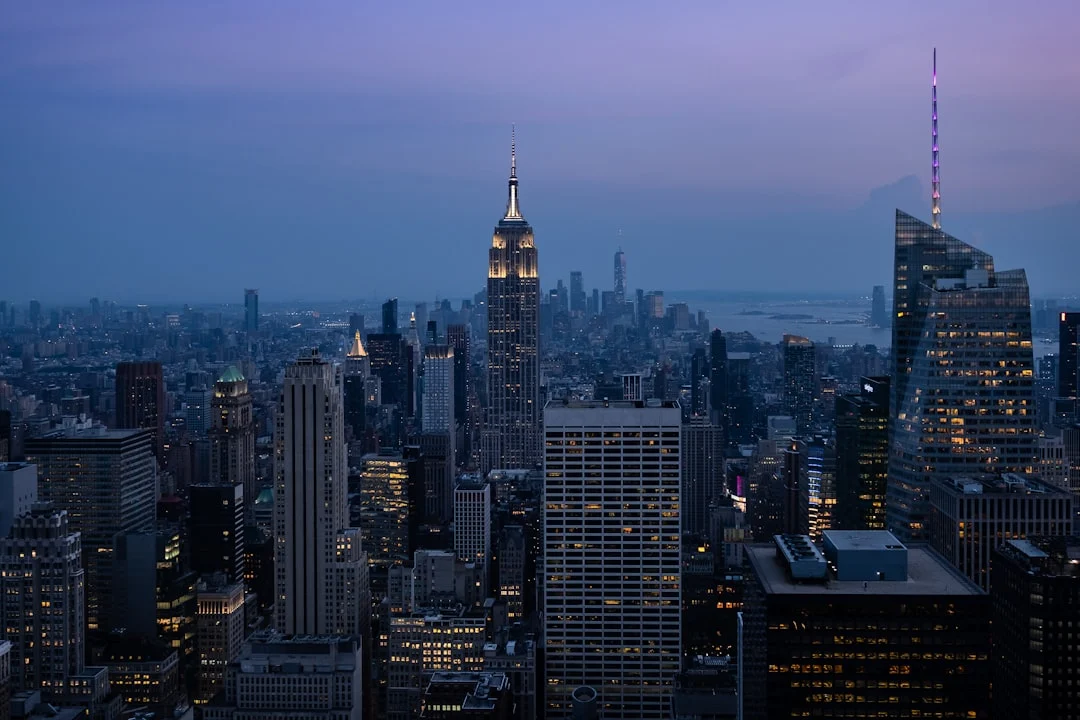
Cityscapes and Architecture
Cityscapes are the classic blue hour subject. The contrast between warm artificial lights (street lamps, office windows, neon signs) and the cool blue sky creates a visually striking color palette that photographs beautifully. The even light also means building facades show detail without the deep shadows that midday sun creates.
Look for elevated viewpoints, bridges, and waterfront locations where reflections double the impact. Many of the most iconic cityscape photographs you have seen were shot during the blue hour.
Seascapes and Water
Long exposures during blue hour turn ocean waves into smooth, misty surfaces while the sky provides a moody backdrop. Harbors with boats, piers, and lighthouses gain a tranquil quality. The reflection of the blue sky on still water can create near-monochromatic compositions in shades of blue.
Landscapes
Mountains, valleys, and open fields take on an ethereal quality during blue hour. Snow-covered scenes are particularly striking because the snow reflects the blue light. Fog or mist adds even more atmosphere. If there are any artificial lights in the scene (a distant farmhouse, a road with car headlights), they create warm accents against the blue.
Portraits
Blue hour can provide a beautiful backdrop for portraits, especially environmental portraits. Use a flash or continuous light on your subject to create warm skin tones that contrast with the cool blue background. The soft ambient light acts as a natural fill.
Composition Tips
Include elements that create contrast between warm and cool tones. A lit window, a street lamp, or car headlights provide warm accents that make the blue tones feel more intense by comparison. This warm-cool contrast is one of the defining characteristics of great blue hour images.
Reflections are your best friend during blue hour. Wet streets, puddles, rivers, and harbors all multiply the available light and color. After rain is an excellent time for blue hour photography in urban settings because every surface becomes reflective.
Use leading lines (roads, bridges, rivers, fences) to draw the viewer into the scene. These compositional tools work especially well when the lines are illuminated or reflective. Keep your compositions clean and give the sky room to breathe since the sky color is a primary element of any blue hour image.
Blue Hour vs. Golden Hour
The golden hour offers warm, directional light that flatters portraits and landscapes. Blue hour offers cool, even, ambient light that flatters cityscapes and creates a contemplative mood. Neither is better; they simply serve different creative purposes.
The good news is that one follows the other. If you plan a sunset shoot, stay an extra 30 minutes for blue hour. If you arrive for a sunrise shoot 40 minutes early, you get blue hour before golden hour. Planning shoots that span both windows gives you maximum variety from a single outing.
Post-Processing Blue Hour Photos
In Lightroom or your preferred editor, resist the temptation to warm up the white balance too much. The blue cast is the entire point. Small adjustments are fine, but pushing the temperature slider toward warm defeats the purpose of shooting during blue hour.
Increase the vibrance slightly to intensify the blue tones without making the image look unnatural. The clarity slider can add definition to buildings and architectural details. For long-exposure water shots, you may want to reduce highlights to recover detail in any bright light sources while lifting shadows to reveal detail in darker areas.
If you bracketed your exposures, consider HDR or exposure blending to handle the dynamic range between bright artificial lights and the darker sky and foreground.
Common Mistakes
- Arriving too late: Blue hour is brief. Scout your location during daylight and be set up before the light starts.
- Using auto white balance: The camera will try to neutralize the blue tones. Set a manual white balance or shoot RAW so you can fine-tune it later.
- Forgetting a tripod: Handholding in this light means high ISO, noisy images, and no long-exposure effects. A tripod is essential.
- Overexposing artificial lights: Bright signs and street lamps can blow out easily during longer exposures. Watch your histogram and consider bracketing for high-contrast scenes.
- Ignoring the transition: The best moments often happen during the transition from golden to blue hour, not deep into blue hour. Keep shooting continuously through the entire twilight window.
Essential Gear
- Tripod: Non-negotiable for sharp images at slow shutter speeds
- Remote shutter release: Prevents camera shake during long exposures (your camera’s 2-second timer works as an alternative)
- Wide-angle lens: Ideal for cityscapes, seascapes, and landscapes. Something in the 14mm to 35mm range on full frame.
- Headlamp with red light mode: Helps you see your camera controls and navigate without ruining your night vision
- Extra batteries: Cold temperatures and long exposures drain batteries faster
Blue hour photography rewards patience and planning. The light changes quickly, the window is short, and the best shots often come from knowing your location well enough to be ready when the sky hits that perfect shade of deep blue. Start by shooting the blue hour in a familiar location where you already know good compositions. Once you see how different the same scene looks in this light, you will want to revisit every location during twilight.