Try It Yourself: Camera Simulator
Practice long exposure photography virtually. Try the “Make the waterfall silky” challenge.
Long exposure photography transforms the familiar world into something extraordinary. Running water becomes silk, clouds streak across the sky in ethereal bands, car headlights paint ribbons of light through city streets, and stars trace arcs across the night. For more, see our star trail photography guide. Check out our astro-landscape photography for more details. By extending the shutter speed beyond what handheld shooting allows, you capture the passage of time in a single frame, creating images that reveal movement the naked eye cannot see. This guide covers everything you need to know to master long exposure photography, from essential gear and camera settings to specific techniques for different subjects.
What Is Long Exposure Photography?
See it side by side
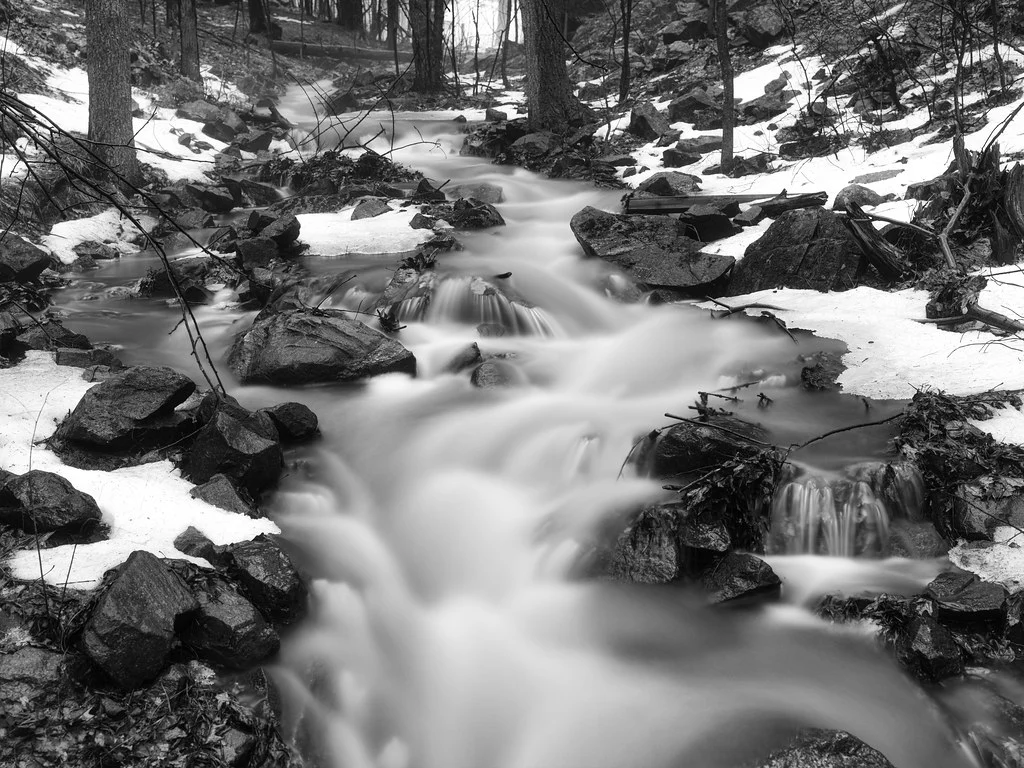
A long exposure smooths moving water into silk and turns clouds into streaks, recording time as texture. A short exposure freezes the same scene into a single moment with all its individual droplets and ripples intact.
Long exposure photography uses extended shutter speeds to capture the cumulative effect of light and movement over time. While there is no universal definition of what constitutes a long exposure, it generally refers to any exposure longer than what you can handhold without blur, typically anything longer than about 1/30 of a second. In practice, most long exposure work uses shutter speeds ranging from half a second to several minutes, and some specialized techniques require exposures of an hour or more.
During a long exposure, anything that moves within the frame is recorded as a blur or streak rather than a frozen moment. Static elements remain sharp while moving elements create patterns of motion. This contrast between sharp and blurred elements is what gives long exposure photographs their distinctive and often magical quality.
The technique works because the camera’s sensor records light continuously for the entire duration of the exposure. If a stream of water flows across rocks during a ten-second exposure, the sensor records the water’s position at every point during those ten seconds, resulting in a smooth, silky appearance. If a car drives through the frame during a thirty-second exposure, the headlights leave a continuous trail of light while the car itself may not be visible at all because it occupied any given position for only a fraction of the total exposure time. When you are counting out a long shutter time in bulb mode, a free online stopwatch helps you keep exposures consistent.
Essential Gear for Long Exposure
Tripod
A sturdy tripod is the single most important piece of equipment for long exposure photography. During exposures measured in seconds or minutes, even the slightest camera movement results in a blurred image. Your tripod needs to be heavy and rigid enough to hold the camera perfectly still in whatever conditions you are shooting in, including wind.
Invest in the best tripod you can afford. Carbon fiber tripods offer the best combination of lightweight portability and vibration dampening. Aluminum tripods are heavier but more affordable. In either case, look for a tripod rated to hold significantly more weight than your camera and heaviest lens combination. A tripod working near its weight limit is a tripod that vibrates.
When setting up, extend the thickest leg sections first as they provide the most stability. Avoid extending the center column if possible, as it raises the center of gravity and reduces stability. On soft ground, push the tripod legs firmly into the surface. In windy conditions, hang your camera bag from the center column hook to add stabilizing weight, or shield the tripod from wind with your body.
Remote Shutter Release
Pressing the shutter button physically introduces vibration. A remote shutter release, whether wired, wireless, or triggered through a smartphone app, lets you open and close the shutter without touching the camera. For exposures in Bulb mode, which is required for exposures longer than your camera’s maximum timed shutter speed (usually 30 seconds), you need a remote that can lock the shutter open for the duration of the exposure.
If you do not have a remote release, use your camera’s built-in self-timer. A two-second delay is usually sufficient to let any vibration from pressing the button dissipate before the exposure begins. This works well for timed exposures up to 30 seconds but is not suitable for Bulb mode exposures because you would need to press the button again to end the exposure.
ND Filters
Neutral density filters are dark pieces of glass or resin that reduce the amount of light entering the lens without affecting color. They are essential for achieving long exposures in daylight conditions. Without an ND filter, a daytime long exposure would massively overexpose the image because there is simply too much light for the sensor during an extended exposure.
ND filters are measured in stops of light reduction. Common strengths include 3-stop (ND8), 6-stop (ND64), and 10-stop (ND1000). A 3-stop ND filter lets you use a shutter speed eight times longer than without it: if your normal exposure is 1/125 second, a 3-stop ND extends it to 1/15 second. A 10-stop filter takes that same 1/125 second exposure to a full 8 seconds, easily enough to smooth moving water.
For daytime long exposure work, a 6-stop and a 10-stop ND filter cover most situations. The 6-stop filter provides moderate lengthening of exposure times, suitable for slightly smoothing water movement or showing gentle cloud motion. The 10-stop filter provides dramatic extension, enabling multi-second exposures in bright daylight that turn moving water to glass and moving clouds to streaks. You can stack multiple ND filters for even greater light reduction, though stacking can sometimes introduce a color cast or vignetting.
Camera Settings for Long Exposure
Proper camera settings ensure clean, sharp long exposures with minimal noise and maximum detail.
- Shoot in RAW: RAW files give you the most latitude for adjusting exposure and white balance in post-processing, which is particularly valuable for long exposure work where precise exposure can be tricky.
- Use the lowest ISO: Long exposures inherently gather a lot of light. Use your camera’s base ISO (typically ISO 100) to minimize noise. Higher ISO values introduce noise that becomes more apparent in the smooth tonal areas typical of long exposure images.
- Set aperture for the desired depth of field: For landscapes, f/8 to f/11 provides the best balance of depth of field and lens sharpness. Avoid extremely small apertures like f/22 because diffraction at very small apertures reduces overall sharpness.
- Choose the appropriate shutter speed: This depends on your subject. Smoothing water ripples requires a few seconds. Turning a waterfall into a silky veil takes 1 to 5 seconds. Smoothing ocean waves might need 15 to 30 seconds. Streaking clouds across the sky can require 1 to 4 minutes.
- Use Manual or Bulb mode: For exposures up to 30 seconds, use Manual mode and dial in the exact shutter speed. For exposures longer than 30 seconds, switch to Bulb mode and time the exposure with your remote release.
- Turn off image stabilization: When the camera is on a tripod, some stabilization systems introduce micro-movements. Disable stabilization for tripod-based long exposure work.
- Turn off long exposure noise reduction (optional): Many cameras offer in-camera long exposure noise reduction (LENR) that captures a dark frame of equal duration after the exposure and subtracts the noise pattern. This is effective but doubles your shooting time. You may prefer to handle noise reduction in post-processing instead.
Calculating Exposure with ND Filters
When you attach an ND filter, you need to recalculate your shutter speed to compensate for the reduced light. The math is straightforward: for each stop of ND filtration, double the exposure time.
Here is a practical approach. First, compose your shot and determine the correct exposure without the ND filter. Let us say the camera meters correctly at f/11, ISO 100, 1/30 second. Now attach your 10-stop ND filter. You need to add 10 stops to the shutter speed. Starting from 1/30: one stop is 1/15, two stops is 1/8, three is 1/4, four is 1/2, five is 1 second, six is 2 seconds, seven is 4 seconds, eight is 8 seconds, nine is 15 seconds, ten is 30 seconds. So your new shutter speed is 30 seconds.
There are numerous smartphone apps and printed reference cards that provide these calculations instantly. Simply enter your base exposure and ND filter strength, and the app provides the new shutter speed. These tools save time and prevent calculation errors in the field.
With very dark ND filters, your camera’s autofocus and metering systems may not function because too little light reaches the sensors. The practical solution is to compose, focus, and meter before attaching the ND filter. Lock your focus by switching to manual focus after the camera has focused. Note the metered exposure. Then attach the ND filter, calculate the new shutter speed, and shoot in manual mode.
Smooth Water Technique
Transforming moving water into a smooth, ethereal surface is one of the most popular long exposure techniques. The waterfall photography effect of silky water is achievable with relatively modest exposure times.
For waterfalls, exposure times of 1 to 5 seconds typically produce beautiful results. This is long enough to blur the falling water into a smooth veil while keeping surrounding rocks and foliage sharp. Very long exposures can over-smooth a waterfall, losing the sense of energy and movement. Start with a 1-second exposure and gradually lengthen until you find the look you prefer.
For ocean and seascape photography, longer exposures of 15 to 60 seconds smooth waves into a misty, dreamlike surface. Very long exposures of several minutes can make the ocean look like fog, completely erasing any sense of individual waves. This creates an otherworldly calm that contrasts beautifully with sharp foreground rocks or piers.
For rivers and streams, 2 to 10 seconds works well. The exposure time depends on how fast the water is moving and how much smoothing you want. Faster-moving water requires less exposure time to achieve the silky effect. A rushing mountain stream might look beautifully smooth at 1 second, while a gently flowing river might need 5 seconds or more.
Light Trails
Vehicle light trails are among the most accessible long exposure subjects. Find a vantage point overlooking a road or highway, set up your tripod, and use an exposure long enough to capture vehicles moving through the frame. Headlights create white or yellow trails, while taillights produce red trails. The longer the exposure, the longer and more continuous the light trails.
Typical exposure times for light trails range from 5 seconds on busy roads to 30 seconds or more on less trafficked routes. The goal is to have enough vehicles pass through the frame to create a continuous river of light rather than just one or two isolated streaks. Time your exposure to coincide with traffic flow, starting the exposure just before a cluster of vehicles enters the scene.
Roundabouts, highway interchanges, and curved roads produce particularly dynamic light trails because the trails curve and weave through the frame. Elevated vantage points show the full pattern of traffic flow and create compositions where the light trails form geometric patterns against the dark road surface.
Star Trails
Star trail photography records the apparent motion of stars across the night sky as the Earth rotates. Depending on the approach, a star trail image might show concentric circles around the celestial pole (Polaris in the Northern Hemisphere) or sweeping arcs across the sky. For comprehensive night photography settings, see our dedicated guide.
There are two methods for capturing star trails. The traditional method uses a single very long exposure, typically 30 minutes to several hours. This requires a fully dark sky, a camera with good long-exposure noise handling, and a reliable Bulb mode with a locking remote release. The advantage is simplicity; the disadvantage is that sensor noise accumulates during extremely long exposures, and a single mistake ruins the entire image.
The modern stacking method captures many shorter exposures, typically 25 to 30 seconds each, in rapid sequence and combines them in software. An intervalometer automates the process, firing exposure after exposure with minimal gaps. In post-processing, the images are stacked using lighten blending mode so that each frame’s star positions accumulate into trails. This method produces cleaner results with less noise and allows you to check individual frames during the shoot.
For either method, choose a dark location far from city lights. Include an interesting foreground element, such as a tree, building, or rock formation, to anchor the composition. Orient your camera toward the celestial pole for circular trails or toward east or west for straight arcing trails.
Daytime Long Exposure
Daytime long exposure requires strong ND filters because there is abundant light available. With a 10-stop ND filter, you can achieve exposures of 30 seconds to several minutes during the day, enough to blur clouds dramatically, smooth water surfaces to glass, and even make moving people disappear from busy scenes.
Cloud streaking is a dramatic effect achievable with exposures of 1 to 5 minutes during daylight. Rapidly moving clouds produce the best results, creating long streaks across the sky that add dynamic energy to an otherwise calm landscape. Slow-moving clouds on a calm day may need extremely long exposures of 10 minutes or more to show visible movement.
Removing people from tourist-crowded locations is a practical application of daytime long exposure. With an exposure of several minutes, any person who moves through the scene during the exposure becomes too faint to register in the final image. The static architecture, landscape, and other non-moving elements remain sharp. This technique can yield clean images of famous landmarks without the usual crowds.
Night Long Exposure
Night provides natural conditions for long exposure work because the low light levels require longer shutter speeds. No ND filter is needed; the darkness itself provides the light reduction that enables extended exposures.
City nightscapes are excellent subjects. The combination of static buildings, moving vehicle lights, and glowing signs creates images with sharp architecture traced by ribbons of light. Reflections in wet pavement after rain add another dimension, doubling the light trails and glowing colors.
For night long exposures, open your aperture wider than you would during the day, typically f/4 to f/8, and keep ISO relatively low, around 100 to 400, to maintain clean files. Shutter speeds will vary from a few seconds for brightly lit urban scenes to 30 seconds or more for darker environments. Use your camera’s live view histogram to check exposure and adjust as needed.
Common Challenges and Solutions
- Vibration: Even minor vibrations ruin long exposures. Use mirror lock-up if your camera has it, a remote release, and shield the camera from wind. Avoid touching the tripod during the exposure.
- Light leaks: On very long exposures, light can leak into the camera through the viewfinder eyepiece. Cover the eyepiece with the built-in shutter (if your camera has one) or drape a dark cloth over it.
- Battery drain: Long exposures and cold temperatures both consume battery power rapidly. Carry spare batteries and keep them warm in a pocket until needed.
- Sensor heating: Very long exposures cause the sensor to heat up, increasing thermal noise. This appears as colored speckles in the image. In-camera long exposure noise reduction or post-processing noise reduction can address this.
- Color cast from ND filters: Some ND filters, particularly cheaper ones, introduce a color cast, usually warm or magenta. Shooting in RAW lets you correct the white balance in post-processing. Higher quality ND filters minimize this issue.
Building Your Long Exposure Skills
Start with accessible subjects. A local stream or fountain is an ideal first subject for smooth water technique. A busy road at dusk provides easy light trail opportunities. These subjects are forgiving and let you experiment with different exposure times to see how the duration affects the result. Check out our smoke art photography for more details.
Progress to more challenging subjects as your skills develop. Ocean seascapes, star trails, and daytime long exposure with ND filters each present unique technical challenges that build on the fundamentals. Each new subject teaches you something different about how time and light interact during an extended exposure.
Long exposure photography rewards patience and planning. Check weather forecasts for cloud movement, tidal charts for ocean shoots, and moon phase calendars for night work. Scout locations during daylight hours so you know where to set up when conditions are right. The best long exposure images rarely happen by accident; they are the result of preparation meeting opportunity at the right moment.
Related Guides
- Exposure Calculator — Calculate shutter speeds for ND filter long exposures
- Neutral Density Filters — Choosing and using ND filters for daylight long exposures
- Light Painting Photography — Creative techniques using long exposures with handheld lights
- Night Photography Guide — Complete guide to shooting after dark
- How to Photograph Stars — Astrophotography with extended exposures
- Best Camera Settings for Night Photography — Quick settings reference
- Depth of Field — How aperture choices affect sharpness in long exposures
- long exposure photography for visual masterpieces