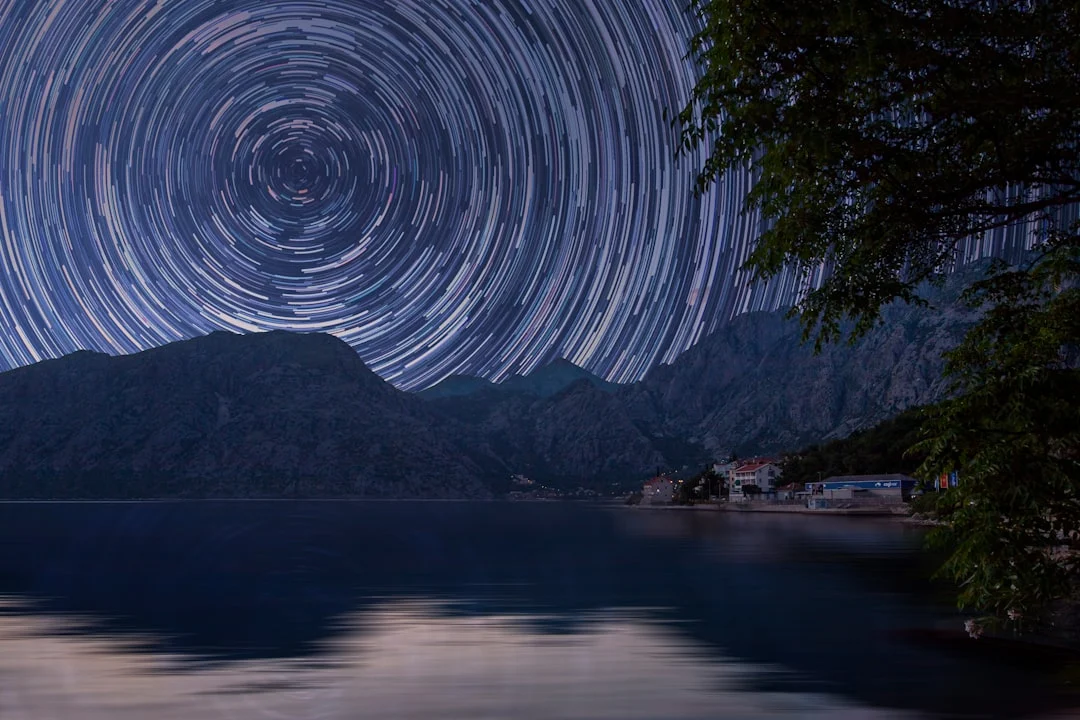
Star trail photography captures the apparent movement of stars across the sky as Earth rotates. The result is an image of concentric arcs or circles of light streaking across the frame. It is one of the most dramatic forms of night photography, and unlike Milky Way photography, it does not require the darkest skies or the fastest lenses to produce impressive results.
There are two main approaches to star trails: a single ultra-long exposure, or a stack of many shorter exposures combined in post-processing. The stacking method is the modern standard because it produces cleaner results and gives you more control over the final image.
How Star Trails Work
Earth rotates approximately 360 degrees every 24 hours, or about 15 degrees per hour. Stars near the celestial pole (Polaris in the Northern Hemisphere, Sigma Octantis in the Southern Hemisphere) appear to move in tight circles, while stars near the celestial equator trace longer arcs. A 30-minute exposure captures roughly 7.5 degrees of rotation, which produces visible trails. A 2-hour exposure creates much longer, more dramatic arcs.
The North Star (Polaris) sits very close to the north celestial pole, so it barely moves. If you compose with Polaris in your frame, all other stars will appear to rotate around it, creating concentric circles. This is the classic star trail composition.
Camera Settings
Single Long Exposure Method
With Bulb mode, you hold the shutter open for as long as you want. This is the simpler approach but has drawbacks: sensor noise increases with longer exposures, a single airplane or headlight can ruin the entire frame, and if the battery dies mid-exposure, you lose everything.
- Mode: Bulb (B)
- Aperture: f/2.8 to f/4
- ISO: 200 to 400
- Exposure time: 30 minutes to 4 hours
- Long exposure noise reduction: ON (the camera takes a dark frame of equal length after each shot, so a 2-hour exposure means 4 hours total)
Stacking Method (Recommended)
The stacking method takes a sequence of consecutive shorter exposures, then combines them in software. Each frame captures a short segment of the star trails. When stacked using a “lighten” blend mode, the segments connect into continuous trails.
- Mode: Manual
- Aperture: f/2.8 to f/4
- ISO: 800 to 1600
- Shutter speed: 20 to 30 seconds per frame
- Interval: 1 to 2 seconds between frames (some cameras have a built-in intervalometer; otherwise use an external one)
- Number of frames: 100 to 400+ depending on desired trail length. 200 frames at 30 seconds each covers about 100 minutes.
- Long exposure noise reduction: OFF (this would create gaps between frames)
The stacking method is superior for several reasons: it controls sensor noise better, an airplane in one frame only affects that frame (which you can remove), you can create a timelapse video from the same frames, and you can choose how many frames to include to control trail length.
Step-by-Step Shooting Process
1. Scout your location during daylight. Find a composition with an interesting foreground (a tree, building, rock formation, lighthouse) and a clear view of the sky. Check which direction is north if you want circular trails around Polaris.
2. Set up during twilight. Arrive while there is still enough light to compose and focus. Mount your camera on a sturdy tripod. Use a wide-angle lens (14mm to 24mm) to capture a large sweep of sky plus foreground context.
3. Focus on the stars. Switch to manual focus. Use live view at maximum zoom on a bright star or distant light to achieve precise focus at infinity. Once focused, do not touch the focus ring. Some photographers tape it in place.
4. Take a test shot. Shoot a single 30-second exposure at ISO 1600 or higher to check composition, focus, and exposure. Adjust as needed.
5. Start the sequence. Set your intervalometer to take continuous photos with a 1 to 2 second gap between frames. Start the sequence and leave the camera running. Do not bump the tripod, shine lights at the lens, or stand in front of it.
6. Wait. Longer sequences produce longer trails. An hour is a good starting point. Two hours or more creates full, sweeping arcs. Bring warm clothing, a chair, and something to do.
7. Take dark frames (optional but recommended). After the sequence, put the lens cap on and take 10 to 20 exposures with the same settings. These “dark frames” capture sensor noise patterns that stacking software can subtract from your light frames for a cleaner result.
Stacking Your Images
Several free and paid tools can stack star trail images:
- StarStaX (free, Mac/Windows/Linux): The most popular dedicated star trail stacker. Supports gap-filling and comet/meteor mode.
- Photoshop: Load all frames as layers, set all layers to “Lighten” blend mode, and flatten. Works but is resource-intensive with hundreds of frames.
- Sequator (free, Windows): Designed for night sky stacking with light pollution removal.
The “lighten” or “maximum” blend mode is the key. For each pixel, it keeps whichever frame has the brighter value. Since each frame captures the stars in a slightly different position, the result shows the combined path of every star across all frames.
Composition Ideas
Circles around Polaris: Point your camera north and include Polaris in the frame. Stars will trace concentric circles around it. This is the most recognizable star trail composition.
Diagonal streaks: Point your camera east or west for star trails that arc diagonally across the frame. This creates a sense of movement and works well with horizontal compositions.
Foreground anchors: A lone tree, a rocky outcrop, a lighthouse, or a ruined building provides a static counterpoint to the moving sky. The contrast between the still foreground and the streaking stars is what makes the image compelling.
Light painting the foreground: During the sequence, briefly illuminate the foreground with a flashlight or headlamp during one or two frames. This adds detail and dimension to an otherwise dark foreground. Be subtle and consistent with the light direction.
Dealing with Light Pollution
Star trails are more forgiving of light pollution than Milky Way photography. Even from suburban locations, bright stars create visible trails against a slightly glowing sky. However, the darker your location, the more stars you will capture and the richer the final image will be.
Light pollution from nearby cities can create an unwanted color cast (usually orange or yellow) on one side of the sky. Shooting away from the city helps, and you can correct color casts in post-processing. A light pollution filter can also help, though it may shift star colors.
Common Problems and Solutions
- Gaps in trails: If there are visible breaks in the star trails, your interval between frames was too long. Reduce the gap to 1 second or use your camera’s continuous shooting mode with an intervalometer that fires continuously. StarStaX has a gap-filling algorithm that can help in post.
- Dew on the lens: Long sessions in humid conditions cause condensation on the front element. Use a lens heater strip (a USB-powered band that wraps around the lens barrel) to prevent this. Check the lens periodically.
- Battery dying mid-sequence: Use a fully charged battery and carry spares. Cold weather drains batteries faster. Some cameras accept external power via a battery grip or dummy battery adapter.
- Airplane trails: With the stacking method, simply remove the frames containing airplane trails before stacking. With a single long exposure, you are stuck with them.
- Foreground too dark: Take a separate, well-exposed foreground frame during blue hour and blend it with the star trail stack in Photoshop.
Essential Gear
- Sturdy tripod: The camera will be in position for hours. Any movement ruins the alignment.
- Intervalometer: Either built into your camera or an external wired/wireless remote. Essential for the stacking method.
- Wide-angle lens: 14mm to 24mm on full frame captures a large swath of sky.
- Extra batteries: You will drain at least one full battery during a 2-hour session.
- Lens heater: Prevents dew. Inexpensive and powered by a USB battery pack.
- Red headlamp: Preserves your night vision while you adjust settings.
Star trail photography is one of the most accessible forms of astrophotography. You do not need a tracking mount, you do not need an ultra-fast lens, and you can get results even from moderately light-polluted skies. The main requirements are patience, a clear night, and a willingness to let your camera run for an hour or two while you enjoy the stars.