Storm photography captures the raw power and drama of severe weather. Towering thunderheads, lightning bolts splitting the sky, shelf clouds rolling across the prairie, and the eerie green light that precedes a hailstorm. These are among the most visually spectacular phenomena in nature. They are also among the most dangerous subjects a photographer can pursue. Before anything else in this guide, understand this: no photograph is worth your life. Weather kills experienced storm chasers and casual observers alike. The safety section below is the most important part of this page.
Weather Safety: Your First Priority
This section comes first because safety must come first in every storm photography decision you make. Severe weather is unpredictable, powerful, and deadly. Lightning, tornadoes, flash floods, large hail, and straight-line winds kill people every year. Many of those deaths are preventable with proper caution and awareness.
Lightning Safety
- If you can hear thunder, you are within striking distance of lightning. Seek shelter immediately.
- Lightning can strike 10+ miles from the storm center. Do not assume you are safe because the rain has not reached you.
- No outdoor location is safe during a lightning storm. Get inside a substantial building or a hard-topped vehicle (not a convertible).
- If caught in the open, crouch low with your feet together. Do not lie flat. Do not stand under isolated tall trees.
- A car with the windows closed provides good protection. The metal body conducts lightning around you.
- Wait at least 30 minutes after the last thunder before going back outside.
Tornado Safety
- If you see a tornado, move away from its path at right angles. Do not drive toward it.
- Never try to outrun a tornado in a vehicle. If the tornado is close, abandon your vehicle and take cover in a low-lying area (ditch, depression).
- Stay far away. Telephoto lenses exist for this purpose. Professional storm chasers maintain miles of distance.
- If you are not trained in storm chasing and meteorology, do not pursue storms. Watch from a safe distance.
- Tornadoes can be rain-wrapped and invisible. Lack of visible funnel does not mean lack of tornado.
Flash Flood Safety
- Never cross flowing water over a road. Turn around. Six inches of moving water can knock you down.
- Be aware of your elevation relative to rivers, streams, and drainage channels during heavy rain.
- Flash floods can occur miles from the storm. Water from upstream arrives without warning.
- In canyons and low-lying areas, move to higher ground immediately when heavy rain begins.
General Storm Safety
- Monitor weather forecasts and warnings continuously. A weather radio app on your phone is essential.
- Have an escape route planned before you start shooting. Know which direction you will go if conditions deteriorate.
- Tell someone where you are going and when you expect to return.
- Carry a charged phone, first aid kit, flashlight, and water.
- Large hail can shatter car windows. If large hail is forecast, take cover under a solid structure.
Understanding Storm Types for Photography
Different storm types produce different photographic opportunities. Understanding basic storm structure helps you anticipate what you might see and where to position yourself.
Supercell Thunderstorms
Supercells are the most photogenic storms. They are organized, long-lived thunderstorms with a rotating updraft. Supercells produce the most dramatic cloud structures: stacked plates, rotating wall clouds, massive overshooting tops, and inflow bands. They can also produce tornadoes, large hail, and damaging winds. The visual structure of a supercell against a clear sky is one of the most spectacular sights in nature.
Shelf Clouds and Squall Lines
Shelf clouds are the dramatic, wedge-shaped clouds that form along the leading edge of a squall line. They look like a wall of cloud rolling across the sky, often with turbulent, layered formations. Shelf clouds are visually spectacular and somewhat safer to photograph than supercells because the severe weather (wind and hail) arrives after the cloud passes overhead, giving you a warning.
Isolated Thunderstorms
Single-cell thunderstorms are shorter-lived and less organized than supercells. They produce rain, lightning, and sometimes small hail. They are excellent for lightning photography because you can often find a safe position at a comfortable distance and photograph the storm as it produces lightning bolts.
Lightning Photography Settings
Lightning photography is the most popular form of storm photography, and it is more accessible than it might seem. The basic concept is simple: leave the shutter open and let the lightning expose itself.
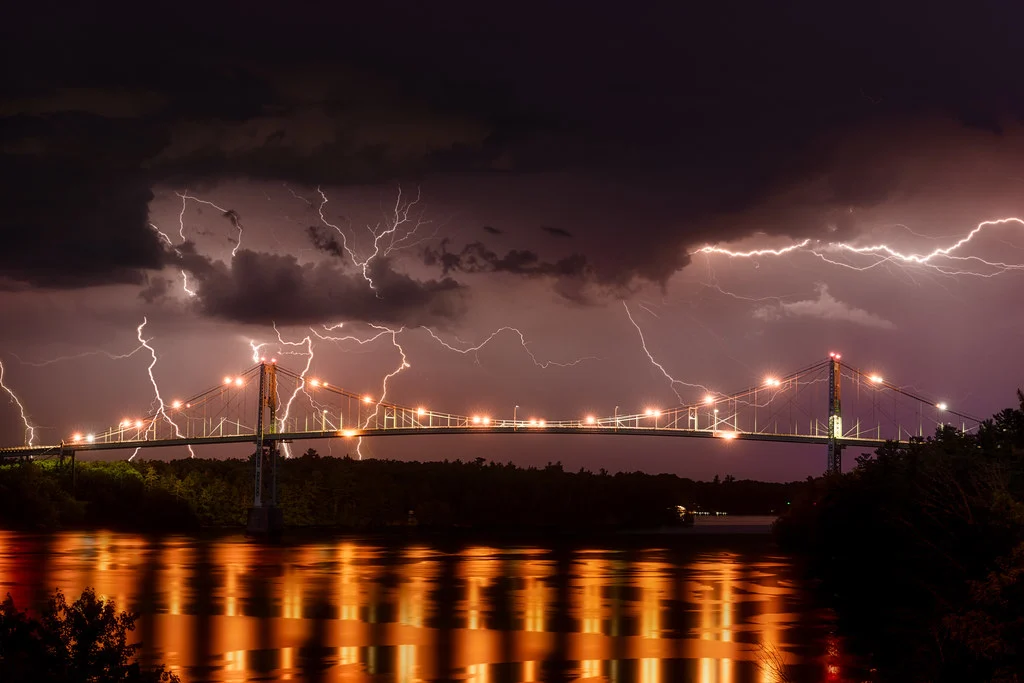
Nighttime Lightning
Nighttime lightning is easier to photograph because you can use Long Exposure Photography techniques. Set your camera on a sturdy tripod, aim at the storm, and use these settings as a starting point:
| Setting | Recommended Value | Notes |
|---|---|---|
| Aperture | f/5.6 to f/11 | Adjust based on lightning brightness and distance |
| Iso | 100-400 | Lower ISO for closer, brighter bolts |
| Shutter Speed | 10-30 seconds | Long enough to capture a bolt during the exposure |
| Focus | Manual, set to infinity | Autofocus will hunt in the dark. Switch to manual. |
| Mode | Manual Mode | Full manual control is essential |
Point your camera toward the area of the storm producing the most frequent lightning. Leave the shutter open and wait. When a bolt strikes during your exposure, it records itself on the sensor. Close the shutter and check the result. Adjust aperture and ISO based on the brightness of the bolt. Very bright bolts overexpose at wide apertures. Distant bolts need wider apertures and higher ISO.
Daytime Lightning
Daytime lightning is harder because you cannot leave the shutter open for 30 seconds in bright light without massively overexposing the image. The solution is a lightning trigger: a sensor that detects the sudden brightness change of a lightning bolt and fires your shutter in milliseconds. These devices mount on your camera’s hot shoe and connect to the shutter release port. When lightning flashes, the trigger fires the camera faster than your reflexes ever could.
Without a lightning trigger, you can sometimes capture daytime lightning by shooting video and extracting frames, or by using a very dark neutral density filter (10+ stops) that allows multi-second exposures even in daylight. Neither method is as reliable as a dedicated trigger, but both can work with persistence.
Photographing Dramatic Cloud Structures
Storms produce some of the most dramatic cloud formations on Earth. These structures are worth photographing even without lightning. Mammatus clouds (the bubble-like formations on storm undersides), anvil clouds reaching into the upper atmosphere, wall clouds rotating beneath a storm, and lenticular clouds formed by mountain wave winds are all visually extraordinary.
Wide-angle lenses (14-35mm) capture the full scope of a storm system against the landscape. Telephoto lenses (70-200mm+) isolate specific cloud features and compress the layers of the storm structure. Include landscape elements (plains, roads, isolated trees or buildings) for scale. A storm without scale reference looks like a photo of clouds. With a house or road in the foreground, the enormous scale of the storm becomes viscerally clear.
Rainbow Photography
Rainbows appear when sunlight refracts through water droplets with the sun behind you and rain ahead. They are most common in the late afternoon when the sun is low and a storm is moving away. Double rainbows (a secondary bow with reversed colors above the primary) are less common but frequently visible if you look for them.
- Use a polarizing filter and rotate it to maximize the rainbow’s intensity. The filter selectively transmits the polarized light that forms the bow.
- Wide-angle lenses capture the full arc. A 16-24mm lens on a full-frame camera can often capture the entire rainbow.
- Include landscape foreground for context and depth. A rainbow over a featureless sky is less compelling than one arching over an interesting scene.
- Expose for the rainbow, which is often brighter than the surrounding sky. Use Exposure Compensation to darken the overall exposure slightly.
- Be ready. Rainbows are ephemeral. When you see one forming, shoot immediately. They can fade in minutes.
Rain, Mist, and Atmosphere
You do not need severe storms for dramatic weather photography. Gentle rain, fog, and mist create atmosphere, mood, and mystery in photographs. Rain-slicked streets reflect city lights. Fog reduces scenes to simple shapes and muted tones. Mist adds depth and separation to layered landscapes.
Shoot in Raw Vs Jpeg to preserve the subtle tonal information in misty scenes. White Balance adjustments in post-processing dramatically change the mood: cool tones emphasize the damp chill, warm tones add a romantic softness. Overexpose slightly (by +0.5 to +1 stop) in foggy conditions because the meter tends to underexpose the bright, even tonality of fog.
Photographing Wind, Snow, and Extreme Conditions
Wind itself is invisible, but its effects are photogenic. Trees bending, flags snapping, waves crashing higher than normal, sand or snow streaming horizontally across a landscape. A slightly slower shutter speed (1/30s to 1/125s) allows wind-blown elements to streak while the landscape remains sharp, conveying the force of the wind. Capture people leaning into the wind, objects being displaced, or grass laying flat for visceral images of weather power.
Snow transforms the landscape and offers unique photographic opportunities. Falling snow adds atmosphere when backlit (shoot toward a light source and the snowflakes become bright dots against a dark background). Blizzard conditions create near-whiteout images with an eerie, disorienting quality. Fresh snow cover simplifies compositions to pure form and contrast. When shooting snow, overexpose by +1 to +1.5 stops because your meter will try to render white snow as middle gray.
Time Lapse Photography is particularly powerful for storm documentation. Set up a camera on a sturdy tripod aimed at the approaching storm, set an intervalometer to shoot every 5 to 10 seconds, and let it run for 30 minutes to an hour. The resulting time-lapse shows the dramatic evolution of storm structure, cloud movement, and lighting changes in a compressed, cinematic sequence.
Protecting Your Gear
Storms mean water, wind, and debris. Your camera gear is at risk every time you shoot in weather.
- Rain covers: Commercial rain sleeves are inexpensive and effective. In a pinch, a plastic bag with a hole for the lens works.
- Lens cleaning: Carry multiple microfiber cloths. Water droplets on the front element ruin every shot until removed.
- Waterproof camera bags: Keep all unused gear sealed in waterproof bags or your car trunk.
- Silica gel packs: Place them in your camera bag to absorb moisture and prevent condensation on cold-to-warm transitions.
- Tripod stability: Wind can blow over a tripod. Hang your camera bag from the center column for ballast. Use a sturdy tripod.
- Weather-sealed gear: If you shoot in weather regularly, invest in bodies and lenses with weather sealing. It is not waterproof, but it handles rain and spray.
Forecasting Tools for Storm Photography
Successful storm photography starts hours or days before you pick up the camera. Understanding weather forecasts helps you predict when and where dramatic weather will occur.
- National Weather Service: Free, reliable, detailed forecasts and severe weather warnings. Check before every outing.
- Radar apps: Real-time radar shows you where storms are, how they are moving, and how intense they are.
- Lightning maps: Real-time lightning detection maps show active electrical storms.
- Cloud forecast models: Satellite-based forecasts predict cloud cover, useful for planning clear-sky and storm opportunities.
- Storm Prediction Center (SPC): Issues convective outlooks that predict where severe storms are most likely to develop. Essential for storm chase planning.
Post-Storm Light: The Hidden Opportunity
Some of the most dramatic Photography Lighting occurs immediately after a storm passes. The air is clean, washed free of dust and haze. Colors are more saturated. If the storm passes near sunset, the low sun can light the retreating storm clouds from below, turning them orange, red, and purple against a clearing sky. These moments of post-storm light are brief and unpredictable, but they produce images of extraordinary color and drama.
Keep your camera ready as storms move through. Do not pack up when the rain stops. Instead, watch the western horizon for breaks in the clouds that might allow the setting sun to illuminate the departing storm. Full rainbows are most common in post-storm conditions when the sun appears behind you while rain continues ahead. This transitional period between storm and clear sky is when many of the most memorable weather photographs are made.
Common Mistakes
- Underestimating danger: The most serious mistake. Weather kills. Never compromise safety for a photograph.
- Being too close: Long telephoto lenses let you capture dramatic storms from miles away. Use them.
- Forgetting a tripod: Lightning photography and low-light storm shooting require a tripod. Handheld does not work for long exposures.
- Overexposing lightning: Bright bolts at wide apertures blow out easily. Start at f/8 and adjust. Check the histogram.
- Shooting in JPEG: Storm scenes have extreme dynamic range. RAW files preserve highlight and shadow detail that JPEG discards.
- Not protecting gear: Rain damage is expensive. Always have a rain cover or plastic bag ready.
- Waiting until the storm is overhead: The best storm structure is visible from a distance. By the time it is overhead, you are in the rain and danger zone.
Try This
- Monitor the weather forecast for the next approaching storm system. Position yourself safely (inside, or in a car with clear view) and photograph the approaching shelf cloud or rain curtain.
- Practice nighttime Long Exposure Photography on a clear night. Once you are comfortable with manual settings and tripod work, you will be ready to photograph lightning when it occurs.
- After a rain shower, go outside and photograph the post-storm light. The air is clean, colors are saturated, and dramatic clouds often remain after the rain stops.
- Create a rain-at-night image in your city. Wet streets reflecting neon signs, car headlights, and streetlamps create colorful, atmospheric urban photographs.
Frequently Asked Questions
What is the safest way to photograph lightning?
From inside a building, looking out a window toward a distant storm. This eliminates nearly all risk. You can also photograph from inside a vehicle (the metal body provides a Faraday cage effect). If outdoors, maintain several miles of distance from the storm. Never stand in an open field, on a hilltop, or near tall isolated objects during a lightning storm.
What lens should I use for storm photography?
A wide-angle lens (14-35mm) captures the full scope of a storm system. A standard zoom (24-70mm) is versatile for both wide shots and tighter compositions. A telephoto (70-200mm) isolates specific cloud structures and distant lightning. Carry all three if possible. The wide-angle is used most often for lightning photography because you cannot always predict exactly where the bolt will strike.
Do I need a lightning trigger?
For nighttime lightning, no. Long exposures capture bolts passively. For daytime lightning, a trigger dramatically increases your success rate. Without one, daytime lightning is extremely difficult to capture. Triggers cost $50 to $300 depending on sensitivity and features.
How do I avoid blurry lightning photos?
Use a sturdy tripod. Use a remote shutter release or 2-second self-timer to avoid camera shake when pressing the shutter. Turn off Image Stabilization when the camera is on a tripod (it can cause blur on a stable platform). Use manual focus set to infinity. Check focus on a distant light or use live view to focus precisely on a distant object.
Can I photograph storms with a smartphone?
Smartphone Photography can capture dramatic cloud structures, rain, and post-storm light effectively. Lightning is very difficult to capture with a phone because you cannot do long exposures easily. Some phone camera apps offer manual controls and long exposure modes that help. The phone’s computational processing often produces impressive results with dramatic clouds and colorful storm light.