A studio lighting setup gives you complete control over every aspect of the light in your photographs, direction, intensity, quality, color, and spread. In a studio, there are no clouds rolling in, no sun moving across the sky, and no mixed lighting to fight. You create exactly the light you want, and you can reproduce it perfectly every time. While studio lighting might seem complex and expensive, the truth is that you can build a functional home studio setup for less than the cost of a mid-range lens. This guide walks you through everything you need to know about studio lighting, from choosing your first lights and modifiers to building professional multi-light setups that produce stunning results.
Types of Studio Lights
There are three main categories of studio lighting, each with distinct advantages. Your choice depends on your budget, space, shooting style, and subject matter.
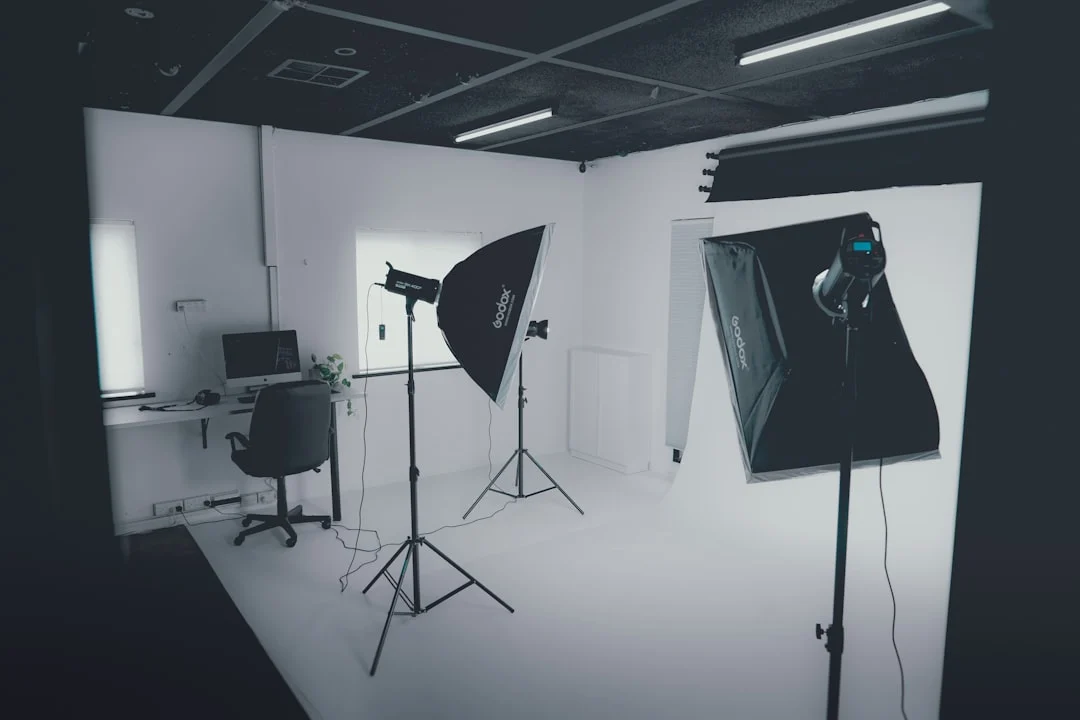
Studio strobes (monolights) are the professional standard for studio photography. A monolight is a self-contained flash unit with the power supply, flash tube, and controls built into a single head that mounts on a light stand. Strobes produce a brief, intense burst of light when triggered, just like a speedlight but with significantly more power. Most studio strobes include a modeling light, a continuous bulb that gives you a preview of how the flash will look, which is invaluable for visualizing shadows and highlights before you shoot. Strobes offer the most power, fastest recycle times, and most professional feature sets. Entry-level monolights are surprisingly affordable.
Speedlights (flashguns) are the portable, battery-powered flash units that mount on your camera’s hot shoe or fire remotely with a trigger. While designed for location work, speedlights function perfectly well in a home studio and are an excellent entry point into studio lighting. They are less powerful than studio strobes, recycle more slowly, and lack modeling lights, but they are compact, affordable, and many photographers already own one. A single speedlight with a modifier produces beautiful studio-quality light for headshots and portraits.
Continuous lights stay on constantly, unlike flash units that fire in bursts. This makes them the easiest to learn with because you see exactly what you get, the light on your subject is the light in the photo. Continuous lights also work for video, making them a versatile choice if you shoot both stills and motion. LED panels and COB (chip-on-board) LED lights are the modern standard for continuous lighting, offering adjustable brightness, color temperature control, and low heat output. The downside is that continuous lights require higher ISO settings or slower shutter speeds than flash, and they cannot freeze motion the way a flash burst can.
Essential Light Modifiers
A bare studio light produces hard, direct illumination, usable for some creative purposes but unflattering for most portrait and product work. Light modifiers shape and soften the light, giving you creative control over its quality and direction.
Softboxes are the most popular studio modifier. They consist of a reflective interior, a diffusion panel on the front, and a mounting bracket that attaches to your light. Softboxes produce soft, controlled, directional light. They come in rectangular, square, octagonal (octa), and strip configurations. A rectangular softbox produces soft light with a more defined edge than an umbrella. An octabox creates round catchlights in the eyes that mimic natural light. Strip boxes are narrow and tall, designed for rim lights, edge lights, and product photography. For a first softbox, a 24×36-inch rectangular or 36-inch octabox is versatile enough for headshots, half-body portraits, and product work.
Umbrellas are the most affordable and beginner-friendly modifier. A shoot-through umbrella (translucent white) is placed between the light and the subject, light passes through the fabric, spreading and softening as it goes. A reflective umbrella (silver or white interior) faces the subject, bouncing light back toward them. Umbrellas spread light widely, which fills a room with soft light but offers less control over exactly where the light falls. They are quick to set up, inexpensive, and produce pleasing results. Their main limitation is light spill, it is difficult to keep umbrella light from hitting the background and walls.
Beauty dishes produce a distinctive quality of light that sits between hard and soft. The light bounces off a small deflector plate in the center of the dish, then off the dish’s curved interior surface before hitting the subject. This creates punchy, slightly contrasty light with visible but soft-edged shadows. Beauty dishes are a favorite in fashion and beauty photography for the way they sculpt cheekbones and jawlines while maintaining a smooth skin quality. They are typically used as the key light at short distances for headshots and beauty work.
Grids and honeycomb attachments narrow the beam of any modifier, preventing light from spilling into areas where you do not want it. A grid on a softbox or beauty dish keeps the light focused on the subject without illuminating the background or walls. Grids are essential for creating controlled accent lights, hair lights, and dramatic spotlit effects.
Barn doors are adjustable metal flaps that attach to a reflector and allow you to shape the light beam precisely, blocking light from specific areas. They are commonly used on background lights and accent lights.
One-Light Studio Setup
A single light with a modifier and optionally a reflector is all you need to create professional-quality studio portraits. This is where every studio photographer should start, and many never need to go further.
Setup: Place a strobe or speedlight with a softbox (24×36-inch or larger) at a 30-45 degree angle to your subject, slightly above eye level, about 3-4 feet from the subject. Angle the light so it points at the subject’s face. Place a white reflector or large white foam board on the opposite side of the subject, close enough to bounce some light back into the shadows. The reflector acts as your fill light without requiring a second light.
This simple setup produces a classic portrait lighting pattern with soft, flattering light on the face, gentle shadows that add dimension, and a natural transition from highlight to shadow. By adjusting the angle of the key light and the distance of the reflector, you can create a range of looks from nearly flat to dramatically sculpted.
Without the reflector, the shadow side of the face goes darker, creating a moodier, more dramatic look. This is split lighting or Rembrandt lighting depending on the angle, and it works well for character portraits, artists, musicians, and editorial work.
Two-Light Studio Setup
Adding a second light gives you independent control over fill and opens up new creative possibilities that a reflector alone cannot achieve.
Key + fill setup: Place your main (key) light at 30-45 degrees as before. Add a second light on the opposite side, slightly further from the subject and at lower power. This fill light brightens the shadows without creating its own competing shadow pattern. A common ratio is to set the fill light 1-2 stops below the key light. Using a larger modifier on the fill (or a bare light bounced off a white wall) keeps it soft and non-directional.
Key + backlight setup: Instead of using the second light for fill, place it behind the subject pointing toward the camera (flagged so it does not flare into your lens). This creates a rim light or hair light that separates the subject from the background with a bright edge. The rim light adds a polished, professional quality to portraits and is especially effective when the subject has dark hair against a dark background. Use a reflector for fill on the shadow side.
Key + background light: Point the second light at the background rather than the subject. This lets you control the background brightness independently, making a gray background appear white, or creating a gradient from light to dark. A gel on the background light adds color for creative effects.
Three-Light Studio Setup
The three-light setup is the classic professional portrait configuration. It gives you complete control over key light, fill, and subject-background separation.
Classic three-light portrait: Light one is your key: a softbox or beauty dish at 30-45 degrees. Light two is a hair/rim light, positioned behind and above the subject with a grid or snoot to focus the light on the hair and shoulders. Light three is a background light, pointed at the backdrop to control its tone and create separation. A reflector on the shadow side handles fill without requiring a fourth light.
This setup covers the vast majority of professional portrait, headshot, and beauty work. Once you master it, you can modify it endlessly: swap the key light modifier for a beauty dish, add a second rim light on the other side for a clamshell effect, put a colored gel on the background light, or replace the background light with a second key light for flat, commercial-style illumination.
Understanding Lighting Ratios
The lighting ratio describes the brightness difference between the lit (key) side and the shadow (fill) side of your subject. It is one of the most important creative decisions in studio lighting.
A 1:1 ratio means the key and fill sides are equally bright. This produces flat, even, low-contrast light with minimal visible shadows. It is common in beauty photography, commercial work, and passport photos.
A 2:1 ratio (one stop difference) is subtle and natural-looking. You can see a slight shadow transition that adds gentle dimension without drama. This is a good default ratio for corporate headshots and clean, modern portraits.
A 4:1 ratio (two stops difference) produces visible, defined shadows that add strong dimension and a hint of drama. This is the classic look for editorial portraits, actor headshots, and character work.
An 8:1 ratio or higher is dramatically lit with deep shadows. Only the key-lit portions of the face are visible while the shadow side falls toward black. This is the territory of low-key, moody, artistic portraiture.
To set your lighting ratio, adjust the fill light power relative to the key. If your key light is at full power and your fill is at half power, that is approximately a 3:1 ratio. A handheld light meter is the most accurate way to measure ratios, but you can also judge by eye using the modeling lights or by reviewing test shots on your camera’s LCD with the histogram.
Backgrounds and Background Control
The background is an integral part of your studio lighting setup. A simple backdrop, a roll of seamless paper, a fabric muslin, or a painted canvas, provides a clean, non-distracting surface that keeps focus on the subject.
Seamless paper is the most popular studio background. It comes in wide rolls (typically 4.5 or 9 feet wide) and hangs from a crossbar supported by two stands. White and gray are the most versatile colors, a single gray backdrop can appear white (with background light), middle gray (unlit), or nearly black (positioned far from the lights) depending on how you light it. Paper is smooth, wrinkle-free, and inexpensive to replace when it gets dirty or torn.
Fabric muslins are more durable than paper and available in solid colors and mottled patterns. They wrinkle, which can be a characteristic you want (for a textured look) or a problem you need to solve (with steaming or pulling taut). Muslins are better for repeated use and travel.
The key to background control is the distance between your subject and the backdrop. When the subject stands close to the background, key light spills onto the backdrop, making it brighter and showing the subject’s shadow. Moving the subject 6-8 feet from the background lets the light fall off before reaching it, giving you independent control. You can then light the background separately, or leave it dark, without affecting the subject lighting.
Building a Home Studio on a Budget
You do not need a dedicated space or expensive equipment to start shooting with studio lighting. A corner of a living room, a garage, or a spare bedroom can work. Here is a practical budget studio setup:
- Light source: A single speedlight or affordable studio strobe. Even one light with a modifier produces professional results. A speedlight you already own works fine.
- Modifier: A 33-inch shoot-through umbrella is the cheapest option. A 24×36-inch softbox is a step up that gives you better control. Either works for portraits.
- Light stand: One basic light stand to mount your light and modifier. Budget stands work fine for a speedlight or small strobe.
- Trigger: A wireless radio trigger to fire your speedlight off-camera. Entry-level triggers are affordable and reliable.
- Reflector: A 5-in-1 reflector or a large sheet of white foam board from a craft store. This is your fill light.
- Background: Start with a blank wall: white, gray, or any solid color works. A 5×7-foot muslin backdrop hung from hooks or a tension rod is a step up. A full seamless paper setup with stands is the most professional option but requires more space.
This entire setup can cost less than a budget camera lens. Start here, learn the fundamentals of light placement, modifier effects, and exposure, and then add equipment as your needs grow. A second light, a larger modifier, a proper background support system, and a light meter are natural next additions as your skills develop.
Studio Lighting Tips
- Start with one light. Master single-light setups before adding complexity. One light with a modifier and reflector is all you need for professional headshots. Adding lights before you understand one-light fundamentals creates confusion.
- Use the modeling light. If your strobes have modeling lights, use them. They show you exactly where highlights and shadows will fall before you fire the flash. Walk around your subject and observe the modeling light before pressing the shutter.
- Move the light, not just the subject. Small changes in light position produce big changes in the look. Move the key light six inches higher or lower, rotate it a few degrees, and observe how the shadow pattern changes. This is how you find the perfect angle for each face.
- Control your ambient light. Close blinds and turn off room lights so that your studio strobes are the only light source. This gives you complete control and prevents mixed color temperatures.
- Watch the catchlights. The bright reflections of your light source in the subject’s eyes (catchlights) reveal your lighting setup. Good catchlights make eyes look alive. Position your key light so catchlights appear in the upper portion of the iris for the most natural look.
- Shoot tethered. Connecting your camera to a laptop lets you see images at full size immediately, making it much easier to evaluate lighting, focus, and expression during the shoot.
Frequently Asked Questions
Should I buy strobes or continuous lights for a home studio?
For still photography, strobes are generally the better choice. They offer more power, freeze motion, allow you to shoot at low ISO for maximum quality, and the modeling light feature previews your lighting. Continuous lights are better if you also shoot video or if you prefer the “what you see is what you get” simplicity of constant illumination. If you are primarily a photographer and budget is limited, a single studio strobe or speedlight with a modifier gives you the most capability for the investment.
How much space do I need for a home studio?
For headshots and half-body portraits, a space as small as 8×8 feet works, enough room for a backdrop, your subject, a light with modifier, and your camera position. For full-body portraits, you need at least 10-15 feet of depth and 8-10 feet of width. Ceiling height matters too: 8-foot ceilings work for seated and headshot work but limit your ability to use overhead lighting for standing subjects. A garage or large spare room (12×15 feet) is ideal for a versatile home studio.
What is the best modifier for portrait photography?
A medium softbox (24×36 inches or a 36-inch octabox) is the most versatile first modifier for portraits. It produces soft, flattering light with enough directionality to sculpt the face, and its output is more controllable than an umbrella. An umbrella is a close second and costs less. For beauty and headshot work specifically, a beauty dish produces a distinctive, punchy quality that many photographers prefer. Start with a softbox, learn how light placement affects the result, and add other modifiers as you discover your preferred aesthetic.
Do I need a light meter for studio photography?
A dedicated light meter is not strictly necessary: you can judge exposure from test shots and the camera’s histogram. However, a light meter is a valuable tool that speeds up your workflow and removes guesswork. It lets you measure the exact brightness of each light at the subject position, set precise lighting ratios, and dial in your exposure without trial and error. If you shoot studio work regularly, especially commercial or client work where consistency matters, a light meter pays for itself in saved time and more reliable results.
Can I use natural window light as part of a studio setup?
Absolutely. Many portrait photographers use a large window as their key light and add a reflector or a single studio light for fill or rim light. The challenge is that window light changes intensity and color throughout the day, so your exposure settings will need to adjust as you shoot. For the most control, either work during consistent lighting conditions (overcast days, north-facing windows) or use blackout curtains on the windows and rely entirely on your studio lights. Mixing window light with flash requires matching the color temperature, a CTO gel on the flash warms it to match late-afternoon window light.
Continue Learning
Studio lighting is a craft that improves with every session. Expand your studio skills with these related guides: