Crystal ball photography, sometimes called lensball photography, places a glass sphere between your camera and the world. The sphere acts like a wide-angle lens, refracting light to create an inverted, circular image of the scene inside its transparent surface. The result is a sharp, detailed miniature world floating against a naturally blurred background. It is one of the most accessible creative techniques in photography, requiring no special camera or lens, just a glass ball and some imagination.
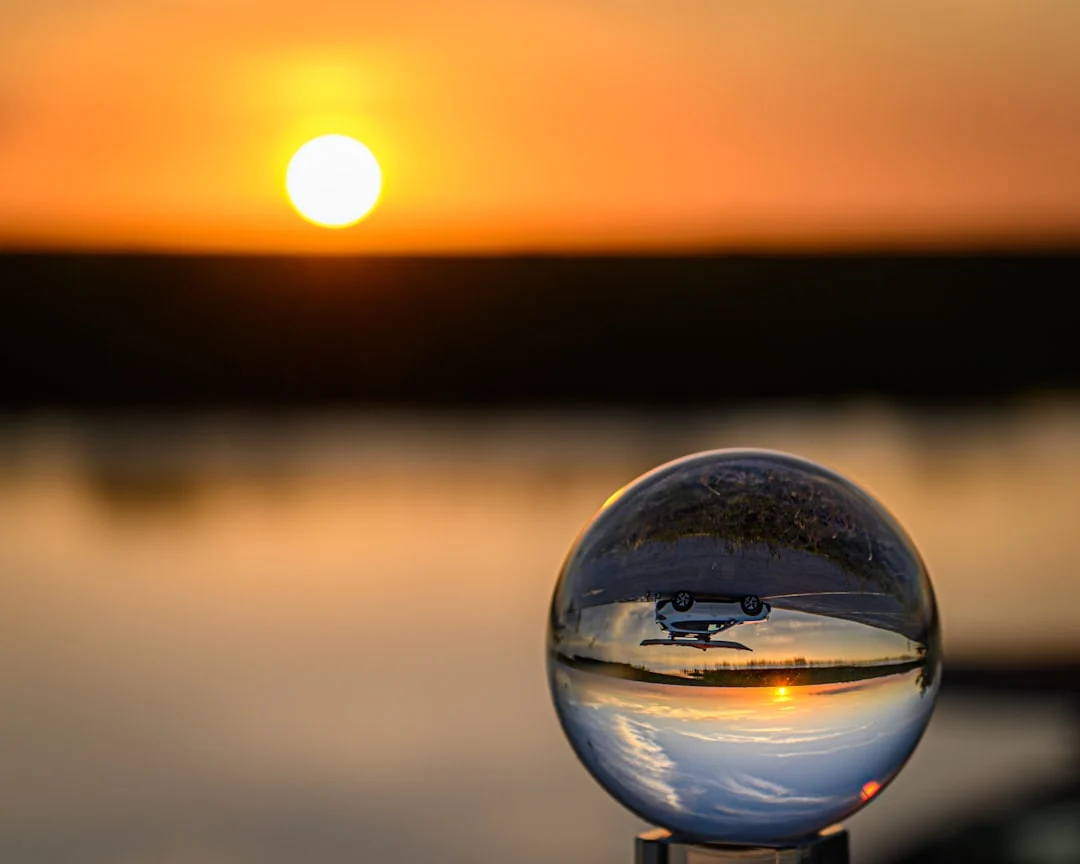
The technique works because a sphere of clear glass bends light through refraction, focusing the scene behind it into a condensed, inverted image visible from the front. It is the same principle that makes a water droplet magnify text on a page, but scaled up to create full compositions. The interplay between the sharp refracted image inside the ball and the Bokeh of the background creates a visual contrast that draws the viewer’s eye.
This guide covers everything from choosing the right ball to mastering camera settings, composing compelling shots, and keeping both you and your equipment safe.
Choosing the Right Crystal Ball
Not all glass spheres are created equal. Here is what to consider.
Size
Crystal balls for photography typically range from 60mm to 110mm in diameter. Smaller balls (60-80mm) are lighter, more portable, and easier to hold in one hand while shooting. Larger balls (80-110mm) produce a bigger refracted image with more detail, but they are heavier and harder to balance on surfaces.
| Size | Weight (approx) | Best For |
|---|---|---|
| 60mm | 300g | Travel, handheld shots, portability |
| 80mm | 700g | Best all-around balance of image size and portability |
| 100mm | 1.3kg | Maximum detail, stationary setups |
| 110mm | 1.8kg | Studio use, placed on surfaces (too heavy for comfortable handheld use) |
Clarity and material
Look for K9 optical crystal glass, which is the standard for photography lensballs. It offers excellent clarity with minimal internal imperfections. Avoid decorative glass balls, colored glass, or acrylic, which introduce unwanted distortion, color casts, or cloudiness.
Inspect the ball for bubbles, scratches, and inclusions. Small internal bubbles are common in cheaper balls and will appear as dark spots in your refracted image.
How Refraction Creates the Image
When light passes from air into glass, it slows down and bends. A sphere bends light from all directions toward a focal point, just like a lens. The scene behind the ball (from the camera’s perspective) is focused into a small, inverted image visible on the near side of the ball.
The image inside the ball is always upside-down. This is identical to how a simple convex lens inverts an image, and it is the same principle your camera lens uses (your camera’s sensor actually receives an inverted image that the camera flips). You can rotate the final photo 180 degrees in post-processing if you want the ball’s interior image right-side-up, but many photographers leave it inverted as part of the aesthetic.
Composition Techniques
Composition in crystal ball photography follows many of the same principles as general Photography Composition, but with unique considerations.
- Center the ball, off-center the scene. Place the ball at the center or along the Rule Of Thirds gridlines. The refracted image naturally draws the eye, so it can hold the center without feeling static.
- Use strong backgrounds. Scenes with bold colors, clear shapes, or dramatic Leading Lines look best inside the ball. Busy, chaotic backgrounds produce a cluttered, unreadable refracted image.
- Get close to the ball. Fill a significant portion of the frame with the ball. This makes the refracted image large enough to see clearly and maximizes the contrast between the sharp ball interior and the blurred background.
- Consider the foreground surface. The surface the ball sits on becomes part of the composition. Textured surfaces (wood grain, stone, sand, moss) add visual interest. Plain, dark surfaces keep the focus on the ball.
- Frame within a frame. The circular ball naturally creates a frame-within-a-frame composition. Use this intentionally by placing compelling subjects inside the ball’s boundary.
- Incorporate hands. Holding the ball in your hand adds a human element and creates the impression of ‘holding the world.’ It also solves the problem of finding a surface to place the ball on.
Camera Settings for Crystal Ball Photography
Getting the right settings is essential for sharp, compelling crystal ball images.
- Aperture: f/2.8 to f/4. A wide Aperture blurs the background while keeping the ball and its interior image sharp. This contrast is central to the technique’s appeal. Going wider than f/2.8 may cause the edges of the ball to fall out of focus.
- Focal length: 50-100mm. A moderate telephoto Focal Length compresses the background, fills the frame with the ball, and provides comfortable working distance. A 50mm or 85mm prime lens is ideal.
- Focus: on the ball’s interior image. Use single-point autofocus or manual focus to lock onto the refracted image inside the ball, not the ball’s surface. The focus distance is typically the center of the ball.
- ISO: as low as practical. Crystal ball shots benefit from clean, smooth Bokeh in the background, which Noise would disrupt. Keep Iso at 100 to 400 when possible.
- Minimum focus distance matters. You need to get close to the ball, so a lens with a short minimum focus distance is helpful. If your lens cannot focus close enough, step back and crop, or use Macro Photography extension tubes.
Backgrounds That Work Best
The background is just as important as the ball itself. Here are scenes that produce strong crystal ball images.
- Sunsets and sunrises. The warm colors of Golden Hour Photography look stunning when condensed into the ball. The sky gradients create a natural color palette.
- City skylines. Building silhouettes and city lights produce detailed, interesting refracted images.
- Flowers and gardens. Colorful blooms create vibrant, painterly effects inside the ball.
- Beaches and coastlines. The contrast between sky, water, and sand gives the refracted image clear structure.
- Autumn foliage. Rich reds, oranges, and yellows are intensified by the ball’s refraction.
- Architectural details. Arches, columns, and symmetrical buildings work well because the ball adds a surreal quality to familiar structures.
- Night lights. City lights, string lights, or candles create gorgeous Bokeh in the background while appearing as sharp points inside the ball. See Night Photography for related techniques.
Safety: The Fire Risk
This is not optional reading. A crystal ball is a magnifying glass, and in direct sunlight it focuses solar energy into a concentrated point that can reach temperatures high enough to ignite paper, fabric, leaves, and skin within seconds.
- Never leave a crystal ball unattended in sunlight. Even briefly turning away to adjust your camera while the ball sits on a surface in direct sun can cause scorching.
- Store it in a padded, opaque pouch. When not actively shooting, keep the ball covered. A clear ball in a backpack near a window is a fire hazard.
- Be aware of the focal point. When handling the ball in sunlight, keep your fingers away from the focal point on the opposite side. It can cause a painful burn instantly.
- Avoid setting it on flammable surfaces in sunlight. Dry grass, leaves, paper, and fabric can all ignite. Use a metal or stone surface if you must set it down in sun.
- Cloudy days eliminate the risk. Diffused light cannot be focused to dangerous temperatures. Overcast conditions are safe for crystal ball photography.
Cleaning and Care
Fingerprints, dust, and smudges on the ball’s surface appear as soft blemishes in your images. Keep your ball clean for the sharpest results.
- Use a microfiber cloth to wipe the surface before each shoot.
- For stubborn smudges, use lens cleaning solution (the same type you use for camera lenses).
- Handle the ball by its edges or wear thin cotton gloves to minimize fingerprints.
- Store in a soft padded pouch to prevent scratches.
- Avoid extreme temperature changes. Moving a cold glass ball into warm humid air causes condensation that takes time to clear.
Creative Variations and Advanced Techniques
Once you master the basics of crystal ball photography, try these more advanced approaches to push the technique further.
- Multiple crystal balls. Arrange two or three balls at different distances from the camera. Each captures a slightly different view of the scene. A wide Depth Of Field (f/8 to f/11) keeps all balls sharp.
- Crystal ball in motion. Throw a crystal ball gently into the air and capture it mid-flight using a fast Shutter Speed (1/1000 or faster) in burst mode. The airborne ball against a blurred background creates a striking, dynamic image. Use a soft surface to catch it.
- Underwater crystal ball. Place the ball partially submerged at the edge of a stream, pool, or ocean. The water distorts the lower portion while the aerial portion refracts normally, creating a split-world effect.
- Light trails through the ball. During Long Exposure Photography at night, capture car light trails or moving lights through the crystal ball. The refracted light trails create circular, swirling patterns inside the sphere.
- Macro details. Use Macro Photography techniques to photograph tiny details inside the ball. Insects, flowers, or textures visible in the refracted image take on an otherworldly quality when magnified.
Crystal Ball Photography Across Genres
Crystal ball images fit naturally into several photography genres. Use the ball during Landscape Photography to add a foreground anchor to wide vistas. Bring it into Street Photography sessions to capture city life in a sphere, adding an abstract quality to documentary scenes. For Portrait Photography sessions, have your subject hold the ball, creating a double portrait, one in the real world and one refracted.
The crystal ball also works beautifully with Natural Light Photography. Backlighting the ball with the sun creates a glowing orb effect. Side-lighting it during golden hour produces warm, directional illumination on the sphere’s surface while the refracted image captures the full scene. Experiment with different Photography Lighting conditions to discover which light quality produces your favorite results.
Common Mistakes
- Shooting too far from the ball. If the ball is small in the frame, the refracted image is too tiny to appreciate. Get close and fill a good portion of the frame with the ball.
- Focusing on the ball’s surface instead of the interior image. The surface of the ball is not the subject. Focus on the scene refracted inside. Use manual focus if your autofocus keeps locking onto the surface or the background.
- Using too small an aperture. Shooting at f/8 or f/11 brings the background into sharper focus, which weakens the ball-against-blur contrast that makes this technique compelling.
- Ignoring the background. A cluttered or boring background produces a cluttered or boring refracted image. Scout your background as carefully as you would for any Photography Composition.
- Placing the ball on an unstable surface. A rolling ball on a hard surface is a broken ball. Use a small rubber ring, silicone stand, or nest the ball in sand or fabric for stability.
- Forgetting about the sun safety issue. Take the fire hazard seriously. One moment of carelessness can cause a burn or start a fire.
Try This: Practical Exercises
- Sunset in a sphere. During Golden Hour Photography, place your crystal ball on a surface facing the setting sun. Shoot with an 85mm lens at f/2.8 to f/4. Experiment with positioning the ball so the sun appears inside it.
- Handheld portrait twist. Hold the ball in one hand at arm’s length with a friend standing behind it, about 10 to 15 feet away. Focus on the ball so your friend appears sharp and inverted inside while the real background goes soft.
- Night lights exercise. Place the ball in front of city lights or holiday string lights. Shoot wide open (f/1.8 to f/2.8) so the background lights become large, colorful Bokeh circles while the refracted image stays sharp.
- Seasons contrast. Shoot the same scene through the crystal ball in different seasons or weather conditions. Autumn foliage, winter snow, spring flowers, and summer sun all produce dramatically different refracted images.
Frequently Asked Questions
What size crystal ball should I buy first?
An 80mm ball is the best starting point. It is large enough to produce a detailed refracted image, small enough to carry comfortably, and light enough to hold in one hand. If you find you love the technique, consider adding a larger ball for stationary setups later.
Can I use a crystal ball with a phone camera?
Yes. Phone cameras work well because their wide depth of field at close distances keeps the ball sharp while still blurring the background somewhat. The main limitation is getting close enough to fill the frame with the ball while maintaining focus.
How do I flip the image right-side-up?
Rotate the entire image 180 degrees in your editing software. This flips the refracted image right-side-up but inverts the background. Many photographers choose to leave the image as-shot, embracing the inverted world as part of the aesthetic.
Why is the image inside the ball blurry?
You are likely focusing on the ball’s surface rather than the scene inside. Switch to manual focus and focus on the details visible within the ball. The focus point is roughly at the center of the ball’s volume. Also, ensure your lens can focus close enough. If you are at your lens’s minimum focus distance and it is still soft, step back slightly.
Is acrylic cheaper and safer? Can I use that instead?
Acrylic balls are lighter, cheaper, and will not shatter if dropped. However, they scratch much more easily than glass, and scratches degrade image quality quickly. Acrylic also has slightly different optical properties that can produce lower contrast and more flare. For serious crystal ball photography, K9 optical glass is worth the investment.
Can I use a crystal ball for video?
Absolutely. Crystal ball video introduces motion and time into the refracted image. Timelapses through a crystal ball, slowly rotating the ball during a shot, or moving the ball through a scene are all compelling video techniques.
What is the best time of day for crystal ball photography?
The Golden Hour Photography periods around sunrise and sunset produce the most dramatic crystal ball images. The low, warm light creates rich colors inside the sphere, and the long shadows add dimension to the scene. Overcast days work well too, producing soft, even illumination without the fire safety risk of direct sunlight. Midday is the least forgiving time because direct overhead sun creates harsh shadows and maximizes the fire hazard from the ball acting as a magnifying glass.
How do I shoot a crystal ball in the rain?
Rain creates beautiful effects with crystal balls. Water droplets on the ball’s surface add texture, and wet surfaces beneath the ball provide additional reflections. Use a lens hood and keep a microfiber cloth handy to wipe the front of your lens. The ball itself handles water fine since it is solid glass. The diffused light on overcast rainy days eliminates the fire risk entirely, making rain a surprisingly good time for crystal ball photography. Consider bringing a small towel to dry the ball between shots for cleaner refracted images. After the rain stops, the wet ground and lingering clouds create dramatic reflections and moody skies that are enhanced even further when viewed through the refracting sphere.