Flat lay photography is the art of arranging objects on a flat surface and photographing them from directly above. This overhead perspective transforms everyday items into graphic compositions, making it one of the most popular styles for product shots, food imagery, fashion accessories, and social media content. The appeal lies in its simplicity: you control every element in the frame, from placement to color to spacing.
What Makes a Good Flat Lay
A successful flat lay combines deliberate arrangement with clean visual design. Unlike candid or environmental photography, nothing in a flat lay is accidental. You choose every item, every angle, every gap. The best flat lays feel effortless, but that ease comes from careful planning. Strong flat lays share a few traits: a cohesive color palette, a clear focal point, intentional use of negative space, and objects that tell a story or evoke a mood.
Camera Setup for Overhead Shots
The defining feature of flat lay photography is the camera angle: perfectly perpendicular to the surface. Any tilt creates perspective distortion, making objects look uneven or skewed. There are several ways to achieve a true overhead angle.
A tripod with a horizontal center column or a boom arm is the most reliable setup. Many tripods allow you to rotate the center column to extend horizontally over the surface, pointing the camera straight down. Some photographers use a copy stand or a ceiling-mounted rail system for repeatable positioning.
If you do not have a horizontal arm, you can shoot handheld by standing on a step stool or chair and holding the camera parallel to the table. This is less precise but works for casual shots. Enable your camera’s grid overlay or electronic level to confirm the angle. Even a slight tilt will be visible in the final image, especially with rectangular objects like books or phones.
Use a moderate focal length between 35mm and 50mm (on a full-frame camera) to minimize distortion at the edges. Wider lenses stretch objects near the frame borders. A 50mm lens at a reasonable height captures a typical tabletop scene with natural-looking proportions.
Lighting for Flat Lays
Lighting can make or break a flat lay. Natural window light is the most accessible and often the most flattering option. Position your surface next to a large window so soft, diffused light falls evenly across the arrangement. Overcast days produce the most even illumination. Direct sunlight creates harsh shadows that can overpower the composition.
Place a white reflector or a piece of white foam board on the side opposite the window to fill shadows. This reduces contrast and ensures objects on both sides of the frame are evenly lit. If shadows are still too strong, hang a sheer white curtain or tape a sheet of diffusion material over the window to soften the light further.
Avoid overhead room lighting. Ceiling fixtures create a flat, unflattering wash of light and often have a different color temperature than daylight. Mixing light sources produces color casts that are difficult to correct. Turn off indoor lights and rely solely on your primary light source for clean, consistent color.
For artificial lighting, a single large softbox positioned to one side at a 45-degree angle simulates window light effectively. The larger the light source relative to the scene, the softer the shadows. A second fill light or reflector on the opposite side balances the illumination.
Choosing Backgrounds
The background surface sets the visual tone for the entire image. It should complement your subjects without competing for attention. Common choices include:
- Wood surfaces. Warm, textured, and versatile. Light wood reads as bright and modern; dark wood feels rich and moody.
- Marble or stone. Clean and elegant, ideal for beauty products, jewelry, or food. Real marble slabs or printed vinyl sheets both work.
- Solid colored paper or poster board. Simple, affordable, and easy to swap. White, grey, and black are classic choices for minimalist compositions.
- Fabric and linen. Adds texture and softness. Wrinkled linen creates a casual, organic feel, while smooth fabric is more polished.
- Concrete or plaster. Gives an industrial, raw look. Textured surfaces add visual interest to otherwise simple arrangements.
Invest in a few portable background boards or large tiles that you can swap depending on the mood of the shoot. Keep backgrounds clean and free of stains, scratches, or distracting marks.
Styling and Arrangement
Arrangement is the core creative skill in flat lay photography. The goal is to create a composition that guides the viewer’s eye through the frame while maintaining balance and visual interest. Several layout approaches work well.
Grid layout. Objects are aligned in rows and columns with even spacing. This creates order and symmetry, making it ideal for collections, product lines, or knolling (the practice of arranging related objects at right angles). Grid layouts feel organized and satisfying.
Diagonal layout. Arranging items along diagonal lines adds energy and movement. Place the main subject off-center and let supporting items flow diagonally across the frame. Diagonals naturally draw the eye and feel more dynamic than straight lines.
Circular or radial layout. Position items radiating outward from a central focal point. This works well when one object is the clear star and everything else supports it. The circular flow keeps the viewer’s eye moving within the frame.
Scattered or organic layout. Items are placed loosely, as if casually dropped onto the surface. Despite the appearance, effective scattered layouts still follow compositional principles. Vary the spacing, overlap some elements, and leave breathing room around key items. This approach feels natural and relaxed.
Color Theory and Palette
Color is one of the strongest tools in flat lay styling. A cohesive color palette unifies the composition and gives the image a polished, intentional look. Before arranging anything, decide on a palette: monochromatic (variations of one hue), complementary (opposite colors on the color wheel), or analogous (neighboring colors).
Limit your palette to two or three main colors plus a neutral. Too many colors create visual chaos. If your main subject is colorful, keep the background and props neutral. If the background is bold, choose simpler objects. Use color to direct attention: the eye is drawn to the brightest or most saturated element first, so make sure that element is your focal point.
Props and Negative Space
Props add context, tell a story, and fill the frame with visual interest. Choose props that relate to your subject: coffee and a notebook alongside a book, brushes and swatches near a makeup palette, herbs and utensils around a dish of food. Props should support the narrative without overwhelming the hero item.
Equally important is negative space, the empty areas between and around objects. Negative space gives the composition room to breathe and prevents the frame from feeling cluttered. It also provides space for text overlays if the image will be used in marketing or social media. A common mistake is filling every inch of the frame. Resist the urge. Strategic emptiness is a powerful compositional tool.
Flat Lays by Genre
Product photography. Product flat lays need to showcase items clearly. Use a clean background, even lighting with minimal shadows, and arrange products with enough space to see each one distinctly. Include lifestyle props to suggest how the product is used, but keep the focus on the item being sold.
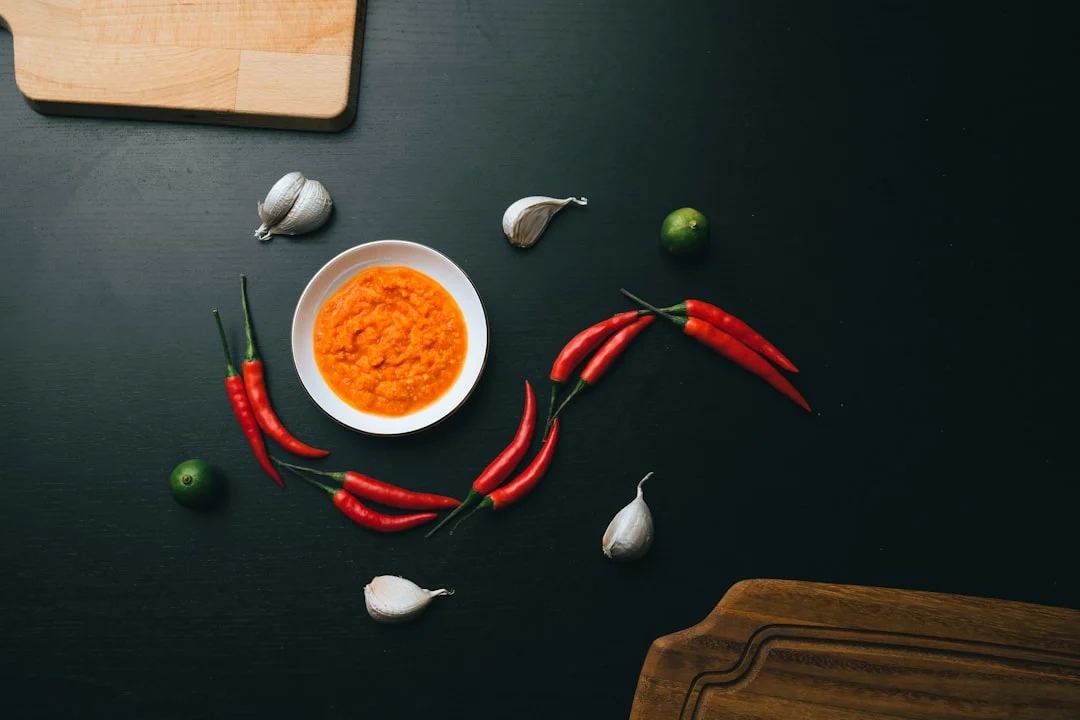
Food photography. Food flat lays benefit from natural textures and warm tones. Include ingredients, utensils, napkins, and cutting boards to create a scene. Shoot quickly, as food changes appearance under lights. Fresh herbs, scattered spices, and drizzled sauces add life and movement.
Fashion and accessories. Lay out outfits or accessory collections on a neutral surface. Fold garments neatly or arrange them as if worn (the “ghost mannequin” flat lay). Shoes, bags, watches, and sunglasses photograph beautifully in overhead arrangements.
Social media content. Flat lays for social feeds prioritize visual impact at small sizes. Use bold colors, simple arrangements, and strong focal points. Keep compositions tight and uncluttered so the image reads clearly on a phone screen.
Editing Flat Lay Photos
Post-processing for flat lays is usually straightforward. Start with lens correction to fix any barrel distortion and ensure straight lines stay straight. Adjust white balance to keep your background and colors accurate. Boost clarity or texture slightly to enhance the surface details that make flat lays tactile and appealing.
Clean up distractions with the clone or healing tool: crumbs, dust, smudges, or wrinkles in fabric. Even small imperfections stand out in overhead shots because the viewer can see the entire surface at once. Crop to straighten the frame if the camera was slightly tilted. Finally, apply consistent editing across a series of flat lays to maintain a cohesive visual style, especially if the images will appear together on a feed or product page.