Still life photography is the art of arranging and photographing inanimate objects to create a visually compelling image. It is one of the oldest photographic genres, rooted in centuries of still life painting, and remains one of the most controllable and rewarding forms of photography. You choose every element: the objects, their arrangement, the background, the light, and the mood.
Whether you photograph a bowl of fruit on your kitchen table, a collection of vintage objects, or a carefully styled commercial arrangement, the same principles of composition and lighting apply. This guide covers the essential techniques for creating still life images that engage viewers and showcase your creative vision.
Choosing and Arranging Your Subjects
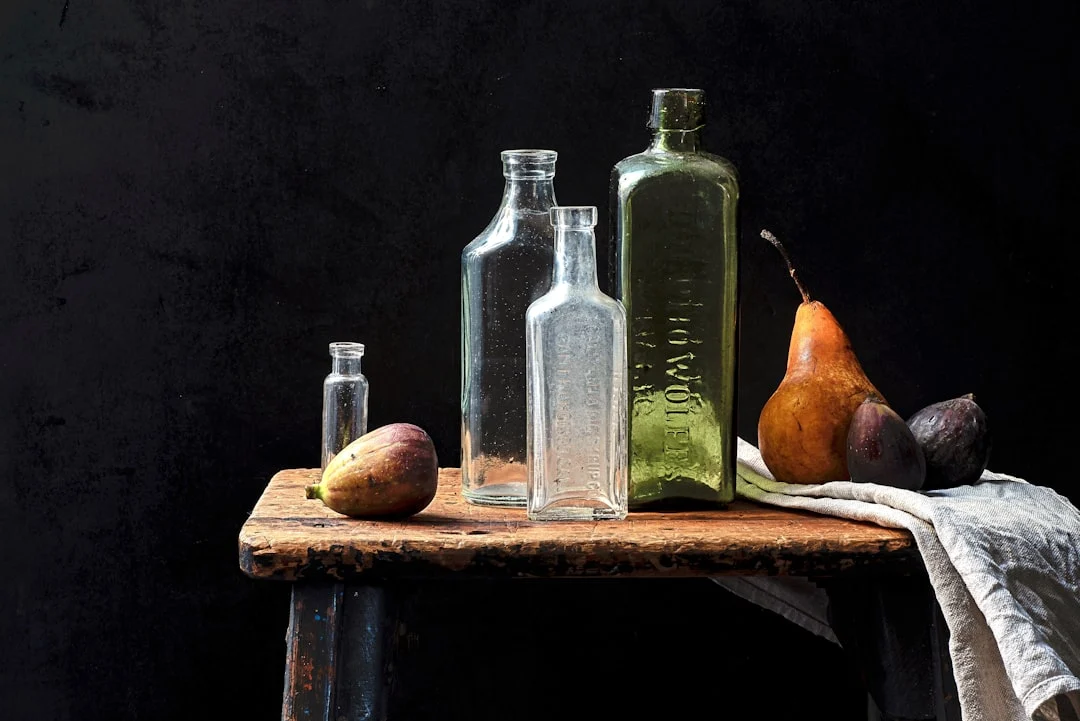
The subjects in a still life can be anything: food, flowers, books, tools, fabrics, personal objects, natural items, or any combination. The most effective still life arrangements share a visual or thematic connection between the objects. A collection of old clocks suggests time. A pile of autumn leaves with a warm drink suggests comfort and season.
Start with an anchor object, the largest or most visually dominant item, and build around it. Add supporting objects that complement the anchor in size, color, or theme. Odd numbers (3 or 5 objects) tend to create more dynamic arrangements than even numbers.
Spend time arranging before you pick up the camera. Move objects a few millimeters at a time, checking how each adjustment affects the relationships between elements. The difference between a good and great still life is often a matter of tiny positional adjustments that create better flow, balance, or tension.
Composition Techniques
The rule of thirds applies to still life, but so do several other principles that are especially important in controlled arrangements.
Leading lines guide the viewer’s eye through the arrangement. The edge of a table, the handle of a spoon, or the stem of a flower can all serve as lines that direct attention. Arrange these lines intentionally.
Negative space, the empty area around your objects, is a powerful compositional tool in still life. Generous negative space creates a clean, minimalist feel and gives each object room to breathe. Tight compositions with little negative space create intimacy and abundance.
Overlapping objects creates depth. When one item partially obscures another, it tells the viewer that the scene has three-dimensional space. Without overlap, objects can look like they are floating independently rather than existing together in a shared space.
Consider your shooting angle. Top-down (overhead) shots work well for flat lay arrangements. A 45-degree angle is the most natural viewing perspective. A low, eye-level angle creates intimacy and emphasizes height differences between objects.
Lighting Setups for Still Life
Window light is the most accessible and beautiful light for still life. Place your setup near a large window and position the objects so the light falls from the side. Side lighting creates shadows that add depth and reveal texture. A white reflector on the opposite side fills the shadows gently without eliminating them.
One-light setup. A single studio light or speedlight with a softbox or umbrella creates a clean, directional light that you can control precisely. Position it at 45 degrees to the side and slightly above the arrangement. Add a reflector on the shadow side if the contrast is too strong.
Two-light setup. Add a second light behind or to the side of the arrangement to create a rim light (edge highlight) that separates objects from the background. Keep the rim light less intense than the main light so it accents rather than dominates.
Diffused light (through softboxes, scrims, or frosted glass) works best for most still life subjects. Hard, direct light creates harsh shadows that can be distracting with multiple objects, though it works well for dramatic, high-contrast single-object compositions.
Background and Surface Selection
The background and surface are part of the composition, not just a backdrop. They set the mood, complement (or contrast with) the objects, and define the visual style of the image.
Wooden surfaces add warmth and texture. Marble and stone suggest luxury and coolness. Fabric creates softness and can introduce color. Dark backgrounds create drama and make objects pop. White or light backgrounds feel clean and modern.
You do not need expensive backdrops. A piece of poster board, a wooden cutting board, a fabric remnant, or a painted sheet of plywood all work well. Build a small collection of surfaces and backgrounds in different colors and textures, and you will be equipped for a wide range of still life work.
Color Palettes and Mood
Color relationships in still life are entirely within your control. Choosing a deliberate color palette elevates a still life from a random arrangement to a designed image.
Monochromatic palettes (variations of one color) create elegant, sophisticated images. A still life in shades of blue, from navy objects on a pale blue surface, creates a cohesive, gallery-quality feel.
Complementary palettes (opposite colors, like orange and blue or red and green) create vibrant contrast and energy. Use one color as dominant and the other as an accent for balance.
Neutral palettes (whites, creams, grays, natural wood) create a timeless, editorial aesthetic. This style depends on texture and shape rather than color for visual interest.
Camera Settings
Because your subjects are stationary, you can use any shutter speed (with a tripod) and optimize for image quality. Use your lens’s sharpest aperture, typically f/8 to f/11, and the lowest ISO (100 or 200) for maximum detail and minimal noise.
For images where every object needs to be sharp, use f/8 to f/16 and focus about one-third into the arrangement. For images where you want a single object in sharp focus with the rest gently blurred, open to f/2.8 to f/4 and focus precisely on your hero object.
Use a cable release or self-timer to avoid camera shake, especially at the slower shutter speeds that come with small apertures and low ISO.
Styling and Props
Styling is what separates a snapshot of objects from a composed still life. Small details make a significant difference: a strategically crumpled napkin, water droplets spritzed on fruit, a slightly open book, or crumbs scattered near bread.
These details add life and narrative to the scene. They suggest that someone was just there, or that the moment is real and unposed. The paradox of good styling is that it looks effortless while being carefully planned.
Build a props collection over time. Vintage kitchenware, textured fabrics, dried flowers, old books, candles, and rustic utensils are all versatile still life props. Thrift stores and flea markets are excellent sources for interesting, affordable objects.
Common Mistakes
Overcrowding the frame. More objects do not equal a better still life. A cluttered arrangement with too many competing elements overwhelms the viewer. Start simple and add objects only if they contribute to the composition.
Ignoring the background. A beautiful arrangement photographed against a cluttered kitchen counter loses its impact. Always control the background. Even a simple piece of poster board behind the arrangement creates a clean backdrop.
Using direct flash. On-camera flash creates flat, harsh lighting that kills the mood and texture of a still life. Use natural window light or off-camera light with diffusion for softer, more dimensional results.
Not spending enough time on arrangement. The arranging process is the creative core of still life photography. Rushing through it and focusing only on camera settings produces technically correct but visually uninteresting images.
Frequently Asked Questions
What is the difference between still life and product photography?
Product photography aims to show a product clearly and attractively for commercial purposes. Still life photography is an artistic genre focused on composition, mood, and creative expression. The techniques overlap significantly, but the intent differs. Product shots serve a product, while still life serves an artistic vision.
Do I need a studio for still life photography?
No. A table near a window in any room works perfectly. Many accomplished still life photographers work exclusively with natural light and simple, portable setups. A small table, a few backgrounds, and a window are enough to create professional-quality still life images.
What lens is best for still life photography?
A 50mm or 85mm prime lens works well for most still life work. These focal lengths provide a natural perspective without distortion. A macro lens is useful if you frequently photograph small objects or want extreme detail. Zoom lenses in the 24-70mm or 70-200mm range offer versatility for different compositions and distances.