AE lock (auto exposure lock) freezes the exposure the camera has just metered so it does not change when you reframe. Point the camera at the tone you want exposed correctly, press the button marked AE-L, AEL or with a star symbol, recompose, and shoot. It works in program, aperture priority and shutter priority modes, and it is the fastest fix for backlit subjects, sunsets and any scene where the meter reads the wrong part of the frame.
This guide covers the exposure half of a button that back button focus covers from the focus side, and it picks up where camera metering modes leaves off: once you know what the meter reads, AE lock lets you decide where it reads from. You will find how the button is labeled, the three ways it can behave, a step by step method, target tones for spot metering, and how it compares with exposure compensation and manual mode.
What AE lock does
In any automatic exposure mode the meter runs continuously. Swing the camera from a bright sky to a dark doorway and the shutter speed, aperture or ISO changes as you move. That is usually what you want. It becomes a problem when the framing you want is not the framing that gives the right reading.
The classic case is a person standing in front of a bright window. Framed as you want it, most of the picture is window, so the meter sets an exposure for the window and the face comes out nearly black. Step close so the face fills the frame, and the meter gives a reading that suits the face. AE lock lets you keep that second reading while you step back to the first framing.
Two details are worth knowing:
- It stores a brightness level, not a fixed pair of numbers. On most cameras you can still turn the dial after locking. In aperture priority, changing from f/4 to f/8 makes the camera lengthen the shutter time by two stops, so the picture stays exactly as bright as the locked reading.
- It only affects what the camera is automating. In fully manual exposure with a fixed ISO there is nothing to lock, because nothing is changing by itself. In manual with Auto ISO, most cameras use AE lock to hold the ISO.
While the lock is active, an indicator shows in the viewfinder or on the screen: usually a star, or the letters AE-L or AEL.
Where the button is and how it behaves
The button sits on the back of the camera where your right thumb rests. The label depends on the maker:
| Label on the button | What it does by default |
|---|---|
| AE-L or AEL | Locks exposure only |
| AE-L / AF-L | Locks exposure and focus together while held; a menu setting lets you choose exposure only or focus only |
| A star or asterisk symbol | Locks exposure; with a flash switched on, the same button often performs flash exposure lock instead |
| No dedicated button | The function exists in the custom button menu and can be assigned to a programmable button |
On phones the equivalent is a long press on the screen, which locks exposure and focus at the point you touched until you tap elsewhere. The guide to smartphone photography covers that version.
Hold, toggle or timed
Pressing the button does one of three things, and you need to know which your camera does or the lock will seem unreliable.
- Hold. The exposure stays locked only while your thumb is on the button. Let go and metering resumes. This is safe, because you cannot forget it, but awkward for more than a frame or two.
- Toggle. Press once to lock, press again to release. The lock survives several frames, which is what you want for a sequence. Some cameras offer a variant that releases by itself after one picture.
- Timed. Press once and the lock lasts as long as the meter stays awake, typically a few seconds, and is renewed for as long as you keep the shutter button half pressed.
Most cameras let you choose between hold and toggle in the custom controls menu. Whichever you pick, the lock is cancelled when the camera goes to sleep or is switched off. Test yours once: lock on something bright, point at something dark, and watch whether the settings change when you lift your thumb.
What a half press of the shutter button already locks
You may have been using a form of exposure lock without knowing it. A half press always starts the meter. Whether it also freezes the reading depends on the camera and its settings:
- On many cameras, a half press in single-shot autofocus locks exposure at the moment focus is confirmed, at least in the default multi-segment metering pattern.
- On others, a half press locks focus only and the exposure keeps updating until the instant the picture is taken, unless you switch on a menu option that adds exposure lock to the shutter button.
- In continuous autofocus, a half press generally locks neither.
This explains a common puzzle: two cameras used for the same focus and recompose move can give differently exposed pictures. The dedicated AE lock button removes the doubt, because it does the same thing regardless of focus mode.
Meter, lock, recompose: the method step by step
- Choose a narrow metering pattern. Center-weighted or spot metering reads a known area. Multi-segment metering can be used too, but only if you fill the whole frame with the tone you are metering.
- Aim at the tone that matters. For a backlit person, fill the frame with the face or with clothing of medium brightness. For a sunset, aim at the sky beside the sun with the sun itself just outside the frame.
- Press AE lock and check that the indicator appears.
- Recompose and focus. Focus is a separate step: the half press now sets focus on the new framing without touching the stored exposure.
- Shoot, then check. Look at the histogram and the highlight warning. If the result is close but not right, add a little exposure compensation and repeat. On most cameras compensation still applies on top of a locked reading.
- Release the lock if your camera uses a toggle.
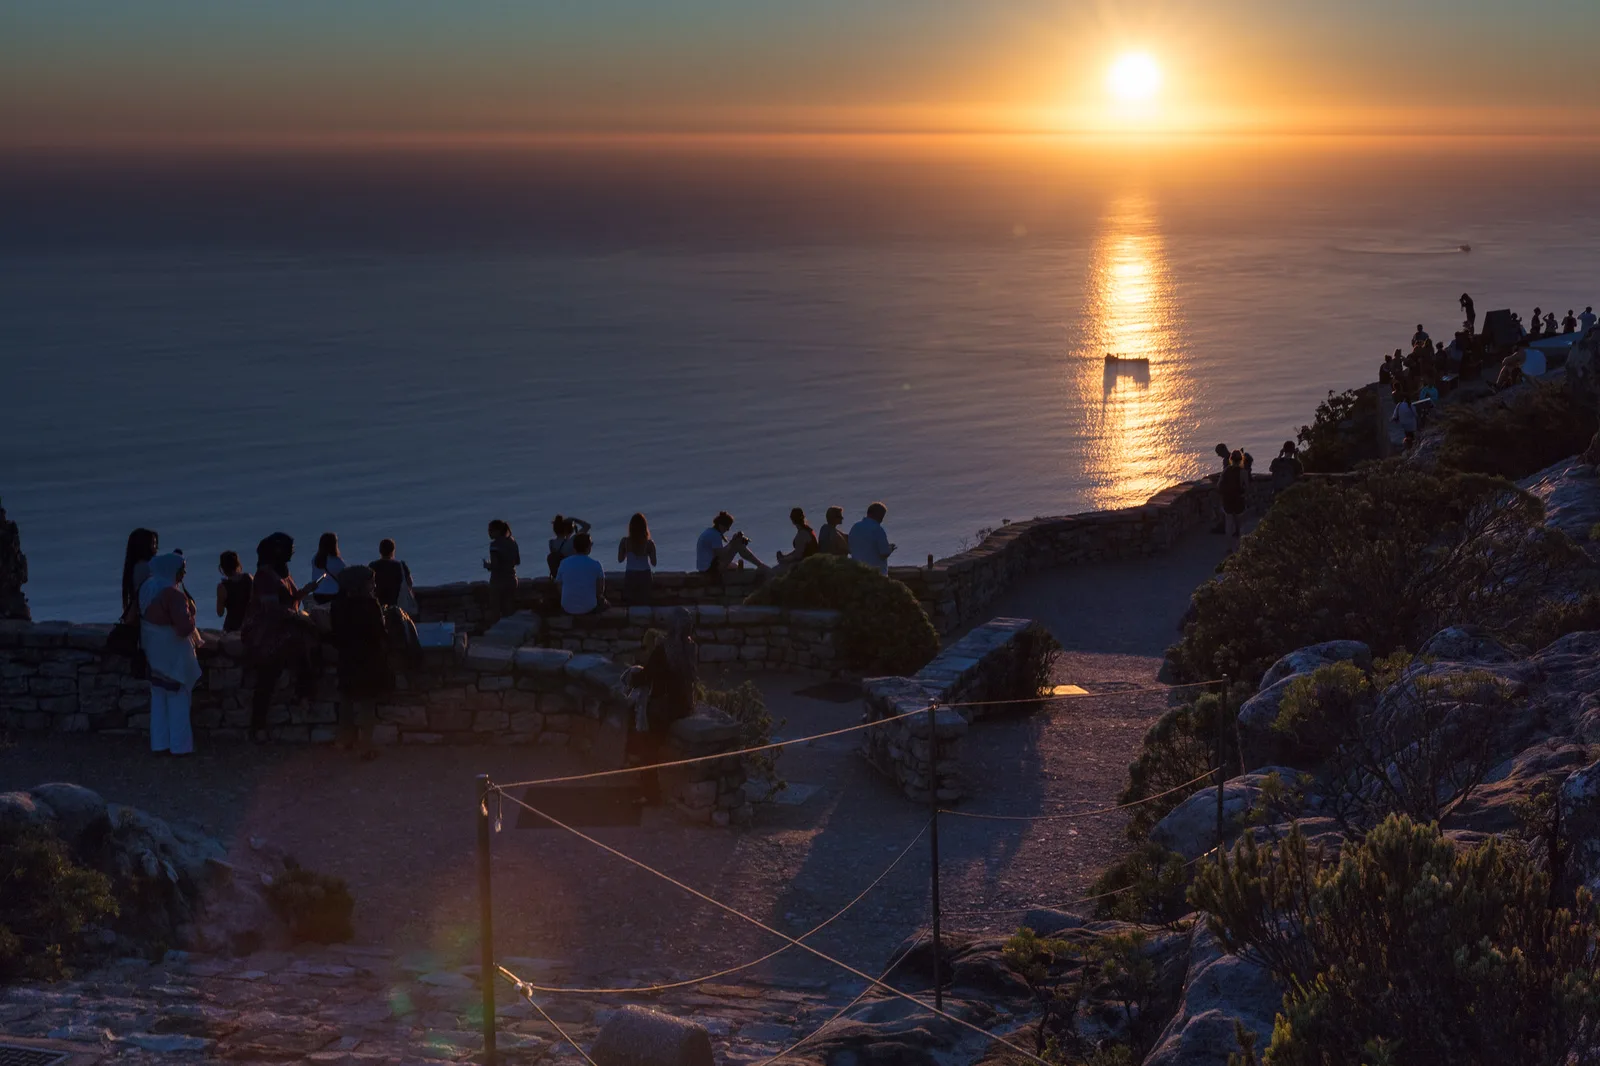
A frame like the one above has three possible exposures. Meter with the sun in the middle and the camera darkens everything to tame the sun, leaving a small orange disc in a black frame. Meter from the shaded rocks and the people become clear but the sky burns out to white. Meter from the sky a little to one side of the sun, lock, and swing back, and you get what is shown: color in the sky, a readable glow on the water, and a foreground that is dim but not empty.
Which way to lock for common scenes
| Scene | Where to take the reading | What you get |
|---|---|---|
| Person in front of a window or bright sky | The face, filling the frame | A correctly exposed face; the background goes very bright or white |
| Sunset or sunrise sky | Sky beside the sun, sun excluded | Saturated sky color; foreground dark |
| Deliberate silhouette | The brightest part of the background | A black subject with a clean outline |
| Performer in a spotlight on a dark stage | The lit performer, with spot metering | Skin and costume hold detail; the stage stays black |
| Interior with a bright window in view | A wall away from the window | A natural-looking room; the window overexposes |
| Small light subject on a large dark background | The subject, filling the frame or spot metered | Detail in the subject instead of a burned-out patch |
Notice that every row involves a trade. AE lock does not increase the range of brightness the sensor can record. It only lets you choose which end to keep. When both ends matter, you need fill light, a reflector or bracketing instead.

For silhouettes the direction of the lock reverses: you meter the background on purpose and let the subject fall into darkness. If the reading had been taken with these dark rocks filling the center of the frame, the camera would have brightened them toward gray and washed out the sky. The guide to silhouette photography goes further into subject choice and outline.
Using AE lock with spot metering
Spot metering reads a small circle, a few percent of the frame, and ignores the rest. On some cameras the circle sits at the center; on others it follows the active focus point. That precision is what makes spot metering and AE lock natural partners: aim the spot, lock, reframe.
It comes with a catch. The meter assumes that whatever is in the circle should be recorded as middle gray. Lock a spot reading from a white shirt and the shirt comes out gray. Lock one from a black coat and the coat comes out gray, with everything else far too bright. So either pick a middle-toned target or correct for the tone you picked:
| Spot target | Compensation to add after locking |
|---|---|
| A gray card, sunlit grass, weathered wood, clear blue sky well away from the sun | 0 |
| The palm of your hand, held in the same light as the subject | About +1 |
| White with texture you want to keep: snow, a white dress, white feathers | +1 2/3 to +2 |
| Dark fur, dark clothing, shadowed stone that should stay dark with detail | -1 to -1 2/3 |
The palm trick is useful when you cannot walk up to the subject. Hold your hand out so the same light falls on it, spot meter the palm, lock, add a stop, and shoot. It works because palms are fairly consistent in tone from person to person and sit roughly a stop brighter than middle gray.
Holding one exposure across a panorama or sequence
When several frames will be joined or shown together, they must match. Left to itself, an automatic mode gives a brighter exposure to the frame that is mostly land and a darker one to the frame that is mostly sky, and the stitched result shows bands where they meet.
With the button set to toggle, AE lock handles a short sequence well:
- Look across the whole sweep and find the brightest section that must keep detail, usually the part of the sky nearest the sun.
- Meter that section and lock. Exposing for the brightest frame protects highlights everywhere else.
- Shoot the frames, overlapping each by about a third, without releasing the lock.
- Check that the shutter speed, aperture and ISO shown on screen are identical for every frame.

Exposure is only one of three things that must stay fixed. Autofocus and auto white balance can also shift between frames, so set focus once and choose a white balance preset. For anything longer than a handful of frames, manual exposure is the sturdier choice, because a lock can drop out when the camera sleeps. Panorama photography covers the whole shooting and stitching process.
The same idea applies to a run of portraits against a changing background, a set of product pictures, or a video clip. In video, locking exposure before you start stops the picture from visibly brightening and darkening as things move through the frame.
AE lock vs exposure compensation vs manual mode
All three override the meter. They differ in how long the override lasts and whether the camera keeps reacting to changes in the light.
| Tool | What it does | Camera still follows changing light? | Best for |
|---|---|---|---|
| AE lock | Freezes one reading taken from a place you chose | No, until released | One awkward frame or a short sequence; fast-changing subjects where you can meter something nearby |
| Exposure compensation | Shifts every reading brighter or darker by a set amount | Yes | A run of pictures in light that fools the meter the same way each time, such as a day on snow |
| Manual exposure | Fixes all settings until you change them | No | Steady light, long sequences, studio work, anything on a tripod |
A simple way to choose: if the light is steady and you have time, use manual. If the light keeps changing but the meter is wrong in a consistent direction, use compensation. If only this one composition is the problem, lock. How to shoot in manual mode explains the first option in full.
Separating focus lock from exposure lock
Focus and recompose and meter and recompose are different moves, and they often point at different things. In a backlit portrait you might want exposure from the cheek and focus on the nearer eye; in a landscape, exposure from the sky and focus on a rock a few meters away. A button that locks both together forces them to be the same spot.
Two setups keep them apart. The first is to set the AE-L / AF-L button to exposure only and leave focus on the half press. The second is back button focus: move autofocus to a rear button, and let either the half press or another button handle exposure lock. With the second setup, focus stays where you put it until you press the rear button again, and exposure is locked only when you ask. Camera focus modes explains how single and continuous autofocus interact with all of this.
Flash exposure lock is a different function
AE lock holds the reading for the ambient light. It does not fix flash output. Automatic TTL flash is measured separately, using a brief preflash just before the exposure. Flash exposure lock (often abbreviated FEL or FV lock) fires that preflash when you press the button, stores the flash power needed for the thing you aimed at, and holds it while you recompose. It is the answer when an off-center subject is being under-lit or over-lit by automatic flash. On cameras where one button does both jobs, switching the flash on changes what the button does, so an ambient reading taken that way will not be held. Balancing flash and ambient light explains how the two exposures combine.
Common mistakes
Locking with multi-segment metering on a mixed scene. The camera evaluates the whole frame, so the locked value depends on everything in view, not on the thing you aimed at. Fix: fill the frame with the target tone before pressing, or switch to spot or center-weighted metering.
Spot metering something white or black and locking without correction. The camera renders the target as gray. Fix: meter a middle tone, or add the compensation from the table above.
Forgetting a toggled lock is still on. You walk from shade into sun and every frame is overexposed. Fix: look for the star or AE-L indicator before shooting, and press the button again as soon as the sequence ends.
Letting go of a hold-type button while recomposing. The lock releases and the camera re-meters the final framing. Fix: keep your thumb down until after the shutter fires, or switch the button to toggle.
Assuming the lock also held focus. On a button set to exposure only, focus is free to change. Fix: confirm what the button is assigned to, and treat focus as its own step.
Locking, then waiting while the light changes. A reading taken before a cloud covers the sun is wrong afterwards. Fix: lock, shoot promptly, and take a fresh reading whenever the light shifts.
Try this
You need a room with a window and about ten minutes. Set aperture priority, f/4, a fixed ISO and spot or center-weighted metering. Place an object such as a plant or a mug on a table in front of the window and stand so the bright window fills most of the background.
Take one picture as framed, with no lock, and note the shutter speed. Move in until the object fills the frame, press AE lock, note the new shutter speed, step back to the original framing and shoot again. Then aim at the window alone, lock, reframe and shoot a third time. You now have three pictures of the same composition: one average, one exposed for the object, one silhouette. Work out how many stops separate the three shutter speeds. Finally, repeat the second picture while watching what happens when you lift your thumb, so you know for certain whether your button is hold, toggle or timed.
Frequently asked questions
What does the AE-L / AF-L button do?
By default it locks both auto exposure and autofocus for as long as you hold it, so you can reframe without either changing. A menu setting lets you restrict it to exposure only or focus only, or turn it into an autofocus start button for back button focus.
What does the star button on a camera do?
It is the AE lock button. Press it and the current meter reading is held for a few seconds, or for as long as you keep the shutter button half pressed. With a flash active it usually fires a preflash and locks the flash exposure instead.
Does AE lock work in manual mode?
With a fixed ISO, no: there is no automatic setting for it to hold. With Auto ISO switched on in manual mode, most cameras use it to hold the ISO, which is useful when you want the same exposure for several frames without leaving Auto ISO.
Is AE lock the same as exposure compensation?
No. AE lock freezes one reading and stops the camera reacting to the light until you release it. Exposure compensation leaves the meter running and shifts every reading by the amount you set. They can be used together.
How do I know the exposure is locked?
An indicator appears in the viewfinder or on the screen, usually a star or the letters AE-L or AEL. You can also test it directly: lock, then point the camera at something much brighter or darker. If the shutter speed and aperture readout do not change, the lock is holding.
Related guides
- Back button focus: reassigning the same rear buttons so focus and exposure are fully independent.
- Camera metering modes: what each pattern reads, which decides what your locked reading means.
- Exposure compensation: the tool to use when the meter is wrong in the same direction for many frames.
- Shutter priority mode: one of the automatic modes where AE lock applies, with its own limits.
- Backlighting: the lighting situation that makes exposure lock most useful.
- How to photograph sunsets: exposing for the sky in practice.
- Metering in photography: how the camera measures light in the first place.