Smoke and steam are captivating photographic subjects. Their constantly shifting forms create unique, unrepeatable patterns with every shot. Whether you are photographing wisps of incense smoke curling through a beam of light or dramatic clouds of steam rising from a surface, these ethereal subjects reward patience, experimentation, and careful lighting.
This guide covers everything from setting up a simple home studio for smoke photography to creative post-processing techniques that transform your captures into striking images.
Setting Up for Smoke Photography
Smoke photography works best in a controlled indoor environment where you can manage lighting and airflow. Choose a room where you can darken the windows, and make sure there are no fans, open windows, or air conditioning vents creating drafts. Even subtle air currents will disperse your smoke before you can capture it.
You will need a dark background, ideally black fabric, poster board, or a dark wall. The contrast between white or gray smoke and a black background is what makes smoke photographs so dramatic. Place the background several feet behind your smoke source to prevent light from spilling onto it.
Mount your camera on a tripod at the same height as the smoke source. Compose your frame to include enough space for the smoke to rise and spread, but not so much that the smoke becomes a tiny element in a mostly empty frame.
Choosing Your Smoke Source
Incense sticks are the most popular smoke source for photography. They produce a steady, thin stream of smoke that creates elegant, flowing shapes. Different incense types produce varying amounts and densities of smoke, so experiment with several options.
For thicker, more voluminous smoke, consider other options. A recently extinguished candle produces a brief but photogenic plume. Dry ice placed in warm water creates thick, low-lying fog that behaves differently from rising smoke. Steam from a kettle or humidifier provides another variation with its own distinctive patterns.
Each source creates a different character of smoke. Incense produces delicate, curling wisps. Steam creates fuller, softer clouds. Experiment with different sources to discover which patterns you find most appealing.
Lighting Techniques for Smoke
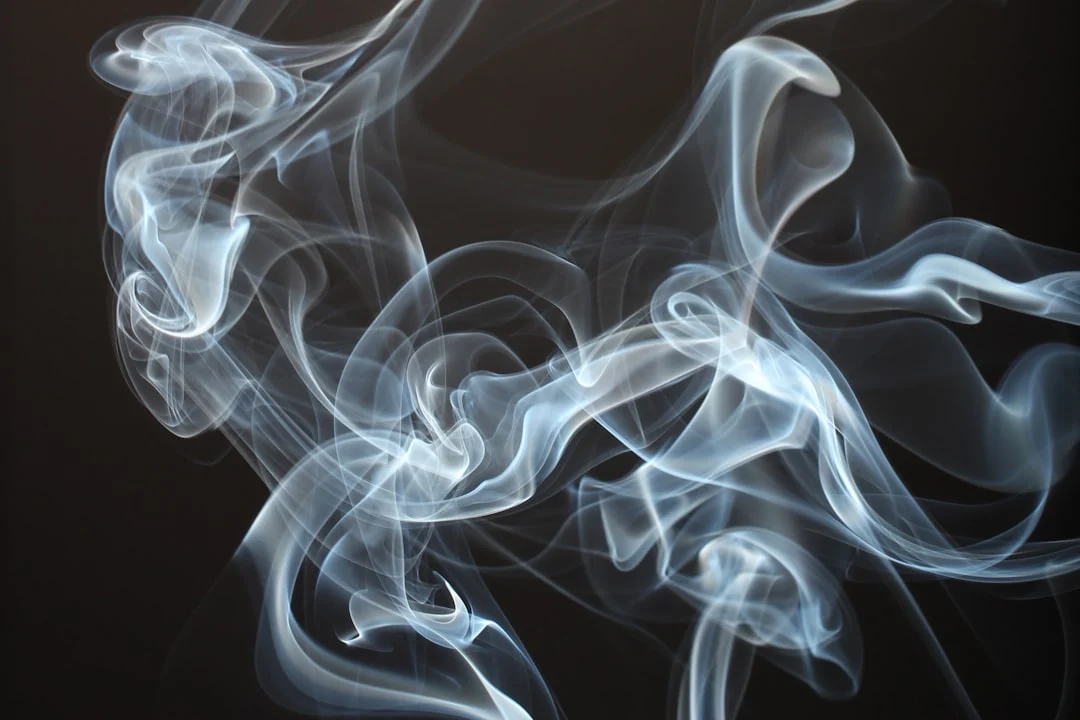
Lighting is the most critical element in smoke photography. The goal is to illuminate the smoke without lighting the background, creating bright smoke against a pure black backdrop.
Side lighting is the most common and effective approach. Place a single flash or continuous light source to one side of the smoke, pointed directly at it from a 90-degree angle. Use a snoot, grid, or barn doors to narrow the beam so it only hits the smoke and not the background. This creates bright edges on the smoke with darker areas in between, revealing the three-dimensional shape of each curl and wisp.
Backlighting creates a different effect. Position the light behind and slightly above the smoke, aimed toward the camera (but shielded so it does not hit the lens directly). Backlit smoke glows with an ethereal quality and appears more translucent than side-lit smoke. Use a flag or black card between the light and your lens to prevent flare.
Avoid front lighting, which flattens the smoke and eliminates the depth and texture that makes it interesting. The direction of light matters more in smoke photography than in almost any other genre.
Camera Settings for Smoke
For sharp, detailed smoke images, use a fast shutter speed. If you are using flash, the flash duration itself freezes the motion, so your camera’s sync speed (typically 1/200s to 1/250s) works well. If you are using continuous lighting, aim for 1/250s or faster to freeze the swirling motion.
For more abstract, blurred smoke trails, slow your shutter speed to 1/30s or longer. The smoke will blur into soft, flowing shapes that look painterly and abstract. This pairs well with abstract photography approaches.
Set your aperture between f/8 and f/11 for a good balance of sharpness and depth of field. Focus manually on the point where the smoke rises from its source, since autofocus often struggles with translucent, moving subjects. Use a low ISO (100-400) to keep noise minimal and maintain clean, smooth tones in the smoke.
Controlling and Shaping the Smoke
Smoke is unpredictable, which is part of its charm. However, you can influence its behavior. A gentle wave of your hand near (but not through) the smoke stream creates turbulence that produces interesting swirls and curls. A piece of cardboard or a book held near the smoke can redirect its flow.
Temperature affects smoke behavior too. Warmer air causes smoke to rise faster and dissipate more quickly. Cooler air slows the smoke and creates denser, more defined shapes. Shooting in a slightly cool room often produces better results than a warm one.
Shoot in bursts. The most interesting smoke shapes last only a fraction of a second before they change. Take many frames and review them afterward to select the best forms. Expect to capture hundreds of images to find a few truly exceptional ones.
Safety and Ventilation
While you want to minimize airflow during shooting, you must also consider ventilation for your health. Burning incense produces particulate matter that is not healthy to breathe in concentrated amounts over extended periods.
Take regular breaks to air out the room. Open windows between shooting sessions to clear the accumulated smoke. If you are sensitive to smoke, consider wearing a mask or using steam or dry ice as alternatives, since these produce no harmful particulates.
Keep a fire-safe surface under any burning source, and never leave burning incense or candles unattended. Place your smoke source on a ceramic plate or metal tray, and keep flammable materials well away from the area.
Post-Processing Smoke Photographs
Post-processing is where smoke photography becomes truly creative. Start by increasing contrast and adjusting levels to get a pure black background and bright, well-defined smoke. Adjust the white and black points until the background is completely black and the smoke has a full range of tones.
Color tinting transforms white smoke into any color you choose. In editing software, add color using hue/saturation adjustments, gradient maps, or color balance tools. Complementary color schemes (such as blue smoke on an orange background) create especially striking results.
Inverting the image (swapping black and white) turns white smoke on a black background into dark smoke on a white background. This creates an entirely different mood and can look like ink spreading in water.
Mirroring and layering in editing software lets you combine multiple smoke images into symmetrical, kaleidoscopic patterns. Duplicate the image, flip it horizontally, and blend the two layers for symmetrical compositions that resemble organic forms.
Common Mistakes in Smoke Photography
Lighting the background. Any light hitting the background reduces contrast and makes the smoke less dramatic. Use focused, directional light and position the background far enough away to remain in shadow.
Not shooting enough frames. Smoke changes shape every fraction of a second. Capturing a single frame rarely produces the best possible shape. Shoot continuously and select the best forms later.
Ignoring air currents. Even the movement of walking near the smoke creates enough air disturbance to disrupt it. Stay still while shooting, and turn off any fans or air conditioning.
Using front lighting. Light aimed from the camera position flattens the smoke and removes the depth that makes it visually interesting. Always use side or back lighting.
Frequently Asked Questions
What is the best light source for smoke photography?
A single speedlight or studio strobe with a snoot or grid modifier works best. The modifier narrows the light beam to illuminate only the smoke while keeping the background dark. Continuous LED panels also work but require faster shutter speeds to freeze the smoke.
Can I photograph smoke outdoors?
It is possible but much harder to control. Wind disperses smoke quickly, and you cannot control the background as easily. If you want to try, choose a calm day, find a shaded area with a dark background, and use a fast shutter speed to freeze the smoke before it dissipates.
How do I get colorful smoke photographs?
The most reliable method is to photograph white smoke and add color in post-processing. This gives you complete control over the colors and lets you experiment with different palettes. Colored gels over your light source can also add color during capture, though this limits you to one palette per session.
Do I need expensive equipment for smoke photography?
No. A camera, a single light source (even a desk lamp with a cardboard snoot), incense, and a dark background are enough to start. Many award-winning smoke photographs have been created with very basic setups. Technique and patience matter far more than expensive gear. The key investments are a tripod and a way to focus your light beam.