Surf and ocean photography captures one of nature’s most dynamic and powerful subjects. Every wave is unique. Every session brings different light, different swells, different energy. The challenge is technical: fast-moving subjects, salt spray, harsh sun mixed with flying water droplets, and the constant threat of gear damage. But the reward is images that convey raw power, athletic grace, and the breathtaking beauty of the ocean. Whether you shoot from the safety of the shore or wade into the lineup with a water housing, surf photography demands preparation, timing, and respect for the ocean.
This guide covers both shore-based and water-based approaches, along with camera settings, lens selection, timing, and the safety awareness essential for photographing in and around the ocean. Whether you are a surfer who wants to document your sessions or a photographer drawn to the visual drama of the coastline, the techniques here will help you create more powerful ocean images.
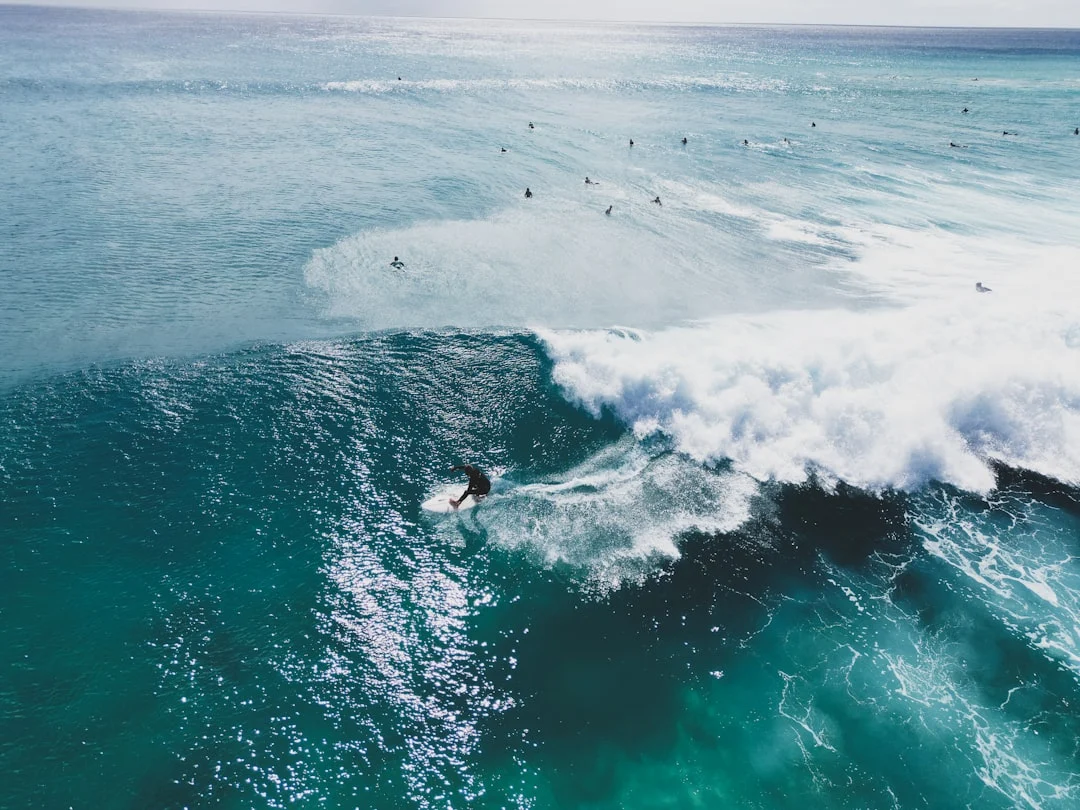
Shooting from Shore vs. from the Water
From the Shore
Shore-based surf photography is the easiest starting point. You stay dry, keep your gear safe, and work with a telephoto lens to compress the scene and isolate surfers on waves. The perspective is side-on or slightly elevated, which shows the wave shape clearly and captures the surfer’s full stance. Shooting from a jetty, pier, cliff, or elevated beach gives even better angles by looking down onto the action.
The downside of shore shooting is distance. Even with a long telephoto, the surfer is far away, and you lose the intimate, immersive feeling of being in the water. Heat haze can also degrade sharpness on long telephoto shots over water on warm days. The best shore positions are elevated spots close to the break, piers that extend over the lineup, and rocky headlands adjacent to surf breaks.
From the Water
Water photography puts you inside the action. You shoot from the surfer’s perspective, inches from breaking waves, spray flying past the lens. The results are dramatically more intimate and dynamic than anything achievable from shore. You see the wave face, the barrel, the lip, the spray. The wide-angle perspective (typically 15-35mm equivalent) creates powerful, immersive compositions.
Water shooting requires a water housing for your camera, swim fins, a wetsuit, and strong swimming ability. You must be comfortable in ocean conditions, able to hold your breath through sets of waves, and aware of currents, rocks, and other hazards. This is not casual photography. It is an athletic pursuit that requires ocean fitness and awareness.
Water Housing Basics
A water housing is a waterproof enclosure that lets you operate your camera underwater and in breaking surf. Housings range from simple soft cases for compact cameras to precision-machined aluminum or polycarbonate enclosures for full-sized mirrorless and DSLR bodies. The housing provides external controls for shutter, aperture, ISO, and focus, along with a port for the lens.
Two types of ports are common. A dome port is a curved glass or acrylic hemisphere that works with wide-angle lenses. It corrects for the refraction that occurs at the air-water interface, producing sharp corners and proper wide-angle perspective. A flat port is a simple flat glass window used with telephoto and macro lenses. Flat ports narrow the field of view slightly underwater due to refraction.
- Always test your housing in a pool or bathtub before taking it into the ocean with a camera inside
- Check and lubricate O-rings before every session. A single hair or grain of sand can cause a catastrophic leak.
- Rinse the housing thoroughly in fresh water after every ocean session to prevent salt crystal buildup
- Use a leak detector (an electronic sensor that beeps when water enters) for extra safety
- Attach a pistol grip for better one-handed handling in the water
Lens Choices for Surf Photography
Telephoto from Shore
For shore-based shooting, a telephoto lens in the 200-600mm range is standard. The longer the better, depending on how far the break is from shore. A 100-400mm zoom covers many situations. A 200-600mm or similar super-telephoto zoom gives you reach for distant breaks. Focal Length choice depends on the specific break. Some spots are close enough to shore that 200mm is plenty. Others require 600mm or more.
Use the fastest aperture available to you for faster shutter speeds and better Autofocus performance. A Prime Vs Zoom Lens trade-off applies here: primes are sharper and faster, but zooms offer flexibility to reframe as the action moves across the wave.
Wide Angle in the Water
In the water, wide-angle lenses (typically 15-35mm equivalent) are the standard. Fisheye lenses (10-16mm) create dramatic barrel distortion that can enhance the curve of a wave. The wide perspective is necessary because you are very close to the action. A wave breaking 3 feet from your lens fills the frame with a 20mm focal length.
Camera Settings for Surf Photography
Surf photography demands fast shutter speeds, reliable autofocus, and the ability to shoot in bursts.
| Setting | Recommended Value | Why |
|---|---|---|
| Shutter Speed | 1/1000s or faster | Freezes the surfer and spray. Use 1/2000s+ for sharp barrel shots. |
| Aperture | f/4 to f/8 | Balances sharpness across the frame with enough light for fast shutters. |
| Iso | Auto ISO with a cap (800-1600) | Lets the camera maintain fast shutter speed in changing light. |
| Focus mode | Continuous AF (AF-C/AI Servo) | Tracks the moving surfer through the frame. |
| Drive mode | High-speed continuous | Captures the peak moment within a sequence. |
| Metering Modes | Evaluative/Matrix | Handles the bright water and sky mix reasonably well. |
The biggest exposure challenge is the bright, reflective water. Your camera’s meter may underexpose because of all the bright highlights. Use Exposure Compensation of +0.3 to +1.0 to keep the scene properly exposed. Check the Camera Histogram regularly. The histogram should show data reaching into the right side (bright highlights from water and sky) without clipping.
Timing, Anticipation, and Reading Waves
Great surf photography is about anticipation. The best shots happen in fractions of a second, and if you are reacting to what you see, you are already too late. You need to predict where the surfer will be, what the wave will do, and when the peak moment will occur.
- Watch the lineup for 10 to 15 minutes before shooting. Learn the wave patterns, where they break, and how surfers approach them.
- Identify skilled surfers who ride waves confidently. Their movements are more predictable and photogenic.
- Pre-focus on the area where you expect the surfer to pass. Track the surfer as they approach and fire in bursts through the turn or maneuver.
- Learn to read wave sets. Bigger sets arrive periodically. Position yourself and be ready when the larger waves come through.
- The bottom turn, cutback, aerial, and barrel are the key moments. Each has a visual peak. Learn to recognize the build-up to these moments.
Swell direction and tide level significantly affect wave shape and quality. An offshore wind (blowing from land toward the sea) grooms wave faces, holds them up longer, and creates clean, photogenic conditions. An onshore wind (sea toward land) creates choppy, messy surf that is harder to photograph well. Check wind forecasts and time your sessions for offshore or calm conditions whenever possible.
Low tide often exposes reef and sandbars that create steeper, more hollow waves. High tide can make the same break mushy and slow. Learn how your local break responds to tide changes. Many surf forecast websites and apps provide detailed swell data, wind direction, and tide charts that help you plan your shooting sessions for optimal conditions.
Shooting Different Wave Types
Beach breaks (waves breaking over sand) produce a variety of peak locations that shift constantly. This keeps you moving and adapting. Point breaks (waves wrapping around a headland or point) produce long, predictable rides that are easier to photograph because you know where the surfer will be. Reef breaks produce the most dramatic waves, often hollow and powerful, but they also present the greatest safety risks due to shallow reef beneath the surface.
Big wave photography is an extreme specialization. Waves over 20 feet are life-threatening for swimmers. Big wave photography from the water requires jet ski support, rescue training, and significant experience. From shore, big waves can be photographed with super-telephoto lenses from safe cliff-top or headland positions. The scale and power of big waves produce extraordinary images, but safety margins must be much larger than for normal surf conditions.
Safety in the Ocean
The ocean is powerful and indifferent to your photography plans. Respect it completely. No photograph is worth risking your life.
- Know your swimming ability: Be honest about your fitness and comfort level. Do not enter conditions you cannot handle.
- Understand rip currents: Know how to identify and escape rip currents (swim parallel to shore, not against the current).
- Wear fins: Always wear swim fins in the surf. You cannot swim fast enough without them to navigate breaking waves.
- Never turn your back on the ocean: Even from shore, rogue waves can reach farther than expected.
- Watch for rocks and reef: Know the bottom contour of any break you enter. Shallow reef is dangerous.
- Tell someone where you are: Let someone know your location and expected return time.
- Be aware of marine life: Jellyfish, sea urchins, and in some areas, sharks. Know the local conditions.
Golden Hour at the Beach
Golden Hour Photography transforms surf photography. The low sun backlights spray and wave lips with warm orange light, creating a glowing halo effect. Silhouettes of surfers against sunset skies are iconic. Sunrise sessions often have cleaner waves (less wind) and fewer surfers, making it easier to isolate your subject.
When shooting into the light (backlit), spray and mist glow dramatically but your subjects become silhouettes. Use fill flash (from the water) or accept the silhouette as a creative choice. When shooting with the light behind you (front-lit), colors are vivid and surfers are clearly visible, but the scene can look flat without interesting sky conditions.
Split Shots (Over-Under)
Split shots show both above and below the water surface in a single frame. Half the image is sky and ocean surface, half is underwater. These shots require a dome port housing, a wide-angle lens, calm-ish water, and practice. The dome port must be half submerged. You need a small aperture (f/8 to f/16) for enough depth of field to keep both the above-water and below-water portions in focus. Water droplets on the dome port are your enemy. An anti-fog solution and occasional licking of the port (yes, really) help keep it clear.
Building Your Ocean Photography Portfolio
A strong ocean photography Photography Portfolio demonstrates range: different wave conditions, different light, different perspectives. Include telephoto shore shots, wide-angle water shots, dawn sessions, stormy conditions, and quiet moments between sets. Show that you can capture both the explosive power of a breaking wave and the subtle beauty of calm water at twilight.
Consistency in one location builds depth. Rather than chasing a different beach every weekend, spend months at one break. Learn its moods and seasons. Show how the same wave looks in summer morning light versus winter storm swell. Depth of knowledge about a specific place produces a more compelling body of work than scattered images from many locations.
Surf culture and lifestyle images add context to your portfolio. The pre-dawn parking lot, wetsuits drying on a fence, wax being applied to a board, the view from inside a van at the beach. These environmental and documentary images tell the full story of ocean life and make your portfolio more interesting to editors, galleries, and potential clients.
Post-Processing Ocean Images
Ocean images often benefit from careful Color Grading Photography to bring out the blues and greens of the water, warm up the skin tones of surfers, and enhance the contrast between wave and sky. Shoot in Raw Vs Jpeg for maximum flexibility.
- Adjust White Balance to taste. Cooler tones emphasize the ocean. Warmer tones suit golden hour shots.
- Boost clarity or texture to bring out spray detail and wave texture
- Use a graduated adjustment to darken the sky without affecting the water
- Reduce Noise carefully if you shot at high ISO in low light sessions
- Crop for maximum impact. The surfer should be at a strong position in the frame.
- Dodging And Burning can add depth to wave faces and draw attention to the surfer
Common Mistakes
- Shutter speed too slow: Surf requires 1/1000s minimum. Soft spray and blurred surfers are the tell-tale sign.
- Not enough reach from shore: A 70-200mm lens on a beach often leaves surfers as tiny specks. Bring more telephoto.
- Centering the surfer in every frame: Use the rule of thirds. Give the surfer space to move into.
- Ignoring the wave: The wave itself is the stage. Include enough of it to show its power and shape.
- Shooting too high: Get low. A low angle with the camera near water level creates more dramatic perspective.
- Neglecting O-ring maintenance: One grain of sand on an O-ring and your camera is flooded. Clean them meticulously.
Try This
- Find a local surf break and spend an hour just watching before you shoot. Learn the wave pattern, the peak, and where surfers perform maneuvers.
- Shoot from the end of a pier or jetty if one is available. The elevated angle and proximity to the break give excellent shore-based perspectives.
- Try shooting at sunrise for the cleanest conditions and most dramatic light. Arrive 30 minutes before sunrise to set up.
- Experiment with slower shutter speeds (1/30 to 1/125s) while Panning Photography with a surfer for a motion blur effect that conveys speed.
Frequently Asked Questions
Do I need an expensive water housing to shoot surf?
For water shooting, yes. A quality housing is essential and they are expensive. However, excellent surf photography is possible from shore with just a telephoto lens and a tripod or monopod. Many professional surf photographers started shooting from the beach before investing in water housings.
What focal length do I need from shore?
It depends on the distance to the break. As a starting point, 200-400mm covers most situations. Some breaks are close enough for 100-200mm. Distant reef breaks may need 500-600mm. A Crop Factor camera body effectively extends your telephoto reach, which is an advantage for surf photography.
How do I protect my camera from salt spray on the beach?
Keep a microfiber cloth handy to wipe the front element regularly. Use a UV filter as a sacrificial first element. On windy days, a rain cover or plastic bag with a hole for the lens helps. After every beach session, wipe down the entire camera and lens body with a damp cloth to remove salt residue. Never let salt crystals dry on your gear.
What is the best time of day for surf photography?
Early morning (sunrise to mid-morning) is ideal. Wind is typically calm, giving cleaner wave faces. The low sun creates dramatic backlight and sidelight. Late afternoon and sunset offer similar benefits. Midday sun is harsh, flat, and unflattering for most surf photography, though it works for high-action, documentary-style shots.
Can I shoot surf with a smartphone?
From shore, the results will be limited because Smartphone Photography lacks the telephoto reach needed for distant subjects. Some phone waterproof cases allow water shooting at close range, which can produce fun, wide-angle surf images. For serious surf photography, a dedicated camera with interchangeable lenses is far more capable.