Aerial photography does not require a drone. Long before consumer drones existed, photographers captured stunning views from above using aircraft, buildings, hilltops, and creative elevation techniques. These approaches remain valuable today, whether you prefer to avoid drone regulations, want to photograph from manned aircraft at altitudes drones cannot reach, or simply want to use the vantage points available to you wherever you are. An elevated perspective transforms familiar landscapes into abstract patterns, reveals hidden geometry in cities, and shows the relationship between human activity and the natural world in ways that ground-level photography never can.
This guide covers every accessible method for getting your camera above eye level, from rooftops and hilltops to helicopters and kites. You will learn how to compose aerial images, handle the technical challenges of each platform, and produce stunning photographs from above.
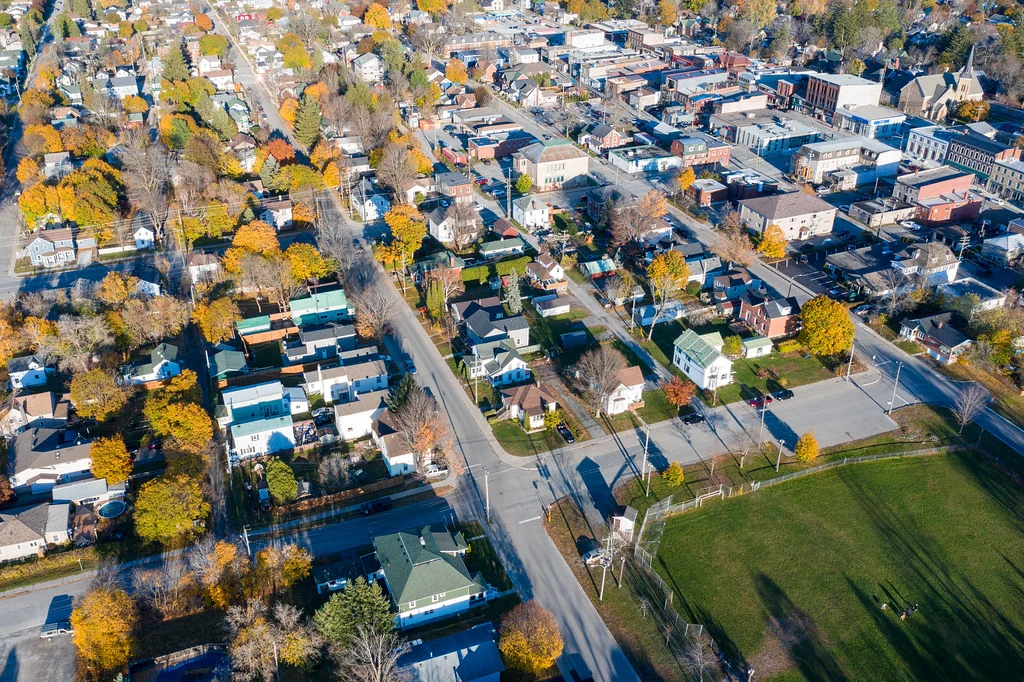
Why Elevated Perspectives Matter
Photographs taken from above show the world differently. Streets become ribbons. Buildings become geometric shapes. Fields become color blocks. Rivers reveal their meandering patterns. The shift from a human-height perspective to an elevated one removes the familiar context we navigate daily and replaces it with something abstract and revealing. This transformation is the creative power of aerial photography.
Elevated perspectives also solve practical Photography Composition challenges. A crowded street market looks chaotic from eye level but becomes an organized tapestry of colors and patterns from three stories above. A coastline photographed from a cliff shows the interaction of land and sea in ways that a beach-level shot never can. Looking down simplifies composition by flattening the scene into a two-dimensional pattern where shape, color, and line become the primary elements.
Shooting from Buildings and Rooftops
Urban rooftops provide some of the most accessible elevated vantage points. Parking garages, hotel upper floors, restaurant patios, and public observation areas all offer elevated perspectives over cities. The key is finding locations that provide both elevation and an interesting subject below.
- Look for public parking garages with open upper levels. These are often free to access and offer 360-degree views.
- Hotels with rooftop bars or restaurants provide elevated views in many cities. A drink purchase is a small price for a great vantage point.
- Observation decks on tall buildings (when available in your city) offer the highest publicly accessible urban perspectives.
- Bridges offer unique perspectives over rivers, harbors, and roadways. Pedestrian walkways on large bridges are ideal.
- Always respect private property. Ask permission before accessing rooftops or restricted areas.
When shooting downward from buildings, be aware of your Focal Length choice. A wide-angle lens includes more of the scene but can create converging vertical lines on surrounding buildings. A moderate telephoto (70-200mm) lets you isolate patterns and details below. A standard zoom (24-70mm) offers flexibility for both wide establishing shots and tighter compositions.
Hilltops, Overlooks, and Natural Vantage Points
Nature provides its own elevated perspectives. Hilltops, mountain ridges, cliff edges, and designated scenic overlooks offer views that combine elevation with natural beauty. Landscape Photography from elevated natural vantage points produces some of the most compelling outdoor images.
Plan your visit around light. Golden Hour Photography from a hilltop overlooking a valley creates warm, directional light that models the terrain and paints long shadows across the landscape. Morning mist settling in valleys below your position creates ethereal, layered compositions.
- Use a tripod for sharpness, especially in low light or with telephoto lenses
- A polarizing filter reduces haze and increases color saturation when shooting through atmospheric distance
- Include foreground elements (rocks, vegetation, railings) for depth and scale
- Panoramic compositions work exceptionally well from elevated vantage points
Aerial Photography from Aircraft
Shooting Through Airplane Windows
Commercial flights provide aerial perspectives that no other method can match for altitude and geographic range. The view from 30,000 feet reveals mountain ranges, coastlines, river systems, and cloud formations on a grand scale. Lower altitude views during takeoff and landing show cities, farms, and infrastructure in fascinating detail.
- Choose a window seat. Request one away from the wing for the clearest downward view.
- Shoot through the window by pressing or nearly pressing your lens against the glass. This eliminates reflections from cabin light.
- Use a dark cloth or jacket draped around the camera and window to block interior reflections if needed.
- Avoid using a polarizing filter against airplane windows. The double-layer glass creates rainbow interference patterns with polarizers.
- Use a fast Shutter Speed (1/500s or faster) to counteract aircraft vibration and movement.
- Shoot in manual focus if the window confuses autofocus. Focus to infinity.
- Clean the window with your sleeve or a cloth before shooting. Interior condensation and fingerprints reduce sharpness.
Helicopter Photography
Helicopter flights offer the ultimate aerial photography experience. With a door removed (available on many charter flights), you have an unobstructed view with no glass to shoot through. The helicopter can hover, circle, and position you precisely for the shot you want. This is how many professional aerial photographers work for commercial, editorial, and fine art projects.
- Always wear the provided harness and attach your camera to a secure strap. Dropped equipment from a helicopter is dangerous and expensive.
- Use Shutter Speed of 1/1000s or faster to freeze vibration. Helicopter vibration is intense.
- Use Image Stabilization if available. It helps significantly with helicopter vibration.
- Communicate with your pilot about the shots you want. Brief them before the flight on your preferred altitude, angle, and subjects.
- Dress warmly. Open-door helicopter flights are cold, even in summer.
- Avoid loose items (lens caps, filters, hats) that could blow out of the aircraft.
Hot Air Balloon Photography
Hot air balloons provide a uniquely stable aerial platform. Unlike helicopters, they have almost no vibration once airborne. The gentle floating movement gives you time to compose carefully. The obvious limitation is that you cannot control where the balloon goes. You are at the mercy of the wind, which adds an element of discovery to the experience.
Balloon flights typically happen at sunrise, which means you are shooting in the best possible Natural Light Photography conditions. The low sun rakes across the landscape, casting long shadows and warm tones. Bring a moderate zoom lens (24-105mm or similar) for flexibility. A wide-angle lens captures the balloon itself as foreground interest in landscape shots.
Kite Aerial Photography (KAP)
Kite aerial photography is the original “drone” photography. A camera is suspended from the kite line on a stabilizing rig and triggered remotely via radio control or an intervalometer. The kite lifts the camera to altitudes of 50 to 500 feet, providing a bird’s-eye perspective without any powered aircraft or drone regulations in many jurisdictions.
KAP requires consistent wind (8-25 mph), a suitable kite (large delta or parafoil kites work well), a lightweight camera, a suspension rig (Picavet or pendulum type), and practice. The camera hangs below the kite and sways gently, so a fast shutter speed and wide-angle lens produce the sharpest results. Modern action cameras and small mirrorless cameras work well for KAP due to their light weight and wide-angle capabilities.
Pole and Mast Photography
A camera on a telescoping pole or mast (8 to 30 feet) provides a modest but often sufficient elevation boost. Painters’ poles, telescoping flag poles, and purpose-built camera masts can raise a camera above head height for a new perspective on events, real estate, and outdoor scenes. Combine with a remote shutter release or Wi-Fi live view on your phone to compose and trigger the shot.
Composition for Aerial Photography
Aerial composition follows different rules than ground-level photography. The horizon often disappears entirely. Foreground and background become less relevant when you are looking straight down. Instead, the primary compositional elements are shape, pattern, color, and line.
- Look for patterns: Agricultural fields, parking lots, rooftops, and natural formations create repeating patterns that are invisible from the ground.
- Follow lines: Roads, rivers, shorelines, and paths create Leading Lines that guide the eye through the aerial image.
- Use color contrast: A red roof in a sea of green trees, a blue pool in a brown landscape. Color differences are amplified from above.
- Embrace abstractions: Not every aerial image needs to be immediately recognizable. Abstract patterns and textures make powerful photographs.
- Include scale references: A person, a car, or a known object in the frame gives the viewer a sense of height and distance.
- Shoot straight down: “Nadir” (straight-down) shots remove all perspective and create flat, map-like compositions. Very distinctive.
Time of Day and Seasonal Considerations
The direction and quality of light are even more critical in aerial photography than in ground-level work. Low-angle sunlight during Golden Hour Photography creates long shadows that reveal terrain features, building shapes, and surface textures invisible under flat, overhead lighting. Shadows from trees, buildings, and hills add a three-dimensional quality to the inherently flat aerial perspective. Midday overhead sun eliminates shadows almost entirely, flattening the scene.
Seasonal changes transform aerial subjects dramatically. The same agricultural landscape shows bare brown earth in spring, vivid green crops in summer, golden harvest patterns in autumn, and snow-covered geometry in winter. Coastal areas change character with the seasons as water color, wave patterns, and beach usage shift. Plan repeat visits to your favorite elevated vantage points throughout the year to document these seasonal transformations.
Atmospheric conditions also affect aerial photography significantly. Clear, dry air after a rain storm produces the cleanest, most detailed aerial images because haze and pollution have been washed out of the atmosphere. Hazy, humid days soften distant details and reduce contrast. Morning air is typically clearer than afternoon air because the sun has not yet heated the ground and generated convective haze.
Legal Considerations
Aerial photography from manned aircraft is generally legal, though there are restrictions near airports, military installations, and some government buildings. Commercial helicopter flights operate under aviation regulations. KAP may or may not be regulated in your jurisdiction. Check local laws before flying anything, even a kite, near airports.
Privacy considerations apply to aerial photography just as they do to ground-level Photography Ethics. Photographing into private spaces from above raises legitimate privacy concerns. Be thoughtful about what you photograph and how you use the images.
Post-Processing Aerial Images
Aerial photographs often need specific post-processing attention. Atmospheric haze reduces contrast and adds a blue-white cast, especially when shooting from high altitude. Increasing contrast, clarity, and vibrance in Lightroom For Beginners or similar software can restore the punch that haze steals. A dehaze slider (available in most modern editing software) is particularly effective for aerial images shot through significant atmosphere.
Lens correction profiles are important for aerial images, especially those shot with wide-angle lenses. Barrel distortion makes straight roads and building edges curve. Applying the lens profile correction straightens these lines. If you shot through an airplane window, the glass may introduce its own slight distortion and color cast. Shoot in Raw Vs Jpeg for maximum flexibility to correct these issues.
Aerial images often have large areas of similar tone (fields, water, sky). This makes dust spots and sensor blemishes very visible. Inspect your aerial images at 100% magnification and remove spots using the healing or clone tool. A clean sensor before your flight saves significant post-processing time.
Aerial Panoramas
Elevated vantage points are ideal for Panorama Photography. The wide, unobstructed views from hilltops, buildings, and aircraft give you sweeping perspectives that work beautifully as stitched panoramas. From a stable platform (building, observation deck, balloon), use a tripod or careful handheld technique to shoot overlapping frames across the scene. Stitch them in post-processing for a high-resolution ultra-wide image.
From aircraft, handheld panoramas are possible but require fast shooting. Overlap each frame by 30-50%, shoot at a fast shutter speed to freeze aircraft movement, and try to maintain a consistent rotation. Modern stitching software handles imperfect alignment well, but smoother shooting produces better results. Vertical (portrait orientation) frames give you more resolution in the final stitched image.
Common Mistakes
- Shooting too wide from too high: Everything becomes small and undifferentiated. Use a longer focal length to isolate specific patterns and subjects.
- Ignoring the light: Overhead midday sun flattens aerial scenes. Low-angle light creates shadows that reveal texture and terrain.
- Dirty windows on aircraft: Always clean the window and shoot through the cleanest section. Interior reflections ruin images.
- Too slow a shutter speed: Aircraft vibration, wind, and movement require fast shutter speeds. 1/500s minimum from any moving platform.
- Forgetting to remove the polarizer near airplane windows: The polarizer interacts with the stressed plastic layers in airplane windows to create distracting rainbow patterns.
- Not securing gear in open aircraft: Dropped items from a helicopter are dangerous. Strap everything securely.
Try This
- Visit the highest public vantage point in your city (parking garage, observation deck, hilltop park). Spend an hour shooting straight down and at various angles.
- On your next commercial flight, request a window seat and shoot during takeoff and landing when the altitude reveals ground-level patterns.
- Find a bridge over a river and shoot straight down at the water, boats, or reflections. Notice how the straight-down perspective transforms the scene.
- Use a selfie stick or monopod to raise your camera 6-8 feet above your head at an outdoor event. Trigger the shutter with your phone or a remote. Notice how even a modest elevation change transforms the perspective.
Frequently Asked Questions
Is aerial photography without a drone still relevant?
Absolutely. Drones are limited to relatively low altitudes (typically under 400 feet legally) and restricted in many urban areas, near airports, and in national parks. Manned aircraft can fly higher and in areas where drones are prohibited. Buildings, hilltops, and other natural vantage points require no permit or registration. Non-drone aerial photography remains relevant and in many situations is the only practical option.
What camera settings should I use from a helicopter?
Use shutter priority or Manual Mode with a shutter speed of 1/1000s or faster. Keep Iso as low as possible while maintaining that shutter speed. Use the widest Aperture your lens offers if needed for speed. Use continuous AF or pre-focus to infinity (most aerial subjects are at infinity focus). Shoot in continuous burst mode.
Can I shoot good aerial photos with a smartphone?
Smartphone Photography from elevated positions works surprisingly well. Modern phone cameras have good wide-angle lenses, fast auto-exposure, and computational processing that handles the high dynamic range of aerial scenes. The main limitation is the lack of optical zoom. From buildings and overlooks, phones produce excellent aerial images. Through airplane windows, results are acceptable but a dedicated camera with manual controls will produce sharper, more detailed results.
How do I avoid reflections when shooting through glass?
Press or nearly press your lens against the glass to block reflections from behind you. Cup your hand around the lens barrel where it meets the glass. Use a rubber lens hood that can seal against the window. Wear dark clothing. Turn off overhead lights if possible. A piece of dark fabric draped over the camera and held against the window is the most reliable solution.
What is the best altitude for aerial photography?
It depends on your subject. Low altitudes (50-300 feet) show detail and keep subjects large in the frame. Medium altitudes (300-1,000 feet) reveal patterns in neighborhoods, farms, and natural features. High altitudes (1,000-10,000+ feet) show large-scale geography, coastlines, and mountain ranges. Each altitude reveals different information. When possible, shoot at multiple altitudes.