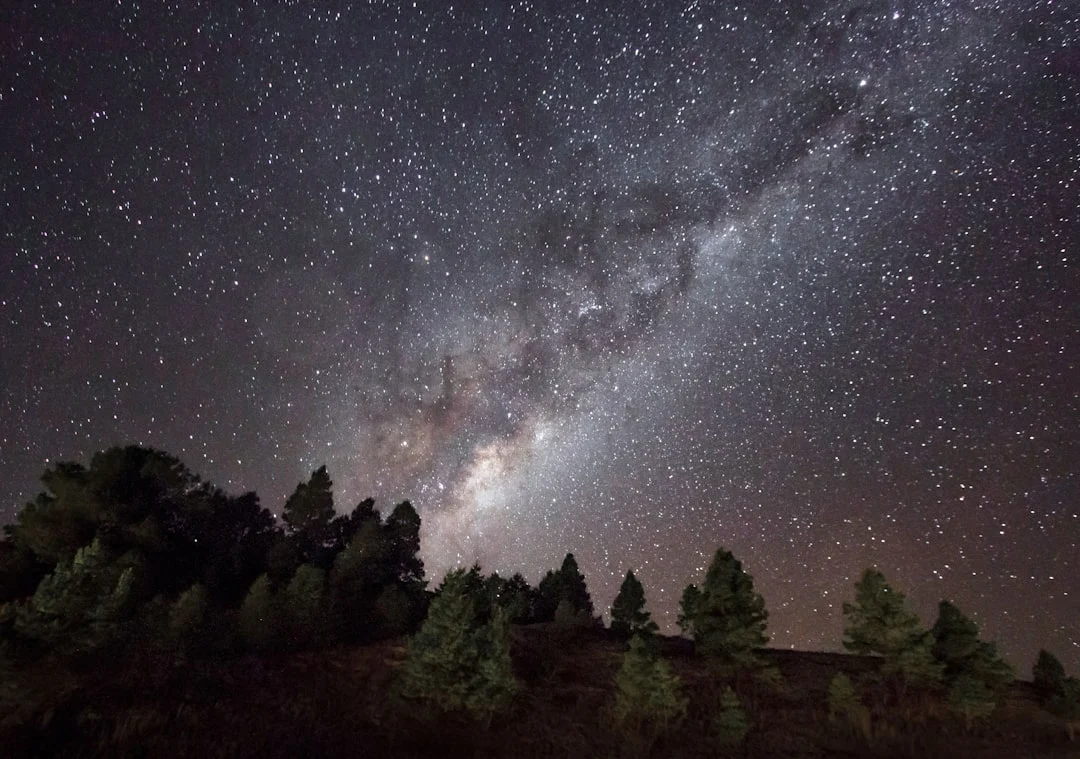
Astro-landscape photography sits at the intersection of Astrophotography and Landscape Photography. While pure astrophotography points the camera at the sky and treats the ground as an obstacle, astro-landscape embraces both. The Milky Way arches over a desert mesa. Stars wheel above a coastal sea stack. The Northern Lights dance over a snow-covered forest. The foreground is not just context. It is half the composition.
This dual focus creates both the genre’s magic and its technical difficulty. The sky requires wide apertures, high ISO, and precise star-tracking awareness. The foreground requires careful focus, often at a different distance. The light levels between sky and ground can differ dramatically. Mastering astro-landscape photography means mastering the technical challenges of shooting in near-darkness while creating compositions that work both as landscape images and as celebrations of the night sky.
This guide covers planning, gear, single-exposure technique, focus stacking, exposure blending, light painting, and the post-processing workflow that brings these elements together.
What Makes Astro-Landscape Different from Astrophotography
Pure Astrophotography uses tracking mounts to follow the sky’s rotation, enabling very long exposures of deep-sky objects. The foreground blurs because the mount tracks the stars, not the earth. In astro-landscape, the camera is fixed to a standard tripod. The ground stays sharp, and the challenge is capturing enough starlight in the limited time before stars begin to trail.
The foreground is what elevates astro-landscape above simple sky photos. A dramatic foreground gives the viewer a sense of place, scale, and emotional connection. Anyone can point a camera up. Astro-landscape photography requires finding and composing a scene where earth and sky complement each other.
Planning Your Astro-Landscape Shoot
Successful astro-landscape photography depends more on planning than any other genre. You cannot control the sky, so you need to know exactly when and where conditions will align.
Dark sky locations
Light pollution is the enemy. Use dark sky maps and apps to find locations with minimal artificial light. Even moderate light pollution washes out all but the brightest stars and makes the Milky Way invisible. National parks, remote deserts, high mountains, and designated dark sky preserves offer the best conditions.
Moon phase
The moon is both friend and enemy. A full moon washes out stars almost completely, making faint objects invisible. A new moon (no moon visible) provides the darkest skies and brightest stars. However, a crescent moon low on the horizon can provide just enough light to gently illuminate the foreground without overwhelming the stars.
Plan your Milky Way shoots within a few days of the new moon for the darkest skies.
Milky Way position and timing
The Milky Way’s galactic core (the brightest, most photogenic section) is visible in the Northern Hemisphere from roughly February through October, with best visibility from April through September. In the Southern Hemisphere, it is visible year-round but best positioned from February through October. Use planning apps to determine the exact time the core rises above the horizon and its position relative to your foreground.
Weather and atmospheric conditions
- Clear skies are essential. Even thin clouds block stars.
- Humidity and haze reduce contrast in the sky. Dry, cold nights produce the clearest skies.
- High altitude improves conditions by putting you above denser atmosphere and water vapor.
- Check forecasts specifically for astronomical conditions (transparency, seeing, cloud cover) in addition to standard weather forecasts.
Essential Gear
- Wide, fast lens. A lens in the 14-24mm range with f/2.8 or wider is the workhorse of astro-landscape. Wider Focal Length captures more sky and more foreground. Wider Aperture gathers more starlight per frame.
- Sturdy tripod. Non-negotiable. You will be shooting exposures of 10 to 30 seconds. Any vibration or flex shows as star trails or blur.
- Remote shutter release or timer. Pressing the shutter button can introduce vibration. Use a remote release, the camera’s built-in timer, or a smartphone app.
- Headlamp with red light mode. Red light preserves your night vision while letting you navigate and adjust settings. White light ruins dark adaptation for 20+ minutes.
- Extra batteries. Cold temperatures and long exposures drain batteries rapidly. Carry at least two fully charged spare batteries.
- Lens hood. Prevents stray light from nearby sources from causing flare.
For camera body, any modern Mirrorless Vs Dslr camera with good high-ISO performance works. Full Frame Vs Crop Sensor full-frame sensors have an advantage in low-light performance, but excellent results are possible with crop sensors.
Single-Exposure Technique
For many astro-landscape scenes, a single well-executed exposure captures both sky and foreground. This is the simplest approach and produces genuine, unmanipulated results.
- Aperture: wide open or one stop down. Start at your lens’s widest Aperture (f/1.4, f/1.8, or f/2.8). If corner sharpness is poor at maximum aperture, stop down one-third or one-half stop.
- ISO: 3200 to 6400. High Iso is necessary to record enough starlight. Modern cameras handle these ISOs well. Do not be afraid of Noise. You can reduce it in post-processing, but you cannot add starlight that was not captured.
- Shutter speed: use the 500 Rule. Divide 500 by your lens’s effective Focal Length (accounting for Crop Factor if applicable). The result is the maximum shutter speed in seconds before stars begin to trail. For a 24mm lens on a full-frame body: 500 / 24 = approximately 20 seconds.
- Focus: infinity, manually confirmed. Set Focus Modes to manual. Focus on a bright star using live view at maximum magnification. The star should appear as the smallest possible point. Once focused, do not touch the focus ring. Some photographers tape it in place.
- White balance: 3800-4200K. This range produces a natural-looking blue sky without being too cold. Set White Balance manually rather than using auto, which may shift between frames.
The 500 Rule Explained
The 500 Rule (sometimes called the 600 Rule or NPF Rule) provides a guideline for the maximum exposure time before star trailing becomes noticeable.
| Focal Length (full frame) | Max Exposure (500 Rule) | Max Exposure (NPF, stricter) |
|---|---|---|
| 14mm | 35 seconds | 15-20 seconds |
| 20mm | 25 seconds | 12-15 seconds |
| 24mm | 21 seconds | 10-13 seconds |
| 35mm | 14 seconds | 7-9 seconds |
| 50mm | 10 seconds | 5-6 seconds |
The 500 Rule is a rough guideline. For critical sharpness or high-resolution sensors (which reveal trailing more easily), use the more conservative NPF values. If you plan to print large or crop significantly, err on the shorter side.
For Crop Factor sensor cameras, multiply your focal length by the crop factor before dividing. A 16mm lens on a 1.5x crop body acts like 24mm: 500 / 24 = approximately 21 seconds maximum.
Focus Stacking: Sharp Foreground and Sharp Stars
At wide apertures (f/1.4 to f/2.8), Depth Of Field is limited. If you focus on the stars (infinity), nearby foreground elements will be soft. If you focus on the foreground, stars will blur. Focus Stacking solves this.
- Take one exposure focused on the stars (infinity).
- Without moving the camera, take a second exposure focused on the foreground (or the nearest foreground element).
- For deep scenes, take additional frames focused at intermediate distances.
- In post-processing, align the frames and mask the sharp areas from each into a single composite.
- Use a sturdy tripod and avoid bumping it between frames. Even a millimeter of shift complicates alignment.
Alternatively, you can light paint the foreground during the sky-focused exposure. This provides a well-lit foreground in a single frame, though the Depth Of Field may still limit sharpness for very close foreground elements.
Blending Multiple Exposures
The Dynamic Range between a bright sky (Milky Way, stars) and a dark foreground (unlit landscape at night) can exceed what a single exposure handles well. Blending exposures lets you optimize each separately.
- Sky exposure: Wide open aperture, high ISO, maximum shutter speed before trailing. Optimized for star brightness and color.
- Foreground exposure: Same aperture, same or lower ISO, potentially longer shutter speed (star trailing in this frame does not matter if you blend only the foreground). Alternatively, a lower-ISO exposure with light painting.
- Blue hour foreground: Some photographers take the foreground exposure during blue hour (just after sunset) when there is still ambient light on the landscape, then return to the same tripod position after dark for the sky exposure. This produces a naturally lit foreground with a star-filled sky, though care must be taken to ensure the lighting direction is consistent.
Blend in Photoshop For Photographers using layer masks. The horizon line is typically the blend boundary. A soft-edged brush along the horizon creates a natural transition. Avoid hard edges that make the composite obvious.
Light Painting the Foreground
Light painting adds illumination to the foreground during a long exposure, revealing detail and color that would otherwise be lost in darkness.
- During the exposure, use a flashlight or headlamp to briefly sweep light across the foreground landscape.
- Use a warm-toned light (2700-3000K) to add warmth that contrasts with the cool sky.
- Keep the light moving constantly. Holding it still on one area creates hot spots.
- Stand behind the camera so your silhouette does not appear in the frame.
- Practice the timing. A few seconds of light painting during a 20-second exposure is usually enough. Too much light washes out the foreground and kills the nighttime atmosphere.
- Use very low power. At night, even a dim light has significant impact. Start with less light than you think you need.
Post-Processing Workflow for Astro-Landscapes
Post-processing is essential for astro-landscape images. Straight out of camera, most night sky exposures look flat and noisy. Processing brings out the detail, color, and drama that the camera captured but did not display.
- Step 1: Lens corrections. Apply lens profile corrections to fix distortion and vignetting. Wide-angle lenses at wide apertures often show significant vignetting.
- Step 2: White balance. Fine-tune White Balance to your preference. A blue sky with warm foreground light painting creates a pleasing contrast. Most astro-landscape images work best in the 3800-4200K range.
- Step 3: Reduce noise. Apply Noise reduction carefully. Too much noise reduction removes star detail. Start with luminance noise reduction at a moderate level and sharpen afterward.
- Step 4: Increase contrast and clarity. Push contrast and clarity to bring out the Milky Way’s structure. Be careful not to over-process. The image should feel like a night scene, not a daytime photo with stars pasted in.
- Step 5: Selective adjustments. Use graduated or radial filters to adjust sky and foreground independently. Brighten the Milky Way core. Darken the horizon if light pollution creates a glow. Dodging And Burning techniques help draw attention to the key elements.
- Step 6: Star color enhancement. Stars have real colors (blue-white, yellow, orange, red). Increasing saturation slightly reveals these colors. Avoid making stars neon-colored, but subtle enhancement adds richness.
Common Mistakes
- Neglecting the foreground. The most common astro-landscape mistake is focusing entirely on the sky and treating the foreground as an afterthought. Scout and compose your foreground with the same care you would for any Landscape Photography.
- Shooting during a full moon. A full moon washes out stars and the Milky Way. Check the moon phase before planning a shoot.
- Star trailing from too-long exposures. The 500 Rule is a guideline, not a guarantee. On high-resolution sensors, trails appear sooner. Check your images at 100% zoom on location to verify sharpness.
- Over-processing the Milky Way. Aggressive clarity, contrast, and saturation can make the Milky Way look like a neon sign. Process with restraint. The goal is a natural-looking night sky that happens to be rich and detailed.
- Forgetting to check focus. At night, a slightly missed infinity focus produces soft stars that cannot be fixed in post. Zoom to 100% in live view and carefully confirm focus on a bright star before shooting.
- Not bringing enough batteries. Cold and long exposures drain batteries fast. A battery that lasts 500 shots during the day may last 100 at night in cold conditions.
- Light pollution in the foreground. Street lights, car headlights, and nearby buildings can cast unwanted light on your foreground. Scout locations during the day and identify potential light sources.
Try This: Practical Exercises
- Star point test. On a clear night, set up your camera on a tripod aimed at a recognizable star. Take a series of exposures at 10, 15, 20, 25, and 30 seconds (all at your lens’s widest aperture and ISO 3200). Zoom to 100% on each image and identify exactly where star trailing becomes visible. This establishes your personal maximum exposure time for that lens and camera combination.
- Foreground focus stack. Set up a scene with a foreground element (rock, tree, fence) and the night sky behind it. Take two exposures: one focused on the foreground and one focused on the stars. Blend them in Photoshop For Photographers using a layer mask at the horizon.
- Light painting practice. During a night exposure, practice light painting a foreground element with a flashlight. Take 10 frames with varying light painting durations (1 second, 3 seconds, 5 seconds) and compare. Learn how much light is needed without overwhelming the scene.
- Plan a Milky Way shoot. Use a planning app to determine when the Milky Way core will be visible from your location, which direction it will appear, and what foreground you can position in front of it. Execute the plan and compare the results to your visualization.
Frequently Asked Questions
Can I shoot the Milky Way from a city?
Not effectively. City light pollution overwhelms the faint glow of the Milky Way. You need to travel to a location rated Bortle Class 4 or lower for a visible Milky Way core. Bright stars and planets are visible from cities, but the galactic core requires dark skies.
What is the best time of year for Milky Way photography?
In the Northern Hemisphere, the Milky Way’s galactic core is best positioned from April through September, with peak visibility in June and July when it rises in the southeast and arches overhead. In the Southern Hemisphere, the core is visible year-round but best from February through October.
Do I need a full-frame camera?
No. Full Frame Vs Crop Sensor full-frame cameras have a noise advantage at high ISO, which is helpful, but modern crop-sensor cameras produce excellent astro-landscape images. The lens matters more than the body. A fast, wide lens (f/1.8 to f/2.8) on any modern camera can capture the Milky Way.
How do I focus on stars in the dark?
Switch to live view, point at a bright star or planet, and magnify the live view to maximum. Manually turn the focus ring until the star appears as the smallest possible point. Do not trust the infinity mark on your lens, as many lenses focus past infinity. Once focused, do not touch the focus ring for the rest of the session.
What is the difference between the 500 Rule and the NPF Rule?
The 500 Rule is a simple formula (500 divided by focal length equals maximum seconds). The NPF Rule is a more precise calculation that factors in sensor pixel density, aperture, and declination of the stars. The NPF Rule typically gives shorter (more conservative) exposure times but produces sharper star points. For high-resolution sensors, the NPF Rule is more reliable.
Can I stack exposures to reduce noise?
Yes. Taking multiple identical exposures and averaging them in software (like Sequator or Starry Landscape Stacker) dramatically reduces noise while preserving detail. This technique is common in astrophotography and works well for the sky portion of astro-landscape images.