A photograph is a flat, two-dimensional rectangle. Yet the best photographs make you feel like you could step right into them. You sense the distance between the foreground rocks and the far mountains. You feel the space between a portrait subject and the blurred background behind them. This illusion of three-dimensionality is depth, and creating it is one of the most important skills in photographic composition. When a photograph has depth, it feels immersive and real. When it lacks depth, it feels flat and lifeless, no matter how interesting the subject is. This guide covers every technique you can use to create a convincing sense of depth in your images.
What Is Depth in Photography?
Depth in photography refers to the visual perception of distance and three-dimensionality within a two-dimensional image. When an image has depth, the viewer perceives distinct spatial layers: a foreground, a middle ground, and a background. Elements within the image appear to exist at different distances from the camera, and the viewer’s eye travels through the scene rather than just across it.
Creating depth requires understanding the visual cues that the human brain uses to perceive distance in the real world, and then deliberately incorporating those cues into your photographs. These cues include overlapping elements, size differences, atmospheric effects, convergence of lines, color shifts, focus gradients, and lighting contrasts. The more depth cues you include in a single image, the stronger the illusion of three-dimensionality becomes.
Depth is not a single technique but a result of combining multiple techniques. Every composition decision you make, from lens choice to subject placement to lighting, affects the perceived depth of the final image. Understanding depth means understanding how all these elements work together.
Why Depth Matters
Depth makes photographs feel immersive. When a viewer perceives spatial distance in an image, they feel invited into the scene rather than looking at a flat surface. This immersion creates a stronger emotional connection between the viewer and the photograph. A landscape with clear depth feels like a place you could visit. A portrait with depth separation feels like a real person in a real space, not a cardboard cutout against a backdrop.
Depth also organizes the visual information in a photograph. By establishing foreground, middle ground, and background, you create a visual hierarchy that guides the viewer’s eye through the image in a deliberate sequence. The foreground draws the viewer in, the middle ground presents the main subject, and the background provides context. Without depth, all elements exist on the same visual plane, and the image can feel cluttered or directionless.
In competitive photography, depth is often what separates amateur work from professional work. Professionals instinctively create layered, three-dimensional compositions. Beginners tend to produce flat images because they have not yet learned to see and create depth cues. Mastering depth will immediately elevate the quality of your photographs.
Techniques for Creating Depth
Foreground Interest
Foreground interest is the most direct way to add depth to a photograph. By including a compelling element in the near foreground, you establish the closest spatial layer and create a visual entry point that draws the viewer into the scene. A rock, a flower, a puddle, a textured surface, a person’s hands, or any other element in the foreground creates a clear “here” that contrasts with the “there” of the background.
The key to effective foreground interest is making the foreground element visually engaging without letting it overpower the main subject. The foreground should invite the eye in, not trap it. Position the foreground element in the lower portion of the frame, and ensure there is a clear visual path from the foreground to the main subject. Wide-angle lenses exaggerate the distance between foreground and background, making foreground interest particularly effective with focal lengths between 14mm and 35mm.
Overlapping Elements (Layering)
When one object partially obscures another, the brain automatically interprets the obscured object as being further away. This is one of the simplest and most powerful depth cues. A tree in front of a hill in front of a mountain creates three distinct layers of depth. Each element’s partial obstruction of the one behind it establishes a clear spatial order.
Layering works in every genre. In landscape photography, multiple ridges or hills receding into the distance create natural layers. In street photography, people at different distances, some partially obscured by others, create urban depth. In portrait photography, foreground elements (a window frame, foliage, another person) overlapping the subject create depth separation.
To use layering effectively, compose so that the overlapping is clear and purposeful. Elements that barely overlap can look accidental. Elements that significantly overlap establish an unambiguous spatial relationship. Look for scenes with three or more layers for the most convincing depth.
Leading Lines
Leading lines create depth by guiding the viewer’s eye from the foreground into the background. A road stretching to the horizon, a river winding through a valley, a fence receding into the distance, or railroad tracks converging at a vanishing point all create lines that the eye follows from near to far. This visual journey through the image creates a powerful sense of spatial depth.
The most effective leading lines for depth start in the foreground corners of the frame and converge toward the middle ground or background. Diagonal lines create the strongest sense of depth because they travel both across the frame and into it. Converging lines (two parallel lines that appear to meet in the distance due to perspective) are particularly powerful depth cues because they mimic the way we perceive depth in the real world.
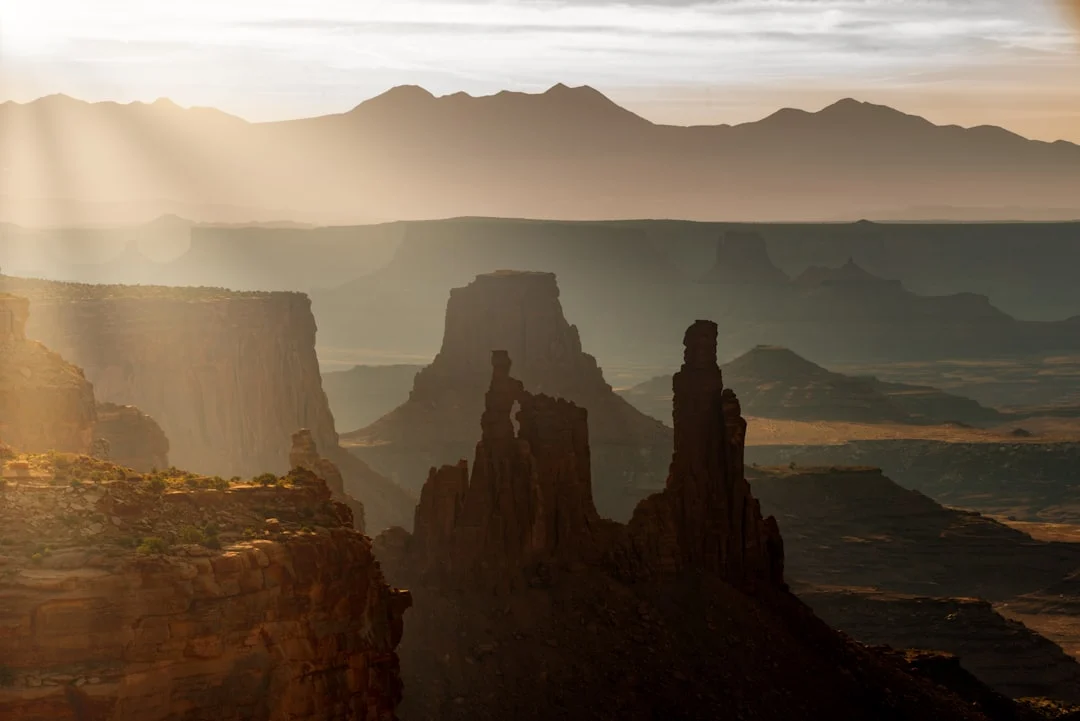
Atmospheric Perspective
Atmospheric perspective is the phenomenon where distant objects appear lighter, less contrasty, and sometimes bluer than close objects. This happens because particles in the air (dust, moisture, pollution) scatter light between the viewer and distant subjects, creating a haze that increases with distance. Mountains in the far distance appear pale and blue, while nearby elements are dark and saturated.
You can use atmospheric perspective deliberately to create depth. Shoot on misty or hazy days when the effect is pronounced. Compose to include both near elements (dark, saturated, detailed) and distant elements (light, desaturated, hazy). The tonal and color gradient from foreground to background creates an unmistakable sense of distance. Landscape photography benefits enormously from atmospheric perspective. Foggy mornings, misty valleys, and smoky skies all provide natural atmospheric depth.
In post-processing, you can enhance atmospheric perspective by slightly increasing the haze in distant areas or adding a subtle blue cast to the background while keeping the foreground warm and saturated.
Diminishing Scale
Objects appear smaller as they get further away. This is such a fundamental aspect of visual perception that we often take it for granted, but deliberately using diminishing scale in your compositions creates strong depth. A row of identical trees that appear progressively smaller as they recede into the distance communicates depth instantly. A group of people where the nearest person appears much larger than those further away establishes clear spatial relationships.
For diminishing scale to work effectively, the viewer needs to recognize the repeating element and understand that the size difference is due to distance, not actual size variation. Identical or similar objects (fence posts, lampposts, people, trees) work best because the viewer knows they are the same size and interprets the apparent size change as distance. This is related to the patterns and repetition concept, where repeating elements receding into distance create both rhythmic pattern and spatial depth simultaneously.
Depth of Field
Depth of field is one of photography’s unique depth tools, unavailable to painters or illustrators without simulating it. By using a wide aperture to create a shallow depth of field, you render the subject sharp while the foreground and background blur. This focus gradient tells the viewer that the sharp area is the point of interest and that the blurred areas are at different distances. The degree of blur indicates relative distance: a gently blurred background is perceived as slightly behind the subject, while a heavily blurred background is perceived as far behind.
Shallow depth of field creates depth through isolation: the sharp subject exists on its own plane, separated from the blurred surroundings. Deep depth of field (narrow aperture, everything sharp) creates depth through the other techniques described here: layering, scale, atmosphere, and lines. Both approaches create depth, but they do it differently. Shallow depth of field is personal and intimate. Deep depth of field is expansive and detailed.
The focal length of your lens affects how depth of field renders. Longer focal lengths create more apparent background blur (bokeh) at the same aperture, making it easier to separate the subject from the background. Wider focal lengths require wider apertures or closer focusing distances to achieve similar separation. Understanding this relationship helps you choose the right lens for the depth effect you want.
Framing
Framing creates depth by establishing a near element (the frame) and a far element (the subject within the frame). When you shoot through a doorway, an archway, tree branches, or any other foreground frame, you create two distinct spatial layers: the frame’s layer and the subject’s layer. The viewer perceives the space between these layers as depth.
Framing is particularly effective for depth when combined with a difference in focus, tone, or brightness between the frame and the subject. A dark, silhouetted frame surrounding a bright, detailed subject maximizes the depth illusion because the tonal contrast reinforces the spatial separation.
Color and Tonal Recession
Warm colors (red, orange, yellow) appear to advance toward the viewer, while cool colors (blue, green, purple) appear to recede. This color-based depth cue is subtle but real. A composition with warm foreground elements and cool background elements will feel deeper than one where the color temperature is uniform throughout.
Tonal recession follows a similar principle: dark, high-contrast elements feel closer, while light, low-contrast elements feel further away. This is closely related to atmospheric perspective but can be used even in scenes without actual atmosphere. In post-processing, you can enhance depth by warming the foreground slightly and cooling the background, or by increasing the contrast of near elements while reducing the contrast of far elements.
Light and Shadow
Directional lighting creates shadows that give objects volume and dimensionality. A face lit from the side has depth because the shadows reveal the three-dimensional contours of the features. A landscape illuminated by low-angle golden hour light has depth because every hill, ridge, and texture casts shadows that define its form. Without shadows, objects appear flat. With carefully placed light and shadow, they appear solid and three-dimensional.
Sidelight and backlight create the most depth because they produce the strongest shadows. Front light (light behind the camera) fills in shadows and flattens the scene. When depth is your goal, choose lighting that sculpts your subject with light on one side and shadow on the other.
Perspective and Viewpoint
Your camera angle and position dramatically affect perceived depth. Low viewpoints exaggerate the distance between foreground and background because the foreground is closer to the lens and appears proportionally larger. This is why getting low is one of the most common landscape photography tips. A camera at ground level with rocks or flowers in the immediate foreground creates a dramatic depth gradient from near to far.
High viewpoints, looking down on a scene, tend to flatten depth because the spatial relationship between foreground and background is compressed. However, high viewpoints can reveal patterns and layouts that create their own type of visual depth. The key is understanding how your viewpoint affects depth perception and choosing the angle that serves your compositional intent.
Wide-angle lenses exaggerate perspective and spatial depth. Elements near the camera appear disproportionately large compared to those further away, creating a dramatic depth gradient. Telephoto lenses compress perspective, making near and far elements appear closer together. For maximum depth, use a wide-angle lens from a low viewpoint with a strong foreground element. For a flattened, layered look, use a telephoto lens.
Building Depth with Layers
The most depth-rich photographs contain at least three distinct visual layers: foreground, middle ground, and background. Each layer plays a role in the composition.
The foreground draws the viewer in and establishes the nearest spatial reference point. It often contains texture, leading lines, or interesting objects that invite the eye to enter the scene.
The middle ground typically contains the main subject. It is where the story of the image unfolds. In a landscape, the middle ground might contain a lake, a building, or a group of trees. In a street photograph, it might contain the main figure.
The background provides context, atmosphere, and a sense of scale. Mountains, sky, distant buildings, or blurred city lights all serve as backgrounds that establish the environment and add the final layer of depth.
When composing, consciously identify and arrange these three layers. Ask yourself: What is in my foreground? What is in my middle ground? What is in my background? How do these layers relate to each other? Are the transitions between layers smooth and logical, or are there gaps? Building this three-layer habit into your compositional process will dramatically improve the depth in your photographs.
Depth in Different Photography Genres
Landscape Photography
Depth is arguably the most important quality in landscape photography. A flat landscape photograph fails to convey the grandeur and immersive quality of being in a natural space. Use foreground interest, leading lines, atmospheric perspective, and deep depth of field to create landscapes that feel three-dimensional. Get low, get close to the foreground, and use a wide-angle lens. Shoot during golden hour or in misty conditions to maximize atmospheric depth cues.
Portrait Photography
In portrait photography, depth is primarily created through focus separation. A wide aperture blurs the background, placing the subject on a distinct plane and creating a sense of space between person and environment. Directional lighting adds facial dimensionality, sculpting the features with light and shadow. For environmental portraits, include multiple depth layers (foreground, subject, background) to place the person within a three-dimensional space.
Street Photography
In street photography, depth comes from layering multiple elements at different distances. People in the foreground, middle ground, and background create natural depth. Converging architecture and leading lines from streets and buildings pull the eye into the scene. The busy, layered quality of street scenes provides abundant depth cues when you compose deliberately.
Architecture Photography
In architecture photography, depth is created through perspective lines, layered spatial planes, and the interplay of light and shadow on structural forms. Corridors, colonnades, and staircases provide natural depth through converging lines and repeating elements. Interior architecture offers opportunities for framing through doorways and openings, creating depth through the “room beyond room” effect.
Common Mistakes
Shooting flat scenes without foreground interest. The most common depth mistake is photographing a subject straight-on without any foreground element. This is especially common in landscape photography, where beginners point the camera at a distant mountain and wonder why the image feels flat. Add a foreground element, and the depth appears immediately.
Using the wrong focal length for the scene. A telephoto lens at a vast landscape compresses the depth and flattens the layers. A wide-angle lens without foreground interest creates empty, directionless space. Choose your focal length deliberately based on whether you want to exaggerate depth (go wide) or compress it (go long).
Shooting in flat, even lighting. Overcast, shadowless light removes one of the most important depth cues: the play of light and shadow that gives objects volume. When the light is flat, your other depth techniques need to work harder. Whenever possible, shoot in directional light that creates shadows and dimensionality.
Ignoring the background. A cluttered, distracting background undermines depth because it competes with the foreground and middle ground for attention. Simplify the background or use a wider aperture to blur it. A clean, differentiated background supports the layered depth structure of the image.
Standing at eye level for everything. The default eye-level perspective produces images that look exactly like how we normally see the world, which is to say, ordinary. Getting lower exaggerates depth by increasing the apparent distance between foreground and background. Getting higher reveals spatial layout. Change your shooting angle to create perspectives that feel fresh and dimensional.
Over-relying on depth of field alone. Shallow depth of field creates separation between planes, but it is only one depth tool. If the only depth in your image comes from background blur, the image will feel simple. Combine depth of field with other techniques (layering, light, atmosphere, lines) for richer, more convincing depth.
Try This
The three-layer exercise. Go to any location with a view, whether a park, a rooftop, or a scenic overlook, and compose a photograph that includes a distinct foreground, middle ground, and background. Make each layer clearly identifiable. Review the image and note how the three layers create depth. Then photograph the same scene without the foreground. Compare the two images and observe how dramatically the depth changes.
Wide vs. telephoto comparison. Find a scene with clear depth (a road stretching into the distance, a layered landscape). Photograph it with a wide-angle lens from a close viewpoint, then with a telephoto lens from further back. Compare how the two images render depth differently. The wide shot will have exaggerated depth, while the telephoto will have compressed depth. This exercise teaches you how focal length controls the depth illusion.
The low-angle landscape. Find a landscape scene with a textured foreground (rocks, flowers, sand, grass). Get as low as you can, placing your camera just centimeters from the foreground element. Use a wide-angle lens and a narrow aperture (f/11 to f/16) to keep everything sharp from foreground to background. This perspective creates dramatic depth that makes the viewer feel like they are right there in the scene.
Atmospheric depth day. Wait for a misty, foggy, or hazy morning and photograph landscapes or cityscapes where the atmosphere creates visible layers. Look for scenes with multiple ridges or rows of elements at different distances, each lighter and less detailed than the one in front of it. This natural atmospheric perspective creates beautiful, painterly depth.
The focus gradient portrait. Photograph a portrait at the widest aperture your lens allows. Position the subject in the middle ground with both foreground and background elements visible. The shallow depth of field will create a focus gradient: blurred foreground, sharp subject, blurred background. This three-zone focus gradient creates clear depth layers. Experiment with different foreground elements to frame the subject.
Leading lines depth study. Find a strong leading line (a road, a path, a fence, a row of columns) and photograph it so that the line starts in the foreground and converges toward the background. Try several different positions: standing over the line, standing beside it, getting low and shooting along it. Note how your position relative to the line changes the depth effect. Add this to your photography project ideas.
FAQ
What is the single most effective way to add depth to a photograph?
Including foreground interest. If you could only use one depth technique, foreground interest would create the most dramatic improvement. A compelling foreground element immediately establishes a near layer that contrasts with the far background, creating an unmistakable sense of spatial distance.
Does depth of field create depth in photography?
Yes. Shallow depth of field separates the sharp subject from the blurred foreground and background, creating distinct visual planes. Deep depth of field can also create depth when combined with other techniques like layering and leading lines. Both shallow and deep depth of field contribute to the three-dimensional illusion, just in different ways.
Which lens focal length creates the most depth?
Wide-angle lenses (14mm to 35mm) create the most exaggerated depth because they stretch the apparent distance between near and far elements. However, “most depth” is not always “best depth.” Telephoto lenses create compressed, layered depth that is equally valuable in different contexts. The best focal length for depth depends on the scene and the effect you want to achieve.
Can I add depth in post-processing?
You can enhance existing depth cues in post-processing. Darken and warm the foreground, lighten and cool the background. Add subtle vignetting to draw the eye inward. Enhance atmospheric haze in distant areas. Apply selective sharpening to the subject with slight blur to the background. However, the foundation of depth must be created in the field through composition, lens choice, and lighting. Post-processing refines depth but cannot create it from scratch.
Why do my landscape photographs look flat?
The most common causes are: shooting without foreground interest, shooting at midday when flat overhead light eliminates shadows, using a telephoto lens from a distance (which compresses depth), and shooting from eye level without exploring lower angles. To fix flat landscapes: include a foreground element, shoot during golden hour or in atmospheric conditions, use a wide-angle lens, and get low. Even one of these changes can dramatically improve depth.
How many depth techniques should I use in one image?
As many as the scene allows. The more depth cues present in an image, the stronger the three-dimensional illusion. A single technique (foreground interest alone, for example) creates noticeable depth. Two or three techniques together (foreground interest plus leading lines plus atmospheric perspective) create compelling depth. Images that combine four or more depth cues feel deeply immersive and three-dimensional. There is no upper limit to how many depth techniques you should use.
Is depth always desirable in photography?
Not always. Some photography styles deliberately minimize depth. Minimalist photography may seek flat, two-dimensional compositions. Abstract photography often removes spatial cues to create images that exist outside of three-dimensional space. Telephoto compression is used deliberately to flatten layers for graphic, pattern-based compositions. Depth is a powerful tool, but like all tools, it should be used when it serves your creative vision.
How does texture contribute to depth?
Texture contributes to depth in two ways. First, a textured foreground provides a tactile, detailed entry point that anchors the near space of the image. Second, the gradient from detailed foreground texture to less detailed background texture mimics how we perceive real-world depth (near things have visible detail, far things do not). Including strong texture in the foreground while allowing background texture to soften reinforces the depth illusion.