Learning to See Light
Light is not something that simply exists in a scene. It is the raw material of your photograph, the single most important element determining whether an image is beautiful, flat, dramatic, or lifeless. Everything else, your composition, your subject, your camera settings, works with or against the light. Learning to see light as a photographer, to read its qualities before you even raise your camera, is one of the most transformative skills you can develop.
Every light source has four qualities that matter to photographers: direction, quality, color, and intensity. Once you learn to identify these four qualities instinctively, you can walk into any scene and immediately understand why it looks the way it does and how to work with it. For a deeper exploration of these principles, see the Understanding Light guide.
Direction refers to where the light is coming from relative to your subject. Front light illuminates the subject evenly and minimizes shadows. It is “safe” light, clear and detailed but often flat and lacking in dimension. Side light creates shadows that give shape and depth to three-dimensional objects. It reveals texture and form, making surfaces look tactile and real. Back light comes from behind your subject, creating rim lighting, silhouettes, and a sense of drama. Top light, like midday sun, casts deep shadows under overhangs, noses, and eyebrows. Each direction has its strengths and its challenges.
Quality describes whether the light is hard or soft. Hard light comes from a small or distant source relative to the subject. It creates sharp-edged shadows with a crisp, defined border between light and dark. Direct midday sun is hard light. Soft light comes from a large or close source relative to the subject. It creates gentle, gradual shadows with soft edges that transition smoothly from light to dark. An overcast sky is soft light. A large window is soft light. Neither hard nor soft is inherently better. Hard light is dramatic and graphic. Soft light is gentle and flattering. The choice depends on what you are photographing and what mood you want to create.
Color, often called color temperature, refers to the warmth or coolness of the light. Morning and evening light is warm, leaning toward gold and orange. Midday light is relatively neutral. Shade and overcast skies produce cooler light with a slight blue cast. Indoor lighting varies widely: incandescent bulbs produce warm, orangish light, while fluorescent tubes can cast a greenish tint. Your eyes adjust automatically to color temperature, but your camera does not. Learning to see color temperature consciously is essential for controlling how your images feel.
Intensity is simply how bright the light is. Bright light gives you more options for fast shutter speeds, small apertures, and low ISO. Dim light forces compromises. But intensity also affects mood. A dimly lit scene photographed well feels intimate, mysterious, or moody. Bright light feels energetic and alive. The intensity of the light shapes both the technical decisions you make and the emotional register of the photograph.
The habit you want to develop is noticing light before you notice subjects. Walk into a room and observe where the light is coming from, how soft or hard the shadows are, what color the light has, and how bright it is. Walk down a street and notice how the light changes as it bounces off buildings, filters through trees, or reflects off pavement. This practice transforms the way you see the world, and it will improve your photographs more than any equipment upgrade ever could.
Golden Hour and Blue Hour
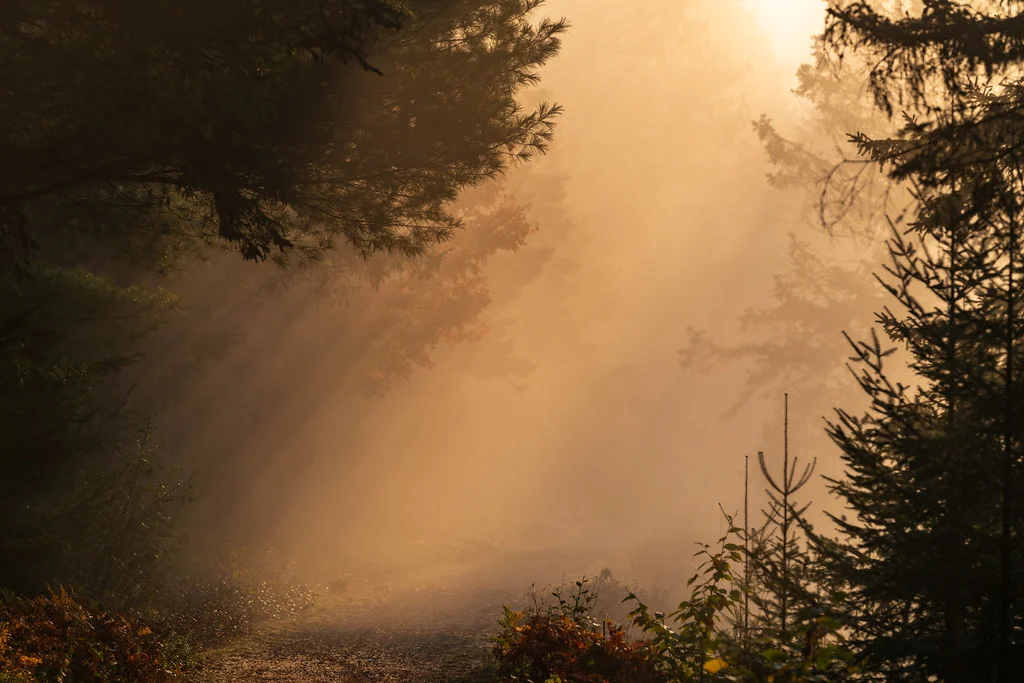
There is a reason photographers talk about golden hour with something close to reverence. The period just after sunrise and just before sunset produces light that is warm, directional, and incredibly flattering. The sun is low on the horizon, so it strikes your subject from the side rather than above, creating long shadows that add dimension and depth. The light passes through more atmosphere, which scatters the shorter wavelengths and leaves the warm gold and amber tones that give golden hour its name.
Everything looks better in golden hour light. Landscapes glow. Portraits are bathed in warm, soft illumination. Even mundane scenes take on a quality of beauty and warmth. This is not just a matter of taste. The low angle, warm color, and moderate intensity of golden hour light combine to produce objectively more dimensional and visually interesting images than flat midday light.
The practical challenge of golden hour is that it is short. Depending on your latitude and the time of year, you may have as little as 20 minutes of prime golden light, or as much as an hour and a half. The light changes rapidly, shifting from warm gold to deep amber to pink as the sun approaches or leaves the horizon. You need to be in position, ready to shoot, before the light peaks. Planning is essential. Scout your location in advance. Know where the sun will be. Use weather apps and sun-tracking tools to predict conditions.
Blue hour is the period just after sunset and just before sunrise when the sky takes on a deep, rich blue tone. The sun is below the horizon, so there is no direct sunlight, but enough ambient light remains to illuminate scenes with a cool, ethereal quality. Blue hour is particularly stunning for cityscapes, because the warm artificial lights of buildings and streets create a beautiful contrast with the cool blue sky. It is also excellent for photographs of water, as the calm, even light produces smooth, serene reflections.
Blue hour typically lasts 20 to 40 minutes, and the light is dim enough that you will usually need a tripod and longer exposures. This slower pace can actually be an advantage. It gives you time to compose carefully, try different angles, and wait for the light to reach its most beautiful point. Many landscape and cityscape photographers consider blue hour their favorite time to shoot, even more than golden hour.
Between golden hour and blue hour, there is often a brief window of pink, magenta, and lavender light that produces some of the most dramatic skies of the day. This transition happens quickly and varies enormously depending on cloud cover and atmospheric conditions. The best approach is to keep shooting through the entire transition, from golden hour through sunset and into blue hour. You never know which moment will produce the most extraordinary light.
Harsh Midday Light
Most photography advice tells you to avoid shooting in the middle of the day. The sun is high, the light is harsh, shadows are short and severe, and the overall quality is considered unflattering. This advice is well-intentioned but incomplete. Midday light is challenging, yes. But it also offers creative possibilities that softer light does not.
Hard shadows are not always a problem. They can be a compositional element. The deep, crisp shadow of a building falling across a street creates graphic shapes, clean lines, and bold contrasts that work beautifully in black-and-white or high-contrast color photography. The geometry of shadows at midday can transform an ordinary scene into an abstract composition of light and dark shapes.
Strong overhead light is also excellent for revealing texture. When light hits a surface from a steep angle, it skims across textures and imperfections, making them visible and tactile. The rough grain of weathered wood, the ridges in sand dunes, the cracks in dried earth, all of these are more visible and more dramatic in hard light than in soft light. If you are photographing texture, seek out the harsh light rather than avoiding it.
Silhouettes are another midday opportunity. When the sun is high and bright, placing your subject between you and the light source creates a strong silhouette with a bright, even background. Expose for the background and let the subject go dark. The result is a bold, graphic image that emphasizes shape and outline over detail.
When you do need to photograph people in harsh light, look for open shade. This is a shaded area with an open sky in front of it, such as the shadow side of a building, under a tree canopy with open sky visible, or beneath an awning. The subject is shielded from direct sunlight, but the sky acts as a large, soft light source that illuminates them evenly. Open shade produces beautiful, flattering light that works for portraits in virtually any outdoor setting.
It is also worth distinguishing between different types of diffused daylight. A lightly overcast sky acts like a giant softbox, producing even, shadowless light that is excellent for portraits and product photography but can make landscapes look flat. A partly cloudy sky creates a mix of hard and soft light as the sun moves in and out of the clouds, which can be dynamic and interesting but requires you to adapt quickly. A hazy sky, with visible sun but reduced contrast, produces a unique quality of light that is warm and slightly diffused, splitting the difference between harsh and soft.
The bottom line is this: do not put your camera away at noon. Train yourself to see the creative potential in every lighting condition. Some of the most striking and memorable photographs are made in light that most photographers walk past.
Window Light
Of all the natural light sources available to you indoors, a window is the most versatile and the most beautiful. Window light has been the portrait photographer’s favorite light source for centuries, long before the invention of artificial studio lighting. The Old Masters of painting understood this intuitively, and photographers can draw on the same understanding.
A window works as a light source because of its size relative to the subject. A large window close to your subject produces soft, directional light with gentle shadows. The closer the subject to the window, the softer the light becomes. Move the subject farther from the window and the light wraps around less, creating deeper shadows and more contrast. This gives you an enormous range of lighting moods from a single window, simply by changing the subject’s position.
The direction of the light matters too. Position your subject facing the window directly and you get flat, even illumination with minimal shadows. This can be useful for certain styles, but it lacks dimension. Turn the subject 45 degrees to the window and one side of the face is lit while the other falls into gentle shadow. This is the most flattering angle for most faces, and it produces the classic “Rembrandt lighting” look that painters have used for centuries. Turn the subject 90 degrees to the window and exactly half the face is lit, with the other half in deeper shadow. This “split lighting” is dramatic and moody.
Sheer curtains or white fabric over a window act as natural diffusers, softening the light even further. If direct sunlight is streaming through the window and creating hard shadows, a sheer curtain transforms it into soft, even illumination. This is one of the simplest and most effective light modification techniques in all of photography.
The orientation of the window in your space affects the quality of light throughout the day. In the Northern Hemisphere, north-facing windows never receive direct sunlight, providing consistent, diffused light all day long. This makes them ideal for photography because the light is predictable and even. South-facing windows receive direct sunlight that moves across the window throughout the day, creating different lighting conditions hour by hour. East-facing windows get morning light, warm and directional. West-facing windows get afternoon and evening light. Each orientation offers different qualities, and understanding your space means knowing when the light will be at its best for the kind of photographs you want to make.
A white wall, ceiling, or reflector on the shadow side of a window-lit subject bounces some of the light back into the shadows, reducing contrast and creating a more evenly lit portrait. This is the simplest “two-light” setup in photography: the window as the main light, and a reflective surface as the fill light. With nothing more than a window and a piece of white foam board, you can produce portrait lighting that rivals a professional studio.
Modifying Natural Light
Natural light is beautiful, but it does not always do exactly what you need. Learning to modify it, subtly and with minimal equipment, extends your creative range enormously.
A reflector is the simplest and most versatile light modifier. It bounces light into shadow areas, reducing contrast and adding detail to dark tones. A commercially made 5-in-1 reflector is inexpensive and useful, but you do not strictly need one. A white piece of foam board, a large white sheet of paper, a white towel, or even a light-colored wall can serve as a reflector. The principle is the same: position a reflective surface opposite the light source so it catches some of that light and redirects it into the shadows on your subject.
The color of the reflector matters. White reflectors produce neutral fill light. Silver reflectors produce brighter, slightly cooler fill. Gold reflectors add warm-toned fill that can simulate golden hour warmth. Black “reflectors” (sometimes called flags) do the opposite: they absorb light and deepen shadows, which can be useful when you want to increase the contrast on one side of a subject.
A diffuser softens harsh light by spreading it over a larger area. Commercially, these are translucent white panels or discs that you hold between the light source and your subject. But anything translucent works: a sheer curtain, a white bedsheet, even a large piece of wax paper or frosted plastic. The principle is that the diffusion material becomes the new, larger light source, producing softer shadows than the original small, hard source.
You can also think about the environment itself as a light modifier. A narrow alley between two buildings acts as a natural funnel for directional light. A white sandy beach acts as an enormous reflector, bouncing light upward into shadows under chins and eyes. A dark forest canopy acts as a natural flag, blocking overhead light and leaving only the soft, filtered light that penetrates through the trees. Pavement reflects light differently depending on whether it is light or dark, wet or dry. Once you start seeing the environment as a collection of reflectors, diffusers, and flags, your ability to find and use beautiful light expands dramatically.
The most important principle of light modification is subtlety. The goal is usually to enhance the natural light, not to overpower it. A reflector that is too close or too bright can create an unnatural “double light” effect with shadows going in conflicting directions. A diffuser that is too small creates a bright spot in the middle of an otherwise hard-lit scene. The best modifications look effortless, as though the light simply happened to fall perfectly.
And sometimes, the right decision is to not modify at all. If the natural light is creating a mood that serves your image, honor it. A portrait with deep, dramatic shadows does not need to be “fixed” with fill light if that drama is the point. Learn when to shape the light and when to simply accept what nature gives you.
Try This — Natural Light Exercises
These exercises will sharpen your ability to see, evaluate, and work with natural light. They require no special equipment, just your camera, an eye for observation, and a willingness to pay attention.
Light Journal. For one full day, photograph the same subject every two hours from sunrise to sunset. Choose something that does not move: a window, a doorway, an outdoor bench, a particular tree. At each interval, photograph it from the same position. At the end of the day, lay all the images out in sequence and study the transformation. Notice how the direction of the light shifts, how the shadows lengthen and shorten, how the color temperature changes from warm to cool and back to warm. This exercise makes the invisible visible. You will never look at daylight the same way again.
One Window Portrait. Using only the light from a single window and a white reflector (a towel, foam board, or even a pillow), photograph a person in five different positions. Face them toward the window. Turn them 45 degrees. Turn them 90 degrees. Move them close to the window. Move them far from the window. Add the reflector on the shadow side for some shots and remove it for others. You will be amazed at how many different looks you can produce with just one window. This exercise demonstrates that beautiful portrait lighting does not require expensive equipment. It requires observation and positioning.
Harsh Light Challenge. On a bright, sunny day around noon, go out and shoot for at least 30 minutes. The rule: instead of avoiding the harsh light, use it. Find strong geometric shadows cast by buildings, fences, or furniture. Find silhouettes. Find textures that the hard light reveals. Find surfaces where the light creates interesting reflections. Challenge yourself to make at least five images where the harsh light is the reason the photograph works, not something you had to work around. This exercise breaks the habit of only shooting in “good” light and teaches you to see creative potential in every condition.
Working with natural light is a lifelong practice that deepens the more you pay attention. The photographers who consistently make beautiful images in any condition are not simply lucky. They have trained themselves to see light the way a musician hears pitch: automatically, instinctively, and with an appreciation for subtleties that others miss. These exercises are the beginning of that training. The more you practice seeing light, the more you will find it everywhere, waiting to be used.