Seeing Architecture Photographically
Most people look at a building and see a building. A photographer looks at a building and sees a composition of line, shadow, texture, and light waiting to be distilled into an image. Architecture photography asks you to slow down and study the built environment with the same intensity a landscape photographer brings to a mountain range or a portrait photographer brings to a human face.
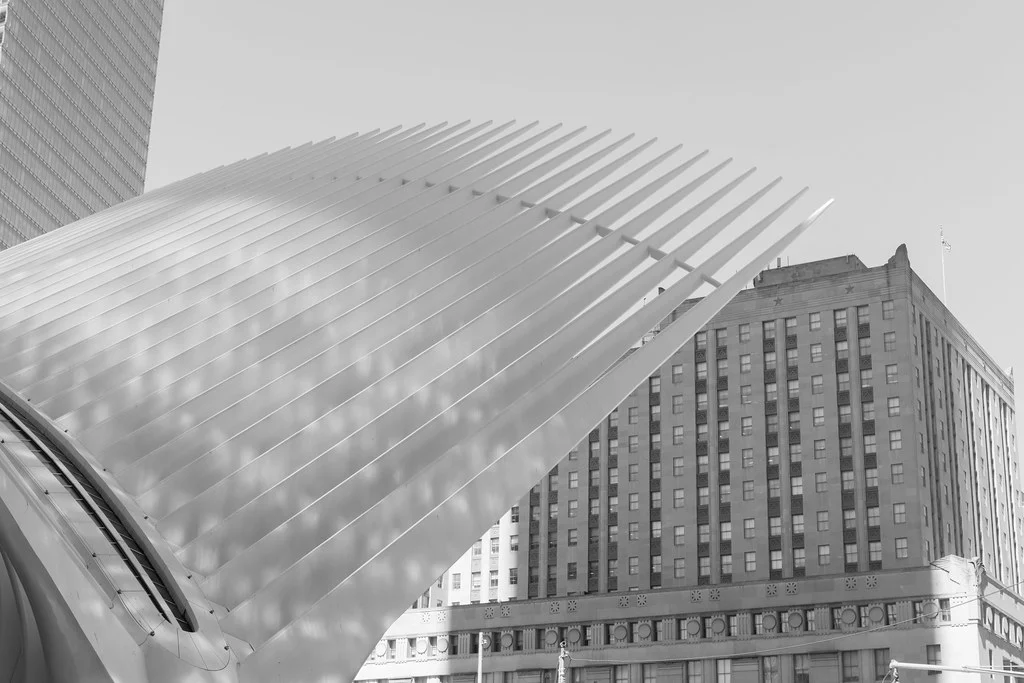
The first shift in thinking is to stop trying to photograph “the whole building.” That instinct, to step back, get everything in the frame, and document the structure from corner to corner, produces record shots, not photographs. Instead, look for the photograph within the structure. Maybe it is the way morning light catches a row of columns. Maybe it is the repetition of identical windows stacked ten stories high. Maybe it is a single doorway framed by crumbling brick. The most compelling architectural photographs are often fragments, not totalities.
Pattern and repetition are among architecture’s greatest gifts to photographers. Buildings are designed with repeating elements: arches, windows, balconies, floor tiles, staircases. Your job is to find these rhythms and frame them in a way that emphasizes their visual music. Look for where a pattern breaks, too. A single open window in a wall of closed ones. A person standing among identical columns. These breaks create tension and interest that pure repetition alone cannot.
The interplay between light and shadow on buildings can be breathtaking. A flat, overcast day renders most architecture dull. But when strong directional light hits a facade, it reveals texture, creates deep shadow, and transforms ordinary surfaces into dramatic compositions. Pay attention to how the light moves across a building during the day. The same structure can look completely different at dawn, midday, and dusk. This is why urban and cityscape photographers often plan their shoots around the position of the sun relative to their subject.
Modern architecture and historical architecture call for different approaches. Contemporary glass-and-steel structures reward clean, graphic compositions that emphasize their geometry and reflective surfaces. Older buildings, with their weathered stone, ornate details, and accumulated character, invite a more textural, intimate treatment. Neither approach is superior. The key is matching your photographic style to the character of the structure in front of you.
Scale is one of the most underutilized tools in architectural photography. A building’s size is difficult to convey in a two-dimensional photograph because the viewer has no reference point. Including a human figure, a car, a tree, or any recognizable object in the frame immediately communicates the scale of the structure. A tiny person at the base of a massive column makes the column feel monumental. Without that person, the viewer has no idea how tall the column actually is. Use scale deliberately to convey the grandeur, intimacy, or proportions of the architecture you are photographing.
Dealing with Perspective and Distortion
If you have ever pointed your camera upward at a tall building, you have seen converging verticals: the parallel edges of the building appear to lean inward, meeting at a vanishing point somewhere above the frame. This is not a flaw in your camera. It is simple geometry: when the sensor plane is tilted relative to the subject, parallel lines converge. Your eyes do the same thing, but your brain corrects for it. Your camera does not.
Whether converging verticals are a problem or a feature depends entirely on your intention. When you want a building to look stable, grounded, and true to its real proportions, converging lines can feel like a distortion that undermines the image. In these cases, you want to correct for it. The simplest approach is to position yourself so that you are level with the middle of the building, shooting from across the street, from an elevated vantage point, or from a distance with a longer focal length. When your camera is level and not tilted up or down, vertical lines stay vertical.
When you cannot get level with the building, you have a few options. Tilt-shift lenses allow you to correct perspective optically, but they are specialized and expensive. Most photographers handle this in post-processing, using perspective correction tools available in nearly every editing application. The tradeoff is that correcting perspective in post crops into your image, so leave extra space around the edges when composing a shot you plan to correct later.
But here is the thing: sometimes converging verticals are exactly what you want. When you stand at the base of a skyscraper, point your camera straight up, and let the lines rush toward infinity, you create a sense of soaring height and dramatic scale that a “corrected” image cannot match. Some of the most powerful architectural photographs deliberately embrace extreme perspective distortion for creative effect. The key is intention. Slight convergence looks like a mistake. Extreme convergence looks like a choice.
Wide-angle lenses are a staple of architectural photography, but they require careful handling. Barrel distortion, where straight lines bow outward near the edges of the frame, can make buildings look warped and unnatural. Keep your subject’s strongest straight lines away from the very edges of the frame, or use lens correction profiles in your editing software to straighten things out. And be mindful that wide-angle lenses exaggerate the size of whatever is closest to the camera, which can make a building’s base look disproportionately large relative to its upper floors.
Symmetry is a powerful compositional strategy in architectural photography, but it demands precision. If you decide to frame a building or interior symmetrically, commit to it fully. Even a slight misalignment, where one side of the image has marginally more space than the other, will feel wrong to the viewer. Take your time, use a tripod if needed, and check your framing carefully before pressing the shutter. A perfectly symmetrical architectural photograph has a calm, authoritative presence that is worth the extra effort.
Light in Architecture
Light does not just illuminate architecture. It reveals it. The same building photographed under flat overcast light and under raking golden-hour sunlight will look like two completely different structures. Understanding how light interacts with the built environment is perhaps the single most important skill in architectural photography.
Time of day is everything. Early morning and late afternoon light creates long shadows that rake across facades, revealing texture and depth that are invisible at noon. Midday overhead sun flattens surfaces and creates harsh, unflattering contrasts under ledges and overhangs. The golden hour wraps buildings in warm light that enhances warm-toned materials like brick, sandstone, and wood. If you want to photograph a specific building beautifully, visit it at multiple times of day and note when the light works best. Which direction the facade faces determines its ideal shooting window.
Shadows on buildings are not just the absence of light; they are compositional elements in their own right. A shadow line cutting diagonally across a wall creates a natural division in the frame. The shadow of one building falling across another creates unexpected juxtapositions. Window mullions cast geometric patterns on floors and walls. Learn to see shadows as positive elements, not obstacles, and your architectural photography will improve dramatically. As covered in the lesson on lighting, the quality and direction of light define the character of any photograph, and this is especially true with rigid, geometric subjects like buildings.
The blue hour, that brief window after sunset when the sky turns deep blue, is a favorite time for exterior architectural photography, particularly for buildings with interior or exterior illumination. During the blue hour, the sky provides a luminous blue backdrop, artificial lights glow warmly from windows, and the exposure balance between ambient sky and building lights is nearly perfect. This window lasts only about twenty minutes, so arrive early, set up your tripod, and be ready to shoot quickly.
Interior photography presents its own lighting challenges, primarily because indoor spaces typically mix multiple light sources with different color temperatures. A room might have warm tungsten table lamps, cool fluorescent ceiling strips, and neutral daylight streaming through windows, all in the same frame. Your camera’s automatic white balance will try to average these together, often producing unsatisfying results. Setting your white balance manually to match the dominant light source, or shooting in raw format and adjusting later, gives you much more control over how the space feels in the final image.
Urban Details and Abstracts
Not all architectural photography is about buildings as a whole. Some of the most compelling urban images focus on details, the elements that make up structures and streetscapes, isolated from their larger context. This is where your eye for pattern, texture, and graphic composition becomes essential.
Doors and windows are endlessly photographable subjects. Every culture, every era, every neighborhood has its own vernacular: the bright-painted doors of a coastal town, the Art Deco geometries of a 1930s apartment block, the symmetrical shuttered windows of a European terrace. A curated collection of doors or windows from a single city can tell you more about its character than a hundred skyline shots. Look for personality: peeling paint, hand-lettered signs, a plant on a windowsill, a curtain half-drawn.
Staircases, both interior and exterior, offer some of the strongest compositional opportunities in the urban environment. A spiral staircase shot from above creates a natural vortex. External fire escapes on the sides of buildings create zigzag patterns of light and shadow. Even a simple set of concrete steps can become a study in geometry when you find the right angle. If you enjoy urban exploration photography, you will find that staircases in older or abandoned buildings carry an emotional weight that newer structures rarely match.
Textures are everywhere in the urban environment. Weathered wood, rusted metal, crumbling plaster, polished marble, rain-streaked concrete, moss-covered brick. Each tells a story about time, weather, and use. Close-up photographs of these surfaces work as standalone images and also serve as a valuable reference library if you ever create double exposures or composite images. Train yourself to run your eyes, and your camera, along surfaces rather than across them.
One of the most valuable habits you can develop as an urban photographer is to break out of eye-level shooting. Look up at the underside of bridges, the edges of rooflines, the canopy of light fixtures over a street. Look down from bridges, parking garages, and balconies at the patterns people and vehicles create on the ground. Changing your vertical perspective transforms familiar scenes into fresh compositions that the walking public never notices.
Reflections deserve special attention in urban photography. Glass facades create mirror images of the buildings across the street. Puddles after rain offer upside-down cityscapes. Polished stone floors in lobbies and atriums reflect the architecture above them. These reflections add layers and complexity to your images, and they can create abstract compositions that challenge the viewer’s sense of orientation. Look for reflections actively, not just when they present themselves obviously.
Interior Photography
Photographing indoor spaces is a distinct discipline with its own technical and creative demands. Whether you are documenting a grand cathedral, a cozy cafe, or a modern apartment, the challenges of working indoors, limited light, tight spaces, mixed color temperatures, and cluttered environments, require thoughtful solutions.
The biggest technical challenge in interior photography is usually light, specifically, the lack of it compared to outdoors. Your first decision is whether to work with available light only or supplement with flash or artificial lighting. Available light preserves the natural atmosphere of a space: the warm glow of table lamps, the cool wash from windows, the pools of light and shadow that give a room its character. Adding flash can brighten a space and even out exposure, but it often kills the very ambience that makes the room interesting. In most cases, start with available light and only supplement when the natural lighting truly cannot create the image you want.
A tripod is nearly essential for interior photography. The combination of low light and the need for deep depth of field (to keep an entire room in sharp focus) often requires shutter speeds too slow for handheld shooting. With a tripod, you can use a low ISO for clean image quality, a small aperture for front-to-back sharpness, and whatever shutter speed the scene demands, whether that is half a second or several seconds. If you are in a space where tripods are not permitted, brace yourself against a wall or furniture, bump up your ISO, and shoot multiple frames to increase your chances of getting a sharp one.
Composing in tight spaces is where wide-angle lenses earn their keep. But wider is not always better. An extremely wide focal length can make a room look unnaturally large and distort furniture and fixtures near the edges of the frame, a common complaint about real estate photography done poorly. A moderately wide focal length often produces more natural-looking results. Position yourself in a corner to maximize your view of the room, and make sure your camera is level. Even slight tilts produce noticeably skewed verticals on interior walls and doorframes.
If you are interested in interior photography as a professional skill, real estate and hospitality photography is one of the most accessible commercial markets for photographers. Restaurants, hotels, rental properties, and interior designers all need high-quality images of their spaces. The work rewards technical precision and an eye for styling: straightening cushions, removing clutter, and positioning furniture to photograph well. It may not be the most glamorous genre, but it is steady, practical, and teaches you to solve complex lighting and composition problems under pressure.
Try This: Architecture and Urban Exercises
One Building, Six Photos
Choose a single building, ideally one with interesting features and good light access, and challenge yourself to create six distinctly different photographs of it. Start with an exterior wide shot that establishes the building in its context. Then move in for an exterior detail: a doorway, a window pattern, an ornamental feature. Next, point your camera straight up and use converging lines deliberately. Find a pattern or texture on the building’s surface for a close-up study. Look for a shadow cast by or onto the building and make it the subject. Finally, if you can access the interior, photograph an inside space. The goal is to prove to yourself that every building contains multitudes. You just have to look for them.
Converging Lines Study
Find a tall building and photograph it from ground level, deliberately tilting your camera upward to create dramatic converging verticals. Lean into the effect: get close to the base and use a wide focal length for maximum distortion. Then figure out how to photograph the same building with corrected verticals: find an elevated position, step back and use a longer focal length, or shoot level and correct in post-processing. Put the two images side by side and study how each approach changes the emotional character of the photograph. Neither is “correct.” They are different creative choices that communicate different things about the same structure.
Urban Abstract
Spend an hour walking through a city or town center with a single rule: none of your photographs may show a complete, identifiable structure. Instead, photograph only fragments, details, and abstractions. Reflections in glass facades. The shadow of a railing on a staircase. The pattern of tiles on a floor. A grid of windows filling the entire frame. Peeling paint on a doorframe. The curve of a handrail. By restricting yourself to abstractions, you train your eye to see beyond the obvious and discover the hidden visual richness of the built environment. Select your five strongest images and ask yourself what each one communicates without the context of the building it came from.
The Light Clock
Choose one building face or architectural detail and photograph it at three different times of day: morning, midday, and late afternoon or evening. Keep your composition as similar as possible across all three visits so that the only variable is the light. When you compare the three images, notice how dramatically the character of the architecture changes with the light. The textures that were invisible at noon may come alive in the raking light of late afternoon. The warm glow of evening may transform a cold concrete surface into something inviting. This exercise teaches you that light, not the building itself, is the true subject of great architectural photography.