Stand in a sunlit doorway looking outside, and your eyes effortlessly perceive detail in both the shadowy interior behind you and the bright scene beyond. Your camera cannot do this. The dynamic range of a single photograph is far narrower than what the human eye can perceive, which means that high-contrast scenes often force a choice: properly expose the highlights and lose the shadows, or properly expose the shadows and blow out the highlights. HDR photography eliminates this compromise by combining multiple exposures into a single image that captures the full range of tones from the deepest shadows to the brightest highlights.
What Is HDR Photography?
HDR stands for High Dynamic Range. In photography, it refers to a technique where you capture multiple photographs of the same scene at different exposure levels, then merge them into a single image using software. The resulting merged image contains detail in both the shadow and highlight regions that no single exposure could capture.
Dynamic range is measured in stops and represents the difference between the darkest and brightest tones a camera can record in a single exposure. Most modern cameras capture between 12 and 15 stops of dynamic range. The human eye, by comparison, can perceive roughly 20 stops when adjusting for different brightness levels. Many real-world scenes, particularly those with strong sunlight and deep shadows, exceed the dynamic range of even the best cameras. HDR photography bridges this gap.
The HDR process typically involves shooting a bracketed sequence of three to seven exposures ranging from significantly underexposed to significantly overexposed. The underexposed frames capture detail in the bright highlights, the overexposed frames capture detail in the dark shadows, and the middle exposures capture the mid-tones. Software then combines the best-exposed portions of each frame into a single file that contains far more tonal information than any individual capture.
When to Use HDR
HDR is most valuable when the contrast range of a scene exceeds your camera’s ability to capture it in a single exposure. Common situations include the following scenarios.
- Interior-to-exterior views: Shooting through windows or doorways where the interior is much darker than the bright outdoor scene. This is one of the most common HDR applications in real estate photography.
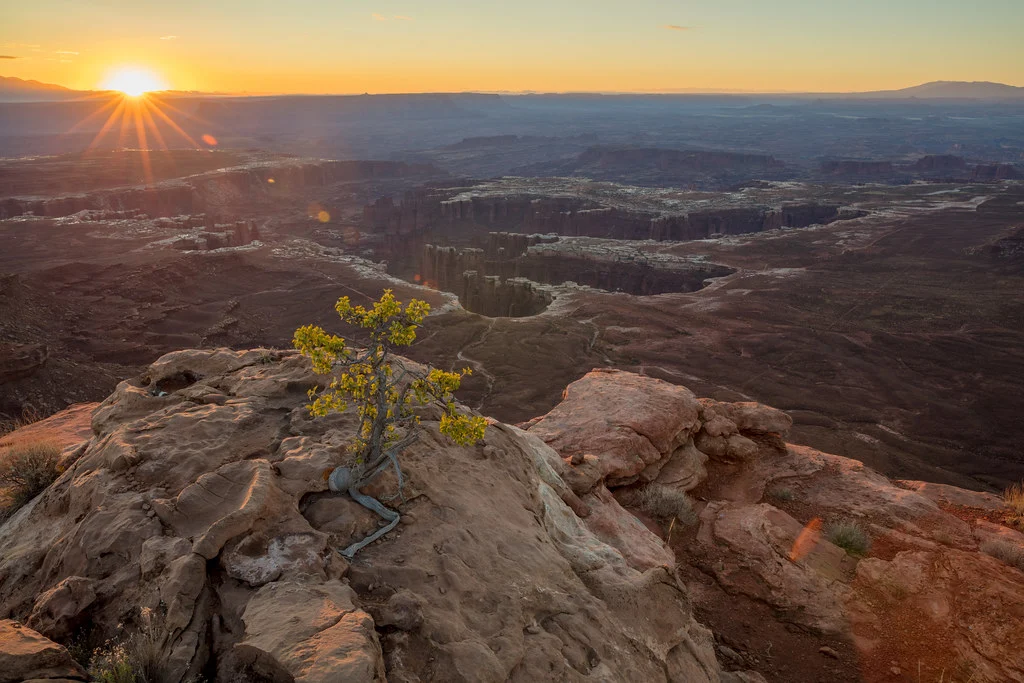
- Sunset and sunrise landscapes: When the sky is brilliantly lit but the foreground is in relative darkness. HDR preserves the rich colors of the sky while maintaining detail in the shadowed land. See our landscape photography settings guide for more on this topic.
- Architectural interiors: Rooms with windows that let in bright light while the rest of the space is comparatively dark. HDR reveals detail throughout the room without making the windows look blown out.
- Backlit scenes: Any situation where your main subject is in front of a much brighter background. HDR allows you to properly expose both the subject and the background.
- Shadowed canyons and forests: Deep shade with patches of bright light filtering through creates extreme contrast that benefits from HDR treatment.
HDR is not appropriate for every situation. Scenes with low contrast, such as overcast days where the sky and ground are similarly bright, do not need HDR because a single exposure can capture the full tonal range. Moving subjects are problematic because the multiple exposures will not align perfectly, causing ghosting artifacts. Sports, wildlife in motion, and busy street scenes are generally poor candidates for traditional HDR.
The Bracketing Technique
Exposure bracketing is the foundation of HDR photography. Your camera probably has an auto exposure bracketing (AEB) feature that automatically captures a series of exposures at different brightness levels with a single press of the shutter. Check your camera manual for how to enable and configure AEB.
A basic three-exposure bracket captures one normal exposure, one underexposed by two stops, and one overexposed by two stops. This four-stop range is sufficient for many moderate-contrast scenes. For extreme contrast situations, expand to five or seven brackets with one- or two-stop spacing to cover a wider range.
When bracketing, vary only the shutter speed while keeping the aperture and ISO constant. Changing the aperture between brackets would alter the depth of field between frames, making alignment and merging problematic. Changing ISO would introduce different noise levels in each frame. Shutter speed is the only exposure variable that changes the brightness without affecting other image qualities, so it is the appropriate variable for bracketing.
Set your camera to continuous shooting mode so that the bracketed sequence fires rapidly, minimizing the time between exposures. The faster the sequence, the less likely anything in the scene will shift between frames. Even with a tripod, wind can move branches and clouds can shift, so speed matters.
Camera Settings for HDR
Optimal camera settings for HDR shooting maximize image quality and alignment while giving you the flexibility to bracket effectively.
- Shoot in RAW: RAW files contain far more tonal information than JPEGs, giving the HDR software more data to work with. Each RAW file already contains several stops of recoverable highlight and shadow detail, and starting with this rich data produces superior HDR results.
- Use aperture priority or manual mode: In aperture priority, lock in your desired aperture and let the camera vary the shutter speed for each bracket. In manual mode, set your aperture and vary the shutter speed yourself. Either approach keeps the aperture constant.
- Set the lowest practical ISO: Lower ISO means less noise, which produces cleaner HDR merges. ISO 100 or your camera’s base ISO is ideal.
- Choose an appropriate aperture: For landscapes, f/8 to f/11 provides excellent sharpness across the frame. For real estate interiors, f/8 to f/10 balances depth of field with lens sharpness. The goal is consistent depth of field across all brackets.
- Enable AEB: Configure your auto exposure bracketing for the number of frames and stop spacing you need. Three frames at two-stop intervals is a good starting point.
- Turn off image stabilization when on a tripod: Some stabilization systems can actually introduce micro-movements when the camera is on a stable tripod. Disable it for sharpest results.
The Importance of a Tripod
A tripod is strongly recommended for HDR photography. While modern HDR software includes alignment algorithms that can compensate for handheld camera movement between brackets, starting with perfectly aligned frames produces superior results. The alignment process works by shifting and warping frames to match, which can introduce softness at the edges of the image and reduce overall sharpness slightly.
A tripod also enables slower shutter speeds for the overexposed brackets. When your normal exposure might be 1/125 second, the two-stop overexposed bracket would be 1/30 second, and a more extreme bracket could require half a second or longer. Without a tripod, these longer exposures would be blurred.
Use a cable release or your camera’s self-timer to avoid introducing vibration when pressing the shutter button. Even the slight motion from pressing the button can cause blur, particularly with longer focal lengths. A two-second delay on the self-timer is usually sufficient to let any vibration dampen.
That said, modern cameras and software have made handheld HDR more viable than ever. If you cannot use a tripod, shoot your brackets in rapid continuous mode, brace yourself against something solid, and enable image stabilization. The software alignment will handle small misalignments. Many photographers successfully shoot three-frame handheld brackets in moderate-contrast situations.
HDR Merging Workflow
Once you have captured your bracketed exposures, the HDR process continues on the computer. The basic workflow involves merging the brackets into a single HDR file, then tone-mapping that file to produce a viewable image.
Step 1: Import and organize. Import your RAW files and identify the bracketed sets. Most photo management software can detect bracketed sequences automatically.
Step 2: Merge to HDR. In Lightroom, select the bracketed files and choose Photo Merge HDR, or use Ctrl/Cmd+H. In Photoshop, use File, Automate, Merge to HDR Pro. Dedicated HDR software like Aurora HDR or Photomatix also handles this step. The software aligns the frames if necessary and combines the exposure data into a single 32-bit file that contains the full range of captured tones.
Step 3: Deghosting. If anything moved between brackets, such as clouds, waves, people, or leaves, the merge will show ghosting, semi-transparent artifacts where the moving elements appeared in different positions across the brackets. Most HDR software includes deghosting tools that use data from a single bracket in the affected areas. Check for ghosting and apply deghosting as needed.
Step 4: Tone mapping. The merged HDR file contains more tonal range than a monitor can display. Tone mapping compresses this range into a viewable format while preserving the appearance of detail in both highlights and shadows. This is where the artistic interpretation happens and where the line between natural and overdone HDR is drawn.
Step 5: Fine-tuning. After tone mapping, adjust the resulting image as you would any photograph: refine exposure, contrast, color, sharpness, and local adjustments. The advantage of working from an HDR merge is that you have dramatically more tonal information to work with, giving you greater flexibility in post-processing.
Tone Mapping: Natural vs. Dramatic
Tone mapping is where photographers’ opinions about HDR diverge most strongly. The same HDR merge can be tone-mapped to produce either a natural-looking image that simply has more shadow and highlight detail than a single exposure, or a dramatic, heavily processed image with exaggerated detail, saturated colors, and a surreal quality.
Natural HDR processing aims to make the image look like what your eye saw at the scene. The goal is to recover shadow and highlight detail without the image screaming that it was HDR processed. This approach uses conservative tone mapping settings with moderate local contrast enhancement and natural-looking color saturation. When done well, natural HDR is invisible; the viewer simply sees an image with beautiful, even tonality.
Dramatic HDR processing pushes the tone mapping further, often cranking up local contrast, clarity, and saturation to produce images that look hyper-detailed and almost painterly. This style was extremely popular in the early days of accessible HDR software and remains a valid artistic choice for certain applications. Architectural detail, gritty urban scenes, and abstract compositions can benefit from dramatic HDR treatment when the style matches the creative intent.
For most professional work, including landscape, real estate, and commercial photography, natural-looking HDR is preferred. The technique should solve the dynamic range problem without calling attention to itself. Reserve dramatic processing for personal creative work where the stylized look is intentional and appropriate.
Common HDR Mistakes and How to Avoid Them
Over-processing: The single most common HDR mistake is pushing the processing too far. Images with halos around edges, unnaturally saturated colors, and a flat, surreal look are the result of excessive tone mapping. Pull back on the local contrast, strength, and saturation sliders. Compare your HDR result to the best-exposed single frame; the HDR should look better, not alien.
Haloing: Bright halos around the edges of buildings, trees, and other high-contrast boundaries are a classic HDR artifact caused by excessive local contrast adjustment. Reduce the clarity, detail, or local contrast slider until the halos disappear. Some software has specific anti-halo controls.
Noise in shadows: Over-brightening deep shadows during tone mapping reveals noise that was hidden in the dark areas of the original exposures. Use noise reduction specifically targeted at the shadow regions, or ensure your bracket set includes an exposure bright enough to cleanly capture shadow detail.
Ghosting: Moving elements between brackets create semi-transparent artifacts. Use your software’s deghosting feature and check the entire image for subtle ghosting, especially in clouds, water, and foliage.
Flat-looking images: Tone mapping can flatten the overall contrast of an image while enhancing local contrast. After merging and tone mapping, you often need to restore some global contrast through curves or levels adjustments to give the image punch and depth.
HDR in Landscape Photography
Landscape photography is perhaps the genre most naturally suited to HDR. Outdoor scenes frequently present contrast ranges that exceed a single exposure’s capabilities, particularly during golden hour when the sky blazes with color while the foreground sits in relative shadow.
For landscape HDR, use a sturdy tripod and a remote shutter release. Compose your scene carefully and bracket with enough exposures to cover the full contrast range. A common approach is to meter the brightest part of the sky and the deepest foreground shadow separately, then set your brackets to span that range with some overlap.
Be cautious with moving elements in landscapes. Wind-blown grass, moving clouds, and flowing water all create potential ghosting issues. For water and clouds, you can sometimes use a single long exposure of the moving elements and blend it with the HDR result of the static elements for the best of both techniques.
HDR in Architecture and Real Estate
Architectural and real estate photography uses HDR more than almost any other genre. Interior spaces with windows present an extreme contrast challenge: the room interior might be ten or more stops darker than the bright outdoor scene visible through the windows. Without HDR, you either blow out the windows to see the room or properly expose the windows and lose all interior detail.
HDR solves this perfectly, and natural-looking HDR processing is essential in this context. Real estate images should look like what a visitor would see when walking into the room, with detail visible in both the interior and the window views. Over-processed HDR in real estate photography looks amateurish and can actually work against selling the property by making spaces look unrealistic.
Bracket more aggressively for interiors, often five to seven frames with two-stop spacing to handle the extreme contrast range. Use a tripod for every shot. Turn on all lights in the room before shooting, as this reduces the overall contrast range and produces a more inviting look in the final HDR merge.
Single-Exposure HDR Alternatives
Modern RAW files contain enough dynamic range that many moderate-contrast scenes can be handled through a single-exposure workflow that mimics HDR results. By shooting a single well-exposed RAW file and using tools like Lightroom’s highlight and shadow sliders, you can recover several stops of detail in both directions without the complexity of bracketing and merging.
This approach works best when the contrast range is within about six to eight stops, which covers many typical landscape and architectural scenes. The advantage is simplicity: no bracketing, no alignment issues, no ghosting, and a faster workflow. The disadvantage is that pushing shadows aggressively in a single exposure introduces more noise than using a properly exposed bright bracket from an HDR set.
For scenes that truly exceed your camera’s dynamic range, there is no substitute for proper HDR bracketing. But for moderate-contrast situations, the single-exposure approach produces excellent results with less effort and is worth considering before automatically defaulting to a full HDR workflow.