Automotive photography turns metal, glass, and rubber into art. Whether you are shooting a vintage classic in golden light or a modern sports car on a rain-slicked street, the principles remain the same: find the right location, master reflections, and let the car’s design guide your composition.
This guide covers everything from camera settings and angles to rolling shots and night photography techniques for compelling car images.
Location Scouting
The background makes or breaks a car photo. A stunning vehicle in a cluttered parking lot looks ordinary. The same car against an empty desert road, an industrial warehouse, or a clean urban backdrop looks extraordinary.
When scouting locations, look for:
- Clean backgrounds: Open roads, empty lots, simple architecture, or natural landscapes that complement the car without competing.
- Interesting surfaces: Wet pavement reflects light dramatically. Gravel and dirt roads suit rugged vehicles. Smooth asphalt works for everything.
- Color harmony: Consider how the car’s color interacts with the environment. A red car pops against green foliage. A dark car benefits from lighter backgrounds.
- Safety: Avoid shooting on busy roads. Private property, closed lots, and quiet back roads are safer options. Always get permission where required.
Time of Day and Weather
Golden hour, the period shortly after sunrise and before sunset, is the most popular time for automotive photography. The warm, low-angle light wraps around the car’s curves, creates long shadows that add drama, and produces rich, warm tones in the paintwork.
Overcast days are underrated for car photography. Cloud cover acts as a giant softbox, producing even, diffused light that reduces harsh reflections on the body panels and windshield. This makes post-processing easier and shows the true color of the paint.
Blue hour (just after sunset) and nighttime offer dramatic possibilities for light painting and long exposures. Rain adds another dimension entirely, with wet surfaces reflecting light and color beneath the vehicle.
Essential Gear
Automotive photography does not require exotic equipment, but a few items make a significant difference:
- Camera with manual controls: Any DSLR or mirrorless camera works. Manual exposure control is essential for consistent results.
- Versatile zoom or prime lenses: A 24-70mm zoom covers most situations. A 70-200mm compresses backgrounds beautifully for three-quarter angle shots. A wide 16-35mm captures dramatic perspectives from low angles.
- Circular polarizing filter: The single most useful accessory for car photography. It cuts reflections from glass and paint, deepens sky color, and lets you control how much of the environment shows in the car’s reflective surfaces.
- Tripod: Essential for light painting, long exposures, and consistent framing.
- LED light panel or flashlight: For light painting at night or filling shadows in tight spots.
Camera Settings for Car Photography
- Aperture: f/5.6 to f/8 for full-car shots where you want everything sharp. Use wider apertures (f/2.8 to f/4) for detail shots where you want the background blurred.
- ISO: Keep it low (100-400) for clean, noise-free images. Raise it only when necessary for handheld shooting in fading light.
- Shutter speed: For static shots on a tripod, shutter speed is flexible. For rolling shots (see below), you will need specific slow shutter speeds. For handheld work, follow the reciprocal rule as a starting point.
- Focus: For static car shots, use single-point autofocus placed on the nearest headlight or badge. For rolling shots, switch to continuous autofocus with tracking.
Angles and Composition
Car designers spend years perfecting lines and proportions. Your job as a photographer is to find the angles that show those design choices at their best. Composition in automotive photography follows its own conventions.
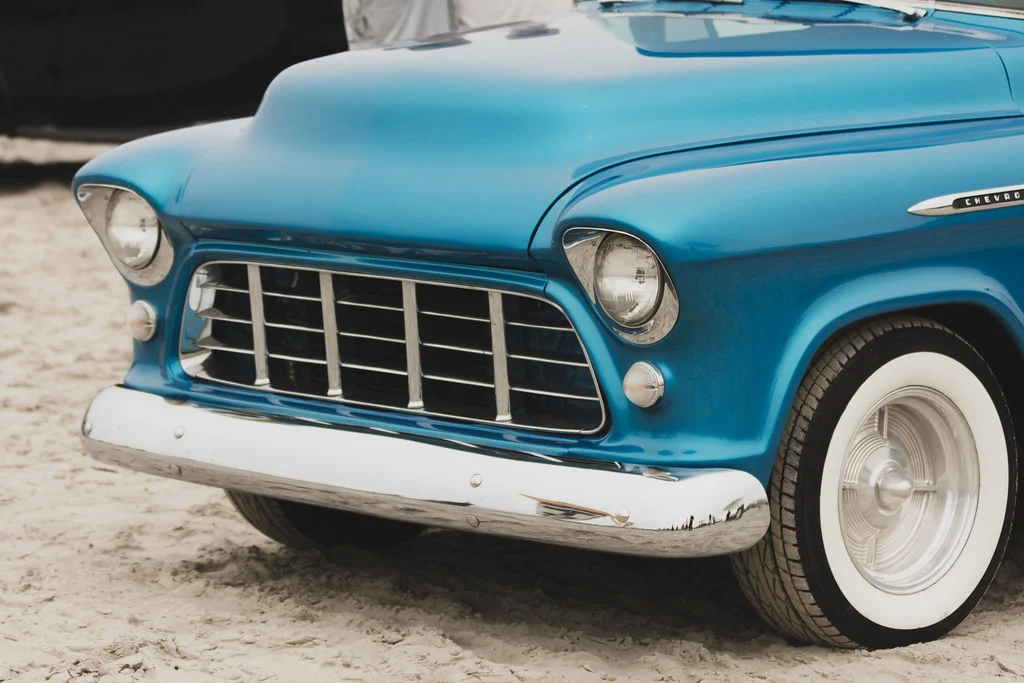
The Three-Quarter Front View
This is the classic automotive angle. Position yourself at roughly 45 degrees to the front corner of the car. You see both the front and one side, showing the car’s proportions, grille design, and profile in a single frame. Most car magazines and advertisements use this angle for good reason: it flatters nearly every vehicle.
Low Angle
Getting low (knee height or below) makes any car look more powerful and dramatic. Wide-angle lenses at low angles exaggerate the car’s stance and make it dominate the frame. This perspective works especially well with sports cars and vehicles with aggressive styling.
Detail Shots
Move in close. Headlights, badges, wheel designs, exhaust tips, stitched leather interiors, and gauge clusters all tell a story. Use a wide aperture to isolate details with a shallow depth of field. Detail shots add variety to any car photo set and showcase the craftsmanship of the vehicle.
Rear and Profile Views
Do not neglect the rear and direct side profiles. A car’s rear end often has distinctive design elements (taillights, exhaust layout, spoilers) worth highlighting. A clean side profile shot emphasizes the roofline, wheel placement, and overall silhouette.
Managing Reflections
Car paint is essentially a giant curved mirror. Managing what reflects in it is a core skill in automotive photography.
- Polarizing filter: Rotate it while looking through the viewfinder to reduce or enhance reflections. It is the single most effective tool for controlling reflections on paint and glass.
- Angle awareness: Move around the car and watch how reflections shift. Sometimes a small step to the left eliminates an ugly building reflection from a door panel.
- Location choice: Shooting in open areas with clean surroundings (sky, trees, fields) produces cleaner reflections than shooting in urban environments with signs, buildings, and power lines.
- Post-processing: Clone and heal tools can remove small unwanted reflections, but getting clean reflections in-camera is always faster and more convincing.
Rolling Shots: Cars in Motion
Rolling shots capture a car in motion with a sharp subject and blurred background, conveying speed and energy. The panning technique is key.
How to Shoot Rolling Shots
- Shoot from a second vehicle. Ride in a car traveling alongside or ahead of the subject at the same speed. Have a driver so you can focus entirely on shooting.
- Set a slow shutter speed. Start around 1/60s and experiment. Slower speeds (1/30s, 1/15s) create more background blur but are harder to keep the car sharp.
- Use continuous autofocus and track the subject as both vehicles move.
- Pan smoothly. Follow the car’s movement with a steady, smooth pan. Fire in bursts.
- Shoot many frames. Rolling shots have a low keeper rate. Expect to take dozens of shots for a handful of sharp results.
Safety is paramount during rolling shots. Drive on quiet roads, keep speeds low (25-40 mph is plenty), and have a dedicated driver who is focused exclusively on the road.
Light Painting Cars at Night
Long exposure light painting produces dramatic nighttime images that look like studio shots taken outdoors. The technique is straightforward but requires patience:
- Mount your camera on a tripod and compose the shot in the last light of dusk or full darkness.
- Set a long exposure (15-30 seconds at f/8, ISO 100).
- Trigger the shutter and walk around the car with an LED light panel or bright flashlight, “painting” light onto the body panels, wheels, and details.
- Keep the light moving to avoid hotspots. Overlap your strokes for even coverage.
- Stay behind the car relative to the camera to avoid painting yourself into the frame. Wear dark clothing.
- Review and repeat. Light painting often takes multiple attempts to perfect the coverage and exposure.
You can also combine multiple light-painted exposures in post-processing, layering frames where different sections of the car are lit.
Interior Shots
Interior photography showcases the driver’s experience. Shoot the dashboard, steering wheel, seats, center console, and any unique design details. Wide-angle lenses (16-24mm) help capture the full cabin from the driver’s seat perspective. Use a small aperture (f/8 to f/11) for front-to-back sharpness.
Clean the interior thoroughly before shooting. Dust, fingerprints, and smudges are magnified in photos. Wipe down every surface, vacuum the seats, and dress the leather or trim.
Post-Processing Automotive Images
Post-processing refines what you captured in-camera:
- Color correction: Ensure the car’s paint matches real life. Adjust white balance and HSL sliders until the color looks accurate.
- Contrast and clarity: Cars often benefit from slightly increased contrast and clarity to emphasize body lines and surface textures.
- Sky replacement or enhancement: A dull sky can weaken an otherwise strong image. Darken or add saturation to skies, or replace them entirely if the conditions were poor.
- Reflection cleanup: Remove distracting reflections in paint and glass using clone, heal, or frequency separation techniques.
- Sharpening: Apply targeted sharpening to edges, badges, and details. Avoid over-sharpening smooth paint surfaces.
- Dodge and burn: Subtly brighten highlights on the car’s body lines and darken areas that should recede. This adds dimension and makes the car’s shape more defined.
Working with Car Owners
If you are photographing someone else’s vehicle, communication and respect are essential. Discuss the shoot plan in advance: locations, time, any special requests. Never touch the car without permission. Many owners are particular about their paint (and rightly so). Ask before opening doors, hoods, or trunks. Share images promptly after the session, and always credit the owner when posting to social media.
Building a reputation in the automotive photography community happens through consistent quality and professionalism. Car owners talk to each other, and word-of-mouth referrals are how most automotive photographers build their client base.
Developing Your Automotive Photography Style
Automotive photography rewards photographers who develop a recognizable style. Some favor moody, dark edits with heavy contrast. Others shoot bright and clean. Some specialize in rolling shots, while others focus on static editorial setups. Study the automotive images that excite you, analyze what makes them work, and practice those techniques until they become part of your own visual language.
Start with the fundamentals in this guide. Master the three-quarter angle, learn to control reflections, and practice rolling shots until they become second nature. From there, push into creative territory: night shoots, rain sessions, aerial perspectives, and dramatic composites. The automotive world is full of subjects worth photographing, and every car has a story your camera can tell.