Try It Yourself: Camera Simulator
Astro photography needs dark skies, long exposures, wide apertures, and high ISO. Try the “Expose a night sky” challenge.
Why Star Photography Is Worth the Effort
Photographing stars and the Milky Way reveals a universe that is invisible to the casual eye. When you capture the night sky with the right camera settings, you see thousands of stars, the glowing band of our galaxy, nebulae, and celestial detail that transforms an ordinary landscape into something otherworldly. Star photography is technically demanding, but the results are unlike anything else in photography.
This guide covers everything you need to shoot sharp star points and the Milky Way, from equipment and settings to location planning and post-processing. For broader night photography techniques including cityscapes and light trails, see our night photography settings guide. For deep-sky objects like nebulae and galaxies, see our astrophotography guide.
Essential Equipment for Star Photography
You do not need thousands of dollars of gear, but certain equipment is essential:
- Camera with manual controls: You need full manual control over aperture, shutter speed, and ISO. Any camera with a manual mode works. Larger sensors (full-frame) perform better at high ISO, but crop-sensor cameras produce excellent results.
- Fast wide-angle lens: A lens with a maximum aperture of f/2.8 or wider and a focal length of 14mm to 24mm (full frame). The wide angle captures a large swath of sky; the fast aperture gathers enough starlight. An f/1.4 or f/1.8 lens is even better.
- Sturdy tripod: Essential for multi-second exposures. A tripod that vibrates in the wind will ruin your shots.
- Remote trigger or intervalometer: Eliminates vibration from pressing the shutter button. An intervalometer also lets you program sequences for time-lapses and star trail stacking.
- Red headlamp: White light destroys your night vision for 20 to 30 minutes. A red headlamp lets you see your camera controls without ruining your dark adaptation.
- Extra batteries: Long exposures and cold temperatures drain batteries quickly. Carry at least two fully charged spares. In freezing conditions, keep spares warm in your pocket.
Core Settings for Sharp Star Points
| Setting | Value | Why |
|---|---|---|
| Mode | Manual (M) | Auto exposure fails in near-total darkness |
| Aperture | f/1.4 – f/2.8 (widest available) | Gather maximum starlight |
| Shutter Speed | 500 Rule: 500 / focal length = max seconds | Longest possible exposure without visible star trails |
| ISO | 1600 – 6400 | Amplify faint starlight while managing noise |
| Focus | Manual, on a bright star using Live View at max zoom | Autofocus cannot lock on stars |
| White Balance | 3800K – 4200K (or Auto, adjust in post) | Neutral night sky without orange cast from light pollution |
| Image Stabilization | OFF | Can cause vibration on a tripod |
| Long Exposure NR | OFF | Saves time; handle noise in post-processing |
| File Format | RAW | Essential for recovering faint detail and controlling white balance |
The 500 Rule Explained
Earth rotates, and during your exposure, the stars move across the sky. If your exposure is too long, stars become short lines (trails) instead of sharp points. The 500 Rule gives you the maximum exposure time before trailing becomes visible:
Maximum seconds = 500 / focal length
- 14mm lens: 500 / 14 = 35 seconds
- 20mm lens: 500 / 20 = 25 seconds
- 24mm lens: 500 / 24 = 20 seconds
- 35mm lens: 500 / 35 = 14 seconds
On a crop-sensor camera, use the equivalent focal length: a 16mm lens on a 1.5x crop sensor is 24mm equivalent, so 500 / 24 = 20 seconds.
The 500 Rule is a starting point. For critical sharpness (large prints, high-megapixel cameras), use the stricter 300 Rule (300 / focal length) or the NPF Rule, which accounts for pixel pitch and aperture. Zoom in to 100% on your first test shot to verify that stars are points, not tiny dashes.
Finding the Right ISO
Higher ISO reveals fainter stars and more Milky Way structure, but also increases noise. The optimal ISO depends on your camera and the amount of light pollution:
- Dark sky sites: ISO 1600 to 3200 is usually sufficient. The sky itself provides enough signal.
- Moderate light pollution: ISO 3200 to 6400. You need more amplification to reveal stars above the light-polluted glow.
- High-end cameras: Can go to ISO 6400 or beyond with acceptable noise.
- Entry-level cameras: ISO 1600 to 3200 is the practical limit before noise overwhelms detail.
A technique called “exposing to the right” (ETTR) works well for astrophotography. Check your histogram and push the exposure until the histogram data just approaches the right side without clipping. This captures the maximum signal, and you can darken the image in post while retaining more detail and less noise than a darker exposure brightened later.
Focusing on Stars
Focusing at night is the most common point of failure for beginners. Autofocus cannot lock on stars, and the infinity mark on your lens is usually inaccurate. Here are reliable focusing methods:
Method 1: Live View on a Bright Star
Point your camera at the brightest star or planet visible (Jupiter, Venus, Sirius, or Vega are excellent targets). Switch to Live View. Many cameras let you increase the display gain in dark conditions (check your menu for “Live View Boost” or similar). Zoom in to maximum magnification (10x). Slowly turn the focus ring until the star appears as the smallest, sharpest pinpoint. When you pass through focus, the star will shrink to a point, then grow again. Find the sweet spot where it is smallest.
Method 2: Focus Before Dark
Arrive before sunset. Autofocus on a distant object (a mountain, building, or tree on the horizon). Switch to manual focus and tape the focus ring in place with gaffer tape. This is the most reliable method if you arrive early enough.
Method 3: Distant Light Source
If no bright star is visible (hazy sky, early twilight), focus on the most distant visible light: a cell tower, distant streetlight, or lit building on the horizon. Anything more than a mile away is effectively at infinity for the purpose of star photography.
Checking Focus
After setting focus, take a test shot and zoom in to 100% on the LCD. Stars should be tight, round points. If they are bloated circles or show coma (comet-like tails), refine your focus. Once you have nailed it, do not touch the focus ring. Some photographers tape it in place.
Finding Dark Skies
Light pollution is the biggest enemy of star photography. City lights scatter off moisture and particles in the atmosphere, creating a bright glow that overwhelms faint stars and the Milky Way. The darker the sky, the more dramatic your photos.
Light Pollution Maps
Online light pollution maps (such as lightpollutionmap.info) show sky brightness levels worldwide. Dark sky locations appear as dark patches on the map. Generally, you need to be at least 50 to 100 miles from a major city to find truly dark skies. Smaller towns create smaller zones of pollution.
Dark Sky Preserves and Parks
Many national and state parks, as well as designated Dark Sky Preserves, protect their night skies from light pollution. These locations offer the darkest conditions and are often in beautiful natural settings, combining spectacular star photography with stunning foreground landscapes.
Moon Considerations
Even a quarter moon brightens the sky enough to significantly reduce visible Milky Way detail. Plan your star photography sessions around the new moon (when the moon is not visible). The days around the new moon give you the darkest possible skies. Use a moon phase calendar to find these windows.
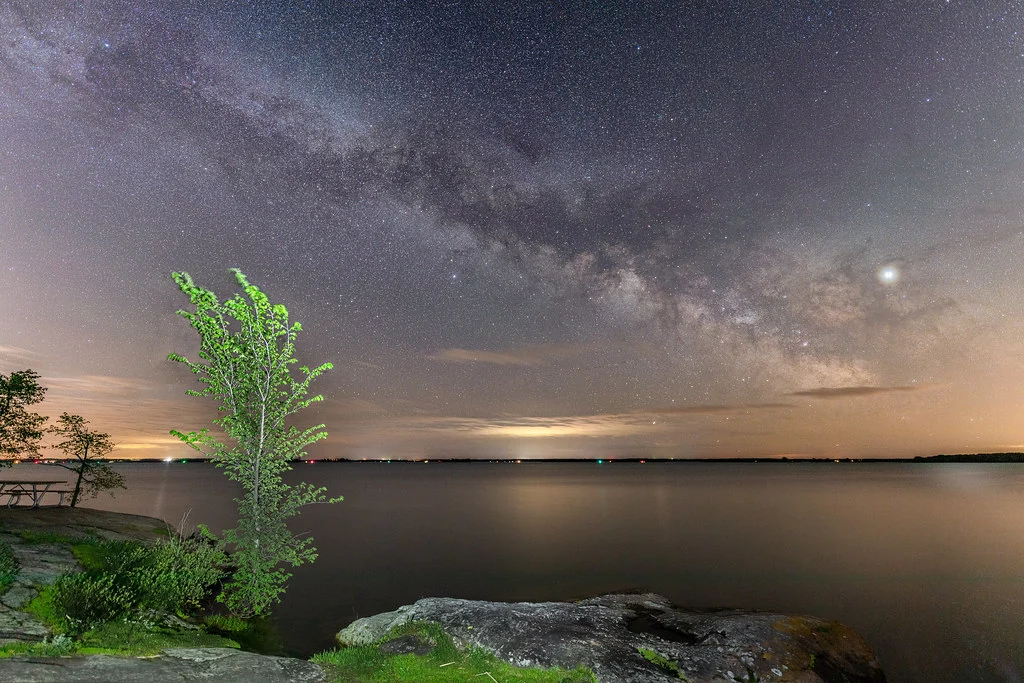
Photographing the Milky Way
The Milky Way core is the bright, cloudy band of our galaxy that is most prominent in the summer sky (March through October in the Northern Hemisphere, roughly September through March in the Southern Hemisphere). It is the most spectacular subject in night sky photography.
When and Where to Find It
The Milky Way core is located in the direction of the constellation Sagittarius. In the Northern Hemisphere, it is visible above the southern horizon during summer. It rises higher through the night and rotates across the sky. A night sky planning app (Stellarium, PhotoPills, Star Walk) shows exactly where it will be at any time and date from your location.
Milky Way Settings
| Setting | Value |
|---|---|
| Aperture | f/1.4 – f/2.8 (widest available) |
| Shutter Speed | 15s – 25s (per 500 Rule for your focal length) |
| ISO | 3200 – 6400 |
| Focal Length | 14mm – 24mm (wide angle to capture the full arc) |
| White Balance | 3800K – 4200K |
Composition for Milky Way Photos
The most compelling Milky Way photos include an interesting foreground: a mountain silhouette, a lone tree, a rock arch, a lake with reflections, or a rugged coastline. The foreground provides scale and context, turning a sky photo into a complete landscape.
Compose with the Milky Way arching over or behind your foreground element. Use leading lines in the foreground that draw the viewer’s eye into the image and up toward the sky. Experiment with the Milky Way on different sides of the frame and at different angles.
Lighting the Foreground
In near-total darkness, the foreground will be a black silhouette. This can be effective for simple, bold shapes (a single tree, a mountain ridge). For more foreground detail, you have several options:
- Light painting: During the exposure, briefly shine a flashlight or headlamp across the foreground. Use a warm-toned light for a natural look. Practice the timing: too much light and the foreground is overexposed; too little and it remains dark.
- Moonlight: A thin crescent moon (not enough to wash out the Milky Way) can provide subtle foreground illumination.
- Ambient twilight: During the first and last hours of astronomical darkness, residual twilight glow near the horizon softly lights the foreground.
- Exposure blending: Take a longer exposure (or higher ISO) for the foreground and blend it with the sky exposure in post-processing.
Star Trails: The Alternative Approach
Instead of fighting Earth’s rotation with short exposures, you can embrace it. Star trails transform the rotating sky into concentric arcs of light centered on the celestial pole.
Star Trail Settings
| Setting | Value |
|---|---|
| Aperture | f/2.8 – f/4 |
| ISO | 400 – 800 |
| Exposure | 30s per frame, many frames stacked |
| Interval | 1 second between frames |
| Total Duration | 30 minutes to 4 hours |
The modern approach to star trails is to take many consecutive 30-second exposures and stack them in software rather than one extremely long exposure. This avoids the noise problems of very long single exposures, lets you remove individual frames ruined by airplane trails or clouds, and gives you the raw frames to also create a time-lapse video.
Use an intervalometer to program the sequence: 30-second exposure, 1-second gap, repeat for 1 to 4 hours. Stack the frames using free software (StarStaX, Sequator) in “lighten” mode, which combines the brightest pixels from each frame into the final image.
Finding the North Star
For circular star trails, point your camera at Polaris (the North Star) in the Northern Hemisphere or the Southern Celestial Pole in the Southern Hemisphere. Stars near the pole create tight circles; stars further away create wider arcs. Polaris itself appears as a stationary dot at the center of the circles.
Post-Processing Star Photos
Star and Milky Way photos benefit enormously from careful post-processing. The camera RAW file will look flat and unimpressive. This is normal. The magic happens in editing.
Key Adjustments
- White balance: Adjust to remove light pollution color cast (often orange or green). 3800K to 4200K usually produces a neutral night sky.
- Exposure and brightness: Brighten shadows to reveal foreground detail. Darken highlights if the sky is too bright.
- Contrast and clarity: Increase both to make the Milky Way structure pop. Clarity (or texture/structure in some editors) is especially effective for defining the dust lanes and bright regions of the galaxy.
- Vibrance and saturation: A modest increase makes star colors and Milky Way nebulae more visible. The Milky Way contains subtle pinks, blues, and golds that emerge with careful saturation adjustment.
- Noise reduction: Apply luminance noise reduction to smooth high-ISO grain. Be conservative: too much noise reduction turns stars into soft blobs. Modern AI-based noise reduction tools are particularly effective for astrophotography.
- Gradient removal: Light pollution often creates a gradient from the horizon upward. Use gradient filters to darken the lower sky, creating a more uniform background.
Common Star Photography Mistakes
1. Focusing on the Infinity Mark
The infinity mark on most lenses is not accurate. True infinity focus is usually slightly before the mark. Always verify focus by zooming in to 100% on a test shot. Never trust the lens markings.
2. Shooting During a Bright Moon
Even a half moon will wash out most of the Milky Way. Plan sessions around the new moon for the best results. Check a moon phase calendar before planning your trip.
3. Not Going Dark Enough
Suburban skies show a few hundred stars. A truly dark sky reveals thousands, plus the Milky Way in full glory. The difference is enormous. It is worth driving an extra hour to reach a darker location.
4. Underexposing
Many beginners shoot darker than necessary, thinking it looks “right” on the bright LCD in the dark. Check the histogram. Push the exposure until data approaches the right side. You can darken in post; you cannot recover data that was never captured.
5. Not Shooting RAW
RAW files are essential for star photography. JPEG processing discards the faint data you need most: subtle Milky Way structure, faint stars, and shadow detail. Always shoot RAW.
6. Leaving Image Stabilization On
Image stabilization on a tripod can cause micro-vibrations that turn star points into wobbly smears. Turn off all stabilization (lens and body) when using a tripod for star photography.
Frequently Asked Questions
Can I photograph the Milky Way with a kit lens?
A kit lens (typically 18-55mm f/3.5-5.6) can capture the Milky Way, but its slow maximum aperture requires higher ISO (6400+) for adequate exposure. The results will be noisier than with a fast prime lens, but still impressive from a dark sky site. Set the zoom to its widest (18mm), open to f/3.5, and use ISO 6400 with a 25-second exposure.
Do I need a star tracker for Milky Way photos?
A star tracker (a motorized mount that compensates for Earth’s rotation) allows much longer exposures at lower ISO, producing dramatically cleaner results. However, it is not required for impressive Milky Way photos. The 500 Rule with a fast lens at ISO 3200 to 6400 produces excellent results, especially with modern noise reduction software. A tracker becomes valuable when you want to push for maximum detail or shoot with longer focal lengths.
What is the best season for Milky Way photography?
In the Northern Hemisphere, the Milky Way core is best viewed from March through October, with June through August providing the highest and most prominent position in the sky. In the Southern Hemisphere, the core is visible from roughly February through October, highest during their winter months (June to August).
How do I photograph star colors?
Stars have distinct colors (red, blue, yellow, white) based on their temperature. These colors are real and can be captured photographically. Proper white balance, slight defocus (stars become larger colored discs), and saturation adjustment in post-processing all help reveal star colors. Betelgeuse (red), Rigel (blue), and the Sun (yellow) are prime examples of stellar color variety.
Try This: Practice Exercises
Exercise 1: The 500 Rule Test
On a clear night, set up your camera at your widest focal length and shoot at the exposure time given by the 500 Rule. Then shoot at double that time and half that time. Compare all three at 100% zoom. You will see exact at which point star trails become visible on your specific camera and lens combination. This calibrates the rule for your gear and creates a personal reference.
Exercise 2: ISO Bracket
From a moderately dark location, shoot the same composition of the Milky Way at ISO 1600, 3200, 6400, and 12800 (adjusting shutter speed inversely if needed). Process each one in your editing software and compare: which ISO gives the best balance of Milky Way detail and acceptable noise for your camera? This is your optimal astrophotography ISO.
Exercise 3: Foreground Light Painting
Find a scene with an interesting foreground element (rock, tree, structure) under a starry sky. Take one exposure with no foreground light (silhouette). Then take several more, briefly “painting” the foreground with a flashlight during the exposure, varying the duration and direction of the light. Compare the results. Light painting is a skill that improves with practice, and the payoff is dramatic: a glowing foreground under a spectacular sky.
Related Resources
- Astrophotography Guide – Deep-sky techniques for nebulae and galaxies
- Night Photography Hub – Complete guide to all night photography
- Night Photography Settings – Settings for cities, light trails, and more
- How to Photograph the Moon – Detailed lunar photography settings
- How to Photograph Northern Lights – Aurora settings and planning
- Understanding ISO – Managing noise at high ISO values
- Camera Histogram Guide – Verify exposure in the dark
- Tripod Guide – Stability for long night exposures
- Photo Editing Guide – Process your star photography RAW files