Few subjects are as rewarding, or as unpredictable, as photographing animals. Whether you are working with your own beloved pet or a client’s energetic puppy, pet photography demands a unique blend of technical skill, patience, and the ability to improvise on the fly. The good news is that with the right camera settings, a few tested techniques, and a genuine love for animals, you can create images that capture the soul of any creature in front of your lens.
This guide covers everything you need to know to produce professional-quality pet portraits, from camera settings and lighting to handling different species and post-processing your best shots.
Camera Settings for Pet Photography
Animals rarely sit still on command, so your camera settings need to account for sudden, unpredictable movement. The single most important adjustment is shutter speed. For a pet that is sitting or lying calmly, 1/250s may be sufficient, but for any kind of movement, a wagging tail, a head turn, a cat pouncing, you should start at 1/500s as an absolute minimum. If the animal is running, playing, or jumping, push your shutter speed to 1/1000s or faster to freeze the action cleanly.
Set your camera to continuous autofocus (AF-C on Nikon, AI Servo on Canon, or the equivalent on your system). This mode constantly adjusts focus as the subject moves toward or away from you, which is essential for tracking an unpredictable animal. Pair this with your camera’s burst or continuous shooting mode so you can fire off a rapid sequence of frames during peak moments. Out of a burst of ten shots, one or two will usually have that perfect expression or pose. Learn more about how different focus modes work and when to use each one.
For aperture, a wide setting between f/2.8 and f/4 gives you a beautifully blurred background that makes your subject pop. However, be aware that at very wide apertures with a close subject, your depth of field becomes razor-thin, you might get the nose in focus but the eyes soft. If you are shooting a head-on portrait, stopping down to f/4 or f/5.6 provides a safer margin while still producing pleasant background blur. Raise your ISO as needed to maintain a fast shutter speed, especially indoors. Modern cameras handle ISO 1600–3200 with minimal noise, and a slightly grainy sharp photo is always better than a smooth blurry one.
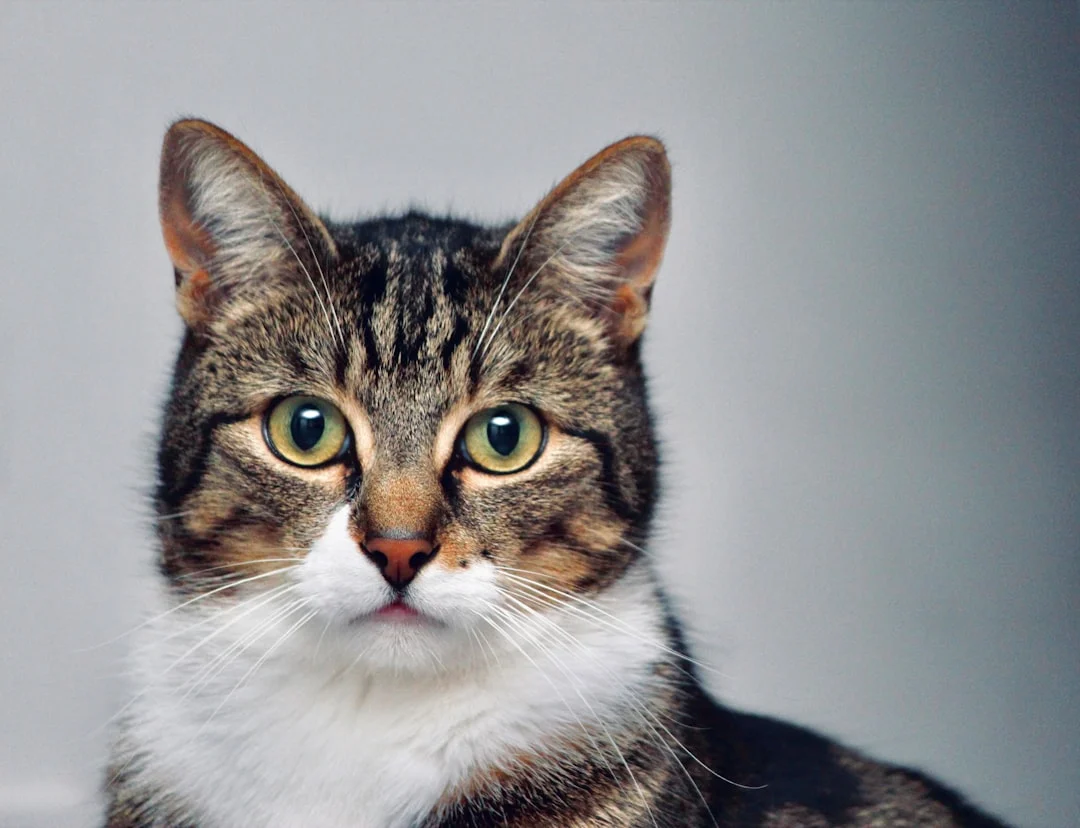
The Most Important Tip: Get Down to Eye Level
If you take away only one lesson from this entire guide, let it be this: get down to your subject’s eye level. The difference between a photograph taken from standing height looking down at a dog and one taken lying flat on the ground at the dog’s eye line is dramatic. Eye-level shots create an immediate sense of intimacy and connection. The viewer feels like they are meeting the animal as an equal rather than observing it from above.
For dogs, this often means kneeling, sitting, or lying on the ground. For cats lounging on furniture, you may already be close to the right height. For very small animals like rabbits or guinea pigs, you might need to place them on a raised surface or get flat on your stomach. A camera with a flip-out or tilting screen is enormously helpful here, it lets you compose your shot at ground level without pressing your face into the dirt. If your camera does not have one, you can shoot a few test frames at ground level and check focus on playback.
This simple change in perspective transforms ordinary pet snapshots into compelling portraits that draw the viewer directly into the animal’s world.
Capturing Personality and Expression
The best pet photographs go beyond sharpness and good exposure, they capture something of the animal’s character. A mischievous glint in a terrier’s eye, the dignified calm of an older cat, the goofy tongue-out grin of a golden retriever. These moments cannot be forced. They happen when you are patient, observant, and ready.
Spend the first few minutes of any session simply observing the animal without shooting. Watch how it moves, what catches its attention, where it gravitates. This observation time helps you anticipate the moments worth capturing. The classic “head tilt” that dogs do when they hear an unusual sound is one of the most universally appealing expressions in pet photography, you can often trigger it with a strange noise, a whistle, or a word spoken in an unusual tone.
Do not limit yourself to posed portraits. Some of the strongest pet images show the animal in motion, mid-leap, shaking off water, stretching after a nap. Candid moments of interaction between a pet and its owner also tell a richer story than a static portrait alone. Keep shooting between the “official” moments. Often the best frame comes in the transition between poses, when the animal is relaxed and unaware of the camera.
Indoor Pet Photography
Many pet photography sessions take place indoors, especially with cats and smaller animals. The biggest challenge inside is light, or rather, the lack of it. Your best friend indoors is natural window light. Position your subject near a large window, ideally one that is not receiving direct, harsh sunlight. A north-facing window (in the Northern Hemisphere) provides beautiful, soft, even illumination throughout the day. East- or west-facing windows work well in the morning or afternoon when the sun is not blasting through directly.
Avoid using your camera’s built-in flash for pet photography. The sudden burst of bright light startles most animals, making them anxious and less cooperative. It also produces the animal equivalent of red-eye, a harsh green or yellow reflection from the tapetum lucidum at the back of their eyes. If you need additional light, use a continuous LED panel or bounce an external flash off the ceiling so the light reaches the animal softly and indirectly.
A simple white foam-core reflector, held or propped opposite the window, can fill in shadows on the far side of the animal’s face, adding dimension without complexity. For backgrounds, choose a clean, uncluttered area, a solid-colored couch, a blank wall, or a simple blanket draped over a chair. Busy backgrounds compete with your subject and weaken the impact of the portrait.
Outdoor Pet Photography
Shooting outdoors gives you more space, more natural backdrops, and the freedom for action shots that are difficult to achieve inside. However, outdoor light requires careful management. Avoid shooting in direct midday sun, the harsh overhead light creates deep shadows under the animal’s brow and nose, and the extreme contrast makes it difficult to retain detail in both bright fur and shadowed areas.
Open shade is your best option for consistent, flattering light. The shade of a building, a large tree, or an overhanging structure provides soft, even illumination without squinting or harsh shadows. If you want warm, golden tones and long, dramatic shadows, schedule your session during golden hour, the period shortly after sunrise or before sunset when the sun sits low on the horizon and bathes everything in warm, directional light.
Safety is a primary concern when photographing animals outdoors. Use a long leash, a fenced area, or a trusted handler who can keep the animal within a safe zone while you shoot. Be aware of environmental distractions, other animals, passing cyclists, loud noises, that could cause the pet to bolt or become agitated. Scout your location in advance to identify potential hazards like traffic, bodies of water, or poisonous plants.
Working with Different Animals
Each species, and each individual animal, presents its own challenges and opportunities. Adapting your approach to the specific animal you are photographing is the mark of a skilled pet photographer.
Dogs
Dogs are generally the most cooperative pet photography subjects, but their enthusiasm can work against you. A dog that is thrilled to see you will often run straight at the camera, making it hard to focus and compose. Work with a handler, someone the dog knows and trusts, who can position the dog, hold its attention, and release it on cue for action shots. Movement and play shots often yield the most dynamic images: a dog leaping for a ball, splashing through water, or running full speed toward the camera. Use burst mode liberally and keep your shutter speed high.
Cats
Cats demand patience above all else. You cannot direct a cat the way you direct a dog, trying to force a cat into a position will only result in a stressed, uncooperative subject. Instead, follow the cat’s lead. Set up your camera and settings in advance, then wait for the cat to move into good light or an interesting pose on its own. Feather toys, crinkly objects, and toys that make soft clicking or chirping sounds are effective for capturing a cat’s alert, ears-forward, wide-eyed expression. Keep sessions short. A cat’s tolerance for being the center of attention is limited.
Horses
Horse photography requires both photographic skill and an awareness of animal safety. Always maintain a respectful distance unless you are experienced around horses, and work with the horse’s handler at all times. A telephoto lens in the 70–200mm range lets you capture tight portraits of the horse’s face and eye without standing dangerously close. Horses photograph beautifully in open fields during golden hour, and the interplay between a horse and its rider offers rich storytelling potential.
Small Animals
Rabbits, hamsters, guinea pigs, reptiles, and birds all require a more contained approach. Use a small, enclosed space or tabletop setup to keep the animal safe and within your focal range. A macro or close-focusing lens helps you capture the fine details, individual whiskers, the texture of scales, the iridescence of feathers. Move slowly and calmly. Small animals are especially sensitive to sudden movements and loud sounds.
Getting Attention and Cooperation
The secret to great expressions in pet photography is controlling where the animal looks and when. You want the animal’s attention directed at or near the camera lens at the moment you press the shutter. There are several reliable techniques for achieving this.
Squeaker toys are one of the most effective tools. A quick squeeze produces a sound that most dogs and many cats cannot resist looking toward. Hold the squeaker directly above or beside your lens so the animal’s gaze aligns with the camera. Treats work similarly, hold a small treat right next to the lens barrel to draw the animal’s eyes toward you. Just be prepared for the animal to lunge for it.
Unusual sounds, a whistle, a clicking tongue, a word spoken in a high-pitched voice, can produce that coveted head tilt and alert expression. However, every trick has a shelf life. Animals quickly habituate to repeated sounds, so save your best attention-getters for the key moments rather than using them continuously.
A second person acting as a handler is invaluable. They can position the animal, hold its attention from behind you, and manage treats and toys while you concentrate entirely on composition and timing. Keep your sessions short to maintain the animal’s cooperation, fifteen to twenty minutes is a good maximum for dogs, and even less for cats. It is far better to get a handful of excellent shots in a focused ten-minute session than to spend an hour wearing out both the animal and yourself.
Composition Tips for Pet Photography
Strong composition is what separates a nice pet photo from an arresting one. Apply the rule of thirds by placing the animal’s eyes at one of the upper intersection points of the grid. Since the eyes are the emotional anchor of any portrait, their placement drives the entire composition.
Negative space, the empty area around your subject, adds breathing room and context. A small dog in the lower corner of the frame with a wide expanse of blurred grass above and behind it tells a story of scale and environment. Conversely, filling the entire frame with a tight crop of the animal’s face creates intensity and impact. Both approaches are valid; the key is to choose one deliberately rather than landing somewhere in between by accident.
Catch light, the small reflection of your light source in the animal’s eyes, is critically important. Without it, the eyes look flat, lifeless, and dark. Position the animal so that a window, the sky, or a reflector creates a visible bright spot in each eye. This single detail makes an enormous difference in the emotional power of the portrait.
Pay attention to depth of field and how it interacts with your composition. A shallow depth of field can isolate a single eye or the tip of a nose, drawing the viewer to exactly the point you want them to look. A deeper depth of field, on the other hand, keeps the entire animal sharp and works well for full-body or environmental portraits where the surroundings matter.
Post-Processing Pet Photos
Thoughtful editing can elevate a good pet photo into a great one without making it look artificial. Start with the eyes, they are the most important element. Use a local adjustment brush to slightly brighten the irises and increase clarity or sharpness on the eyes alone. This draws the viewer’s gaze and adds life to the portrait. Be subtle; over-sharpened or over-brightened eyes look unnatural.
White balance is especially important when photographing fur. Auto white balance often shifts the color of white, cream, or gray fur toward blue or yellow. Compare your edited image to what you remember seeing in person, or shoot a gray card at the start of the session to use as a reference point. Getting the white balance right ensures that a golden retriever looks golden, not orange, and a white cat looks white, not blue.
If a leash, collar, or harness is distracting in an otherwise beautiful portrait, you can remove it with your editing software’s clone or healing tool. This is a judgment call, some photographers prefer to keep collars as part of the animal’s identity, while others remove them for a cleaner look. Similarly, drool, eye discharge, or stray fur tufts can be cleaned up without altering the fundamental character of the image.
Apply selective sharpening to the eyes and face while leaving the background soft. Global sharpening can introduce noise in out-of-focus areas, so a targeted approach yields better results. Finally, consider converting some images to black and white, monochrome processing emphasizes texture, form, and expression, and can transform a good pet portrait into something truly striking.
Frequently Asked Questions
What is the best lens for pet photography?
A 70–200mm f/2.8 zoom is the most versatile choice for pet photography. It gives you enough reach to photograph a running dog from a comfortable distance, and at 70mm with a wide aperture, it produces beautiful, creamy background blur for portraits. A 50mm f/1.8 is an excellent budget alternative for indoor work and close-up portraits, while a 35mm f/1.8 or f/2 works well for environmental shots where you want to include more of the surroundings. For small animals, a dedicated macro lens in the 90–105mm range lets you capture extraordinary detail.
How do I photograph a black dog or cat?
Dark-furred animals are challenging because cameras tend to overexpose the scene when a large dark subject fills the frame. The meter tries to brighten the overall image, which washes out the fur and loses detail. Use exposure compensation of -1/3 to -2/3 stops to preserve the richness and texture of dark fur. Shoot in soft, directional light, side lighting from a window is ideal, so that the light skims across the fur and reveals its texture and sheen. Avoid flat, front-on lighting, which makes dark animals look like featureless silhouettes. In post-processing, pull the blacks down slightly and increase clarity to bring out fur texture.
Do I need flash for pet photography?
In most cases, no, and it is generally better to avoid flash with animals. The sudden burst of light can startle pets, making them anxious and less willing to cooperate. Direct flash also produces unflattering, flat lighting and causes the bright eye-shine effect (green or yellow glowing eyes) due to light reflecting off the tapetum lucidum. If you absolutely need additional light, use a continuous LED panel, which animals adjust to quickly, or bounce an external flash off the ceiling or a wall so the light reaches the subject softly. Natural window light remains the gold standard for indoor pet portraits.
How do I photograph pets with children?
Photographing pets with children combines two of the most unpredictable subjects in photography, so patience and preparation are key. Have a second adult present to manage one subject while you direct the other. Keep the session short and playful, neither young children nor animals tolerate long, structured photo sessions. Capture natural interactions: a child reading to a dog, a toddler and a kitten looking at each other, a gentle hand stroking fur. Use burst mode constantly, as the perfect moment of connection between child and animal lasts only a fraction of a second. Safety is paramount, never leave young children and animals in a situation that could become unsafe, and stop the session immediately if either subject shows signs of stress or discomfort.