Silhouettes are among the most powerful images in photography. A dark figure set against a bright, colorful sky instantly communicates drama, mystery, and emotion, often more effectively than a fully lit photograph. The best part is that silhouette photography requires no special equipment. You just need a strong backlight, the right camera settings, and an eye for compelling subjects. This guide covers everything you need to create striking silhouettes, from metering technique and timing to composition strategies and post-processing.
What Makes a Great Silhouette?
A silhouette works because it strips a subject down to its most essential element: shape. Without color, texture, or detail to rely on, the outline of your subject has to do all the storytelling. This is why subject choice and positioning matter so much in silhouette photography, a strong, recognizable shape reads instantly, while a cluttered or ambiguous outline falls flat.
The most effective silhouettes feature subjects with distinctive outlines: a person in profile, a tree with dramatic branches, a cyclist on a ridge, a couple holding hands, or a bird in flight. The subject should be easily identifiable by shape alone.
Best Times and Conditions for Silhouettes
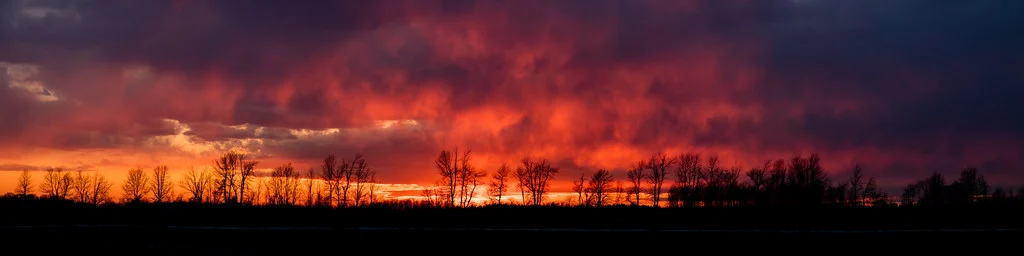
See it side by side
A clean silhouette exposes for the bright background so the subject collapses into a pure black shape with a recognizable outline. Partial light on the subject muddies the contrast and weakens the graphic effect.
Silhouettes require a bright background behind a darker subject. While you can create silhouettes in controlled lighting situations, natural light offers the most dramatic backdrops.
- Golden hour and sunset: The classic silhouette setting. The low sun creates a vibrant sky of warm oranges, reds, and purples while any subject between you and the sun becomes a natural silhouette. The 15-20 minutes around sunset produce the most colorful skies.
- Sunrise: Offers the same backlighting geometry as sunset, often with less haze and more pastel tones. Sunrise silhouettes tend to feel calmer and more serene than the dramatic warmth of sunset.
- Overcast days with bright sky: Even without direct sun, an overcast sky is significantly brighter than subjects on the ground. You can create subtle, moody silhouettes against a bright gray sky. These work especially well in black and white.
- Midday backlight: Shooting directly into the sun at midday creates harsh, high-contrast silhouettes. This is less common but can be effective for graphic, minimalist images.
- Artificial backlighting: Windows, studio lights, street lamps, and even phone screens can serve as backlight sources for indoor or nighttime silhouettes.
Camera Settings for Silhouette Photography
The key to a clean silhouette is exposing for the bright background while letting your subject go dark. Here is how to set up your camera:
- Metering mode: Use spot metering or center-weighted metering and meter off the bright sky, not the subject. This tells your camera to expose for the highlights, which naturally underexposes the foreground subject into a silhouette. If you are unfamiliar with metering modes, our metering modes guide explains each option in detail.
- Exposure compensation: If you are shooting in aperture priority or shutter priority mode, dial in -1 to -2 stops of exposure compensation. This ensures the subject goes fully dark rather than your camera trying to brighten it.
- Manual mode approach: Point your camera at the bright sky, note the exposure settings your camera suggests, then switch to manual mode and use those settings. The sky will be properly exposed and your subject will be dark.
- Aperture: Use a narrow aperture (f/8 to f/16) for sharp silhouettes with good depth of field. If the sun is in your frame, f/16 or narrower creates a starburst effect on the sun.
- ISO: Keep it low (100-400). There is plenty of light from the bright background, and low ISO keeps the sky colors clean and noise-free.
- Focus: Focus on your subject, not the background. You want the silhouetted shape to be tack-sharp. In low-contrast situations where autofocus struggles, switch to manual focus.
Choosing and Positioning Your Subject
Subject choice is critical because the viewer can only see the outline. Follow these guidelines:
- Choose subjects with strong, recognizable shapes. A person in profile reads much better than a person facing the camera head-on. A tree with spreading branches is more interesting than a rectangular building.
- Separate your elements. If you are photographing a person, have them spread their arms or legs slightly so their limbs do not merge into a single blob. Two people should stand slightly apart so both outlines are distinct.
- Position your subject against the brightest part of the sky. Place your subject directly in front of the light source so there is clean, bright sky behind them with no distracting background elements breaking the outline.
- Shoot from a low angle. Getting low puts more sky behind your subject, making it easier to isolate them as a clean silhouette. Shooting upward also makes subjects appear more imposing and dramatic.
- Avoid merging with background elements. Make sure your subject does not overlap with trees, buildings, or other dark objects that would break or confuse the silhouette shape.
Composition Techniques for Silhouettes
Strong composition is what elevates a silhouette from a simple dark shape to a compelling photograph.
- Use the rule of thirds. Place your silhouetted subject off-center for a more dynamic composition. A figure placed at the intersection of thirds with a dramatic sky filling the rest of the frame creates visual tension.
- Embrace negative space. Silhouettes thrive on simplicity. Give your subject room to breathe by surrounding it with open, colorful sky. The sky itself is a major part of the image.
- Tell a story. A silhouette of a person simply standing is less interesting than a person mid-action, running, jumping, dancing, fishing, or reaching out to someone. Action and interaction give silhouettes narrative power.
- Use reflections. Water reflections double the impact of a silhouette. A figure silhouetted against a sunset with their reflection in still water below creates a perfectly symmetrical, eye-catching image.
- Create layers. Multiple silhouetted subjects at different distances create depth. A foreground tree, a mid-ground person, and a distant mountain range all silhouetted against a bright sky give the image a sense of three-dimensional space.
Rim Lighting: The Partial Silhouette
A pure silhouette shows the subject as completely black. But sometimes, a thin rim of light around the subject’s edge, known as rim lighting or edge lighting, adds an extra dimension of beauty. This happens naturally when the light source is slightly off to the side or when the light wraps around hair, fur, or translucent materials.
To create rim lighting, position the backlight so it is not directly behind the subject but slightly to one side. The light catches the edges of the subject, creating a glowing outline while the core of the subject remains dark. This technique is particularly effective with portraits (hair glows beautifully), animals with fur, and translucent subjects like leaves or flower petals.
You can control the intensity of the rim light through exposure. A slightly brighter exposure brings out more rim detail, while a darker exposure keeps the rim subtle and the silhouette more dominant.
Post-Processing Silhouettes
Silhouettes are relatively simple to process, but targeted adjustments can make a big difference in the final impact.
- Crush the blacks. If your subject is not quite dark enough, reduce the shadows and blacks sliders to deepen the silhouette. The subject should be completely or nearly black with no distracting detail visible.
- Boost the sky. Increase vibrance and saturation slightly to make sunset colors pop. Adjust the white balance warmer for richer golden tones, or cooler for a more moody, blue-hour atmosphere.
- Add contrast. Silhouettes are inherently high-contrast images. Boosting contrast emphasizes the separation between the dark subject and the bright sky.
- Clean up the edges. Zoom in on the silhouette outline and look for any bright spots or light leaks. Use the burn tool to darken any areas where the silhouette is not fully opaque.
- Consider black and white. While colorful skies are a major draw, some silhouettes work even better in black and white. Monochrome silhouettes emphasize shape and contrast with a timeless, graphic quality.
- Crop for impact. Silhouettes benefit from deliberate cropping. Remove any distracting elements and tighten the composition to strengthen the relationship between subject and sky.
Creative Silhouette Ideas
- Window silhouettes. Photograph people standing in front of bright windows for indoor silhouettes. The window acts as a natural light box.
- Silhouettes with props. Umbrellas, hats, bicycles, musical instruments, props add character and make the silhouette shape more interesting and story-driven.
- Group silhouettes. Families, couples, or groups of friends make compelling multi-figure silhouettes. Make sure each person’s outline is distinct and separated.
- Wildlife silhouettes. Birds in flight, deer on a ridgeline, or elephants against an African sunset are classic wildlife silhouette subjects. The shape of the animal must be instantly recognizable.
- Architectural silhouettes. Buildings, bridges, monuments, and power lines create graphic silhouettes, especially during twilight when the sky is colorful but structures are already dark.
- Fog and mist silhouettes. Backlit fog creates ethereal, layered silhouettes with reduced contrast and a dreamy quality that feels very different from the sharp contrast of a clear-sky sunset.
Common Mistakes to Avoid
- Exposing for the subject. Your camera’s meter wants to brighten everything to middle gray. If you meter for the subject, the sky will blow out to white and you lose all that beautiful color. Always expose for the bright background.
- Using flash. An accidental flash pop will light up your subject and destroy the silhouette. Turn your flash off before you start shooting.
- Cluttered outlines. Overlapping subjects, merged limbs, or background objects breaking the silhouette edge weaken the image. Simplify and separate.
- Ignoring the background. The sky or backlight behind your subject is half the image. A boring, featureless sky makes for a boring silhouette. Wait for interesting clouds, vibrant colors, or dramatic light.
- Too much detail in the silhouette. If you can see texture and color in your subject, it is not a true silhouette. Underexpose further to darken the subject completely.
Frequently Asked Questions
What is the best metering mode for silhouettes?
Spot metering pointed at the bright sky is the most reliable method. This tells your camera to expose correctly for the sky, which naturally underexposes the darker subject into a silhouette. Center-weighted metering also works if you aim at the sky. Evaluative (matrix) metering tries to balance the whole scene, which often results in the subject being partially lit, not what you want for a clean silhouette. For more details, read our metering modes guide.
Can I create silhouettes without a sunset?
Absolutely. Any strong backlight can produce a silhouette. Bright overcast skies, studio lights behind your subject, window light, street lamps, bonfires, and even a bright wall or screen all work. The principle is the same: expose for the light source, and the subject in front of it goes dark.
How do I photograph a silhouette with my phone?
Most phone cameras will try to brighten the subject automatically. To force a silhouette, tap on the bright sky in your camera app to set exposure for the highlights. On iPhone, you can then swipe down on the screen to reduce exposure further. On Android, look for an exposure compensation slider after tapping to focus. Shooting in your phone’s manual or pro mode gives you even more control.
Should the subject be completely black in a silhouette?
In a classic silhouette, yes, the subject should be entirely black with no visible detail. However, partial silhouettes with a hint of rim lighting or subtle detail can also be very effective. There are no strict rules. Let the mood of the image guide your decision. Some of the most compelling silhouettes have just a trace of light catching the subject’s edge.
Continue Learning
Silhouette photography is a wonderful exercise in simplification and light. Explore these related guides to keep developing your skills:
- Golden Hour Photography Guide
- Understanding Exposure
- Camera Metering Modes Explained
- Composition Techniques
- Black and White Photography
- Portrait Photography Guide
- Photography Masterclass
- Double Exposure Photography