Toy photography transforms miniature objects into protagonists of their own visual stories. Action figures battle in dramatic landscapes. LEGO minifigures commute through tiny cityscapes. Model cars cruise along tabletop highways. When done well, toy photography suspends disbelief, making viewers forget they are looking at objects that fit in the palm of a hand. It is a genre that combines photography, model building, storytelling, and a childlike willingness to play.
The genre has grown significantly with the rise of social media, where dedicated communities share and celebrate miniature world-building. Professional toy photographers work with entertainment companies, toy manufacturers, and brands. But the barrier to entry is remarkably low. You need a camera, a toy, and some imagination.
This guide covers every aspect of toy photography, from choosing subjects and building scenes to mastering the camera settings and lighting techniques that make miniature worlds feel real.
Choosing Your Subjects
The toy you choose defines the type of story you can tell and the technical challenges you will face.
- Action figures (6 to 12 inch). Larger figures are easier to light and photograph. Articulated joints allow expressive posing. The bigger the figure, the more detail the camera can capture.
- LEGO minifigures. Enormously popular in toy photography. The simple, iconic design is instantly recognizable, and the standardized scale makes it easy to build matching environments.
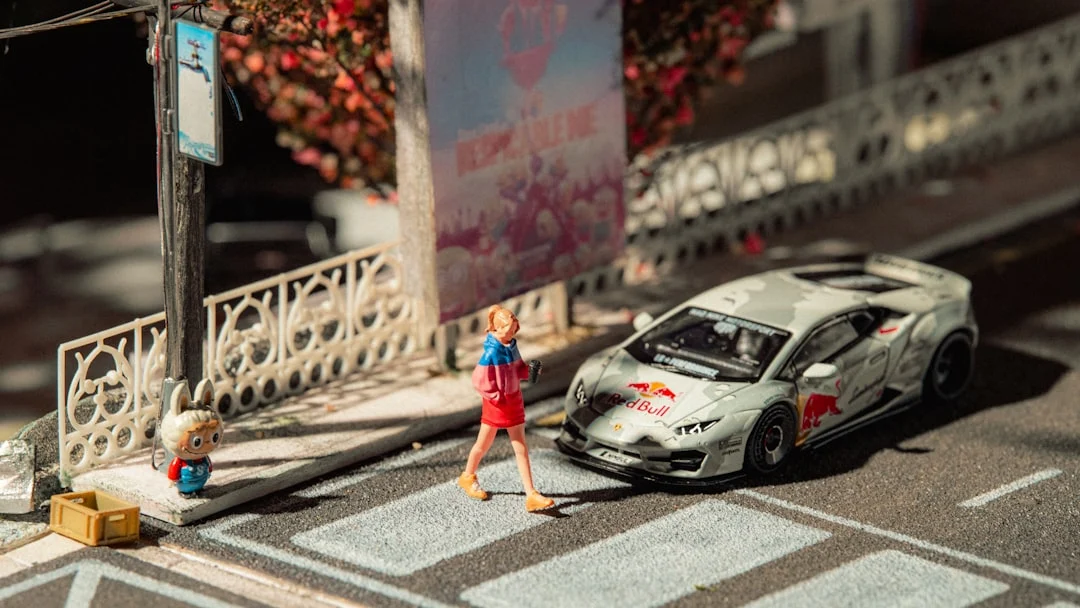
- Model cars. Die-cast cars at 1:18 or 1:24 scale offer incredible detail. At the right angle, they are indistinguishable from real vehicles.
- Miniature figurines (model railroad scale). Tiny figures (1:87 HO scale) require Macro Photography techniques but create dramatic scenes where the miniature scale is part of the art.
- Stuffed animals and plush toys. Their soft, organic shapes create a different aesthetic, often whimsical or emotional.
- Custom or kitbashed figures. Combining parts from different toys or customizing with paint and accessories creates unique subjects that stand out.
Building Scenes and Dioramas
The scene around your toy is just as important as the toy itself. A well-built diorama sells the illusion that the miniature world is real.
Simple backgrounds
- Printed photographs of landscapes, cityscapes, or interiors placed behind the toy.
- A tablet or laptop screen displaying a background image.
- Solid colored paper or fabric for clean, minimal backdrops.
- Natural outdoor settings: grass, soil, rocks, and water at ground level become scale-appropriate environments.
Moderate dioramas
- Foam board or cardboard constructions painted and textured to look like walls, floors, or landscapes.
- Model railroad scenery materials (miniature trees, ground cover, fake water, rock formations).
- Everyday objects repurposed as props: a book becomes a building, aluminum foil becomes water, cotton becomes clouds or smoke.
- Sand, dirt, or gravel for natural-looking ground surfaces.
Advanced diorama techniques
- 3D-printed custom buildings, vehicles, and props designed to match your toy’s scale.
- Weathering and aging effects (dry brushing paint, adding rust, simulating wear).
- Water effects using clear resin, hot glue, or clear silicone.
- Atmospheric effects: fog machines (or incense smoke), theatrical haze, water spray for rain.
Forced Perspective with Toys
Toy photography naturally involves forced perspective. The entire premise is making something small appear life-sized. The same principles from general forced perspective photography apply, but the scale makes the execution different.
- Shoot from the toy’s eye level. Getting the camera down to the toy’s height makes the viewer’s perspective match a life-sized figure’s viewpoint.
- Use real outdoor environments as backgrounds. A LEGO figure on a rock with a mountain behind it becomes a mountaineer if the scale and camera angle are right.
- Match the focus. Both the toy and its environment should be similarly sharp. Use a small Aperture (f/8 to f/16) or Focus Stacking to achieve deep Depth Of Field.
- Watch for scale-breaking elements. A blade of grass next to a 6-inch figure immediately reveals the trick. Remove or hide scale references that break the illusion.
Camera Settings for Toy Photography
- Aperture: f/5.6 to f/16. The tiny subjects and close shooting distances mean Depth Of Field is very shallow even at small apertures. Use f/8 to f/11 for most shots. Consider Focus Stacking for maximum sharpness.
- Focal length: 50mm to 100mm macro. A macro lens or a standard lens with extension tubes lets you fill the frame with a small subject. Avoid wide-angle lenses, which distort the toy’s proportions and exaggerate scale differences.
- ISO: keep it low. Toy photography is usually static, so you can use long exposures. Keep Iso at 100 to 400 for clean images. Noise at high ISOs is proportionally much more visible on tiny subjects.
- Shutter speed: depends on whether subjects move. For static scenes, use a tripod and any Shutter Speed needed. For action scenes involving falling water, smoke, or thrown props, faster speeds freeze the action.
- Manual focus. Autofocus often struggles with small subjects at close range. Switch to manual Focus Modes and use live view magnification to nail focus on the most important detail (usually the figure’s face or eyes).
Lighting Miniatures
Lighting is arguably the most important technical element in toy photography. The right light sells the illusion. The wrong light exposes the miniature scale.
- Small light sources create hard shadows. A desk lamp that would produce soft, flattering light on a human face produces hard, dramatic shadows on a 6-inch figure. This can be a feature (for dramatic scenes) or a problem (for realistic ones).
- Diffuse for realism. To simulate the soft, ambient light of an overcast day, use a large diffuser relative to the subject’s size. A piece of white paper held above the toy is enormous relative to the figure, creating beautifully soft light. Photography Lighting principles apply, but the scale changes everything.
- Tiny practical lights. LED string lights, fiber optic strands, and small flashlights can serve as practical lights within the scene, simulating streetlights, fire, or ambient glow.
- Colored gels and filters. Small pieces of colored gel over your light source set mood instantly. Blue for night scenes, warm orange for firelight, red for dramatic or dangerous atmospheres.
- Backlighting for drama. A light behind the toy creates rim lighting and silhouettes that add depth and atmosphere, following the same principles as Silhouette Photography.
- Natural light outdoors. Golden Hour Photography is spectacular for outdoor toy photography. The low, warm sun creates the same dramatic lighting on miniatures as it does on full-sized landscapes.
Backgrounds and Surfaces
The surface your toy stands on and the background behind it are critical for selling the illusion.
- Texture matters. A smooth, glossy table immediately reads as ‘toy on a table.’ Textured surfaces like rough wood, stone, sand, or painted foam board look like natural terrain.
- Scale the texture. Large gravel looks like boulders at toy scale. Fine sand looks like desert. Dried herb leaves look like fallen foliage. Think about what each texture looks like relative to the toy’s size.
- Background distance. Push the background as far behind the toy as your space allows. This increases background blur and makes printed or screen backgrounds less obviously flat.
- Seamless transitions. Where the ground surface meets the background, avoid a visible joint. Curve paper or fabric upward gradually, or use strategic blur to hide the transition.
Post-Processing for Realism
Post-processing transforms a good toy photo into a convincing miniature world. Start with your standard Photo Editing For Beginners workflow, then add these toy-specific techniques.
- Color grading for mood. Color Grading Photography sets the emotional tone. A warm, desaturated grade suggests a gritty war scene. Cool blues suggest sci-fi or winter.
- Adding depth with vignette. A subtle vignette draws the eye toward the center and reduces distracting edges.
- Dust, scratches, and grain. Adding subtle film grain or dust overlays gives images a cinematic quality and helps sell the realism by masking the ‘too clean’ look of miniatures.
- Atmospheric effects. Adding haze, fog, or rain in post-processing creates environmental depth. Even a slight haze overlay separates foreground and background convincingly.
- Compositing elements. Adding real skies, smoke, fire, or explosion effects from stock images or your own photography adds drama that is hard to create at miniature scale.
Community and Sharing
Toy photography has a vibrant, welcoming online community. Sharing your work and learning from others accelerates your growth.
- Instagram hashtags like #toyphotography, #toyartistry, and #legophotography connect you with thousands of creators.
- Dedicated forums and online groups offer technique-sharing, challenges, and constructive feedback.
- Toy photography contests and exhibitions are increasingly common, offering recognition and motivation.
- Collaborations with other toy photographers can combine different skill sets (one person builds incredible dioramas, another excels at lighting and post-processing).
Creating Environmental Effects at Miniature Scale
Convincing environmental effects elevate toy photography from simple snapshots to cinematic scenes. Here are techniques for common weather and atmospheric effects.
- Fog and atmosphere. A small amount of incense smoke, a cotton ball stretched thin, or a tiny fog machine creates haze that adds depth and mood. Even a puff of breath in cold conditions works at miniature scale.
- Rain. A fine mist spray bottle above the scene during a Long Exposure Photography creates realistic rain streaks. Alternatively, use thin fishing line dipped in water and suspended above the scene for drip effects.
- Snow. Sifted baking soda or finely ground white craft material makes convincing snow. Apply it to surfaces and sprinkle it from above during exposure for falling snow.
- Fire and explosions. Cotton balls painted with orange and yellow acrylic paint, backlit with a warm LED, simulate fire convincingly. For explosion effects, cotton stuffing combined with orange lighting and a burst of flour creates convincing debris clouds.
- Wind effects. Attach thin threads to fabric elements on your figures and pull them gently during exposure to simulate wind-blown capes, flags, or clothing.
- Dust and debris. A pinch of fine material (flour, corn starch, or crushed chalk) tossed into the scene during a Flash Photography burst creates an impact effect, as if something just landed or exploded.
Telling Stories Through Miniature Worlds
The most compelling toy photography tells a story. It is not enough to place a figure in a pretty setting. The best images suggest narrative: what happened before this moment, what is about to happen, and what the figure is thinking or feeling.
- Create tension through composition. A figure at the edge of a cliff, approaching a dark doorway, or facing something much larger creates immediate narrative tension using Photography Composition principles.
- Use series and sequences. Multiple images showing the same figure in different stages of an action tell a richer story than any single frame.
- Include environmental storytelling. A discarded weapon, footprints in sand, or an open door all suggest narrative without needing another figure.
- Consider the viewer’s imagination. The most powerful stories leave gaps for the viewer to fill in. Suggest rather than show.
Common Mistakes
- Shooting from standing height. Looking down at a toy screams ‘this is a toy on a table.’ Get the camera at the toy’s eye level to create a perspective that matches the scale of the miniature world.
- Too much depth of field blur. While some background blur is natural, excessive blur (from shooting wide open at macro distances) makes the scene feel miniature rather than full-sized. Stop down to f/8 or f/11.
- Ignoring lighting quality. A single bare bulb creates harsh shadows that look unnatural at toy scale. Diffuse your lights or use multiple sources to create realistic lighting ratios.
- Scale-breaking details. A fingerprint on the toy, a hair on the set, or a visible human element (finger, shadow) in the frame destroys the illusion instantly. Clean your set and check every frame.
- Flat, lifeless poses. Action figures with dynamic articulation should be posed dynamically. A straight-standing, arms-at-sides figure looks stiff and unconvincing. Study how real people stand, walk, and interact for posing reference.
- Neglecting the background. A detailed foreground with a blank or obviously fake background creates a disconnect. Build or select backgrounds that match the foreground’s quality and narrative.
Try This: Practical Exercises
- Outdoor adventure. Take a toy figure outdoors and place it at ground level in an interesting natural setting (moss, puddle, soil, rock). Shoot from the toy’s eye level with f/8 and natural light. Focus on making the environment look like a full-sized wilderness.
- Tabletop diorama. Build a simple scene using household items: a towel for terrain, aluminum foil for water, paper for walls. Light it with a desk lamp through a white napkin (as diffuser). Photograph a toy figure in the scene.
- Night scene with practical lights. Create a Night Photography miniature scene using LED string lights as streetlamps. Shoot in a dark room with a long exposure on a tripod. The tiny lights create beautiful, scale-appropriate illumination.
- Action sequence. Set up an action figure in three sequential poses telling a simple story (approaching, fighting, victorious). Photograph each setup from the same angle. The series demonstrates narrative toy photography.
Frequently Asked Questions
Do I need a macro lens for toy photography?
Not necessarily. For larger toys (6 inches and up), a standard 50mm lens works fine if you have enough working distance. For smaller figures (LEGO minifigures, HO scale), a macro lens or extension tubes help you fill the frame. Many excellent toy photos are shot with kit lenses.
Can I do toy photography with a phone camera?
Yes. Phone cameras’ small sensors provide deep Depth Of Field at close range, which is actually helpful for keeping miniature scenes in focus. Some phones’ portrait modes also work well for toy photography. The main limitation is controlling lighting, which matters more than the camera itself.
How do I avoid shallow depth of field at close distances?
Use a smaller Aperture (f/11 to f/16), increase the distance between camera and subject (and crop if needed), or use Focus Stacking to combine multiple exposures focused at different points. Focus stacking is the most effective technique for achieving deep sharpness in macro-range toy photography.
What background works best for outdoor toy photography?
Natural environments at ground level work best. Grass, moss, dirt, rocks, and water at the toy’s scale create convincing landscapes. Get the camera at ground level and angle it so the sky or distant scenery fills the background. Avoid backgrounds where full-sized objects (cars, buildings, people) are visible at their normal scale.
How do I make water effects at toy scale?
For standing water, clear resin poured into a shallow tray creates a realistic surface. For splashes and waves, hot glue or clear silicone can be shaped and frozen in place. For rain, use a fine mist spray bottle during a long exposure. Real water at the right scale (a shallow puddle, a slow drip) also works but requires careful lighting.
What editing software works best for toy photography?
Lightroom For Beginners handles basic adjustments, color grading, and cropping well. For compositing, adding atmospheric effects, or removing unwanted elements, Photoshop For Photographers is the standard. Many toy photographers use both in sequence. Start with global adjustments in Lightroom, then take specific images into Photoshop for detailed work like adding fire, smoke, or background replacements. Free alternatives like GIMP provide similar compositing capabilities for photographers on a budget.
How do I get started with toy photography on a budget?
You do not need expensive toys or elaborate dioramas to begin. Start with a single figure and an outdoor natural setting. Place the figure at ground level in grass, on a rock, or next to a puddle. Use your camera’s kit lens and natural light. The Golden Hour Photography light works beautifully at miniature scale, and it costs nothing. As you develop your eye for miniature composition and lighting, you can gradually invest in additional figures, set-building materials, and dedicated lighting.