Night photography was once exclusively the domain of photographers with tripods, fast lenses, and cameras capable of clean high-ISO performance. Smartphones have changed that. Modern phones can capture remarkably detailed night scenes that would have been impossible just a few years ago. The combination of computational photography, multi-frame processing, and increasingly capable sensors means your phone can produce night images that surprise even experienced photographers.
But understanding how to use your phone effectively at night, and knowing the limits of what it can do, makes the difference between stunning results and a noisy, blurry mess. This guide covers the techniques, settings, and creative approaches for capturing the night world with the camera in your pocket.
The principles here apply to all modern smartphones. While different manufacturers implement night photography features in slightly different ways, the underlying techniques and creative principles are universal.
How Night Mode Actually Works
Understanding what happens when you press the shutter in night mode helps you use the feature more effectively. Unlike a traditional camera that captures a single exposure, night mode captures a burst of multiple frames at different exposure settings over several seconds. The phone’s processor then analyzes these frames, aligns them to correct for hand shake, selects the sharpest details from each frame, averages out the noise, and merges everything into a single clean, bright image.
This computational approach overcomes the fundamental physics limitation of a small phone sensor. Each individual frame may be noisy and underexposed, but by combining information from many frames, the phone creates a result that is much better than any single frame could be. The technique is conceptually similar to the image stacking that astrophotographers have used for years with dedicated cameras.
The phone determines how long the night mode capture will take based on how dark the scene is and how stable the phone is. In moderately low light with the phone held in your hands, the capture might take two to three seconds. In very dark conditions with the phone on a tripod, some phones will extend the capture to ten seconds or more, producing even better results because they have more data to work with.
Essential Techniques for Sharper Night Photos
Stability Is Everything
Night mode captures take multiple seconds. During this time, any movement of the phone degrades the final result. The phone’s software corrects for some hand shake, but it cannot fully compensate for significant movement. The steadier you hold the phone, the sharper and cleaner the final image will be.
The best approach is to use a tripod. Small, inexpensive phone tripods with flexible legs can wrap around railings, lampposts, or any solid object. When the phone detects it is completely stable (mounted on a tripod), it often extends the night mode capture duration automatically, gathering even more light for a better result.
If you do not have a tripod, improvise. Rest your phone on a wall, a table, a rock, a car roof, or any stable surface. Lean your body against a solid object and brace your arms. Hold the phone with both hands and press your elbows against your torso. These simple techniques dramatically reduce camera shake and produce noticeably sharper night photos.
Use a timer or the volume button as a remote trigger. Tapping the screen to fire the shutter introduces vibration right at the start of the capture. A two-second timer lets the phone stabilize before the capture begins. Some phones also support wireless remotes or watch-based triggers that eliminate this problem entirely.
Choose the Right Lens
In low light, your phone’s main (1x) lens almost always produces the best results. It typically has the largest sensor and the widest aperture, which means it gathers more light than the ultra-wide or telephoto lenses. Some phones support night mode on all lenses, but image quality degrades significantly on the secondary lenses in dark conditions.
Avoid digital zoom entirely at night. Zooming in crops a smaller area of the already limited sensor data and enlarges every flaw: noise, blur, and softness all become more pronounced. If you need a closer view of a night subject, shoot at 1x and crop during editing. The result will almost always be better than in-camera digital zoom.
Focus Carefully
Autofocus struggles in very low light because it needs contrast to lock onto a subject. If your phone’s autofocus is hunting (focusing back and forth without locking), try these solutions. Tap on a subject that has some contrast or an edge lit by available light. Move the phone to focus on something at the same distance as your subject, lock focus (long press), then recompose. Or switch to Pro mode and set focus manually.
For city night scenes, focus on a point of light like a street lamp, a lit sign, or a window. These bright elements give the autofocus system something to grab onto. For landscapes and starscapes, manual focus set to infinity usually produces the best results.
City Night Photography
Cities come alive at night photographically. The combination of artificial lights, reflections, deep shadows, and human activity creates a visual richness that daytime rarely matches. Phone cameras are excellent tools for city night photography because they are compact, unobtrusive, and always available when you encounter a great night scene.
Finding Good Night Subjects
Look for scenes with a mix of light and shadow. A fully illuminated building is less interesting than one where pools of light create drama against dark areas. Street scenes with neon signs, wet pavement reflecting lights, steam rising through lit air, and silhouettes against bright backgrounds all create compelling night images.
Rain is your friend at night. Wet surfaces reflect lights, creating doubled patterns of color and extending the visual interest throughout the frame. Even a light drizzle transforms an ordinary street into a canvas of reflected neon and lamplight. Just protect your phone from direct rain exposure.
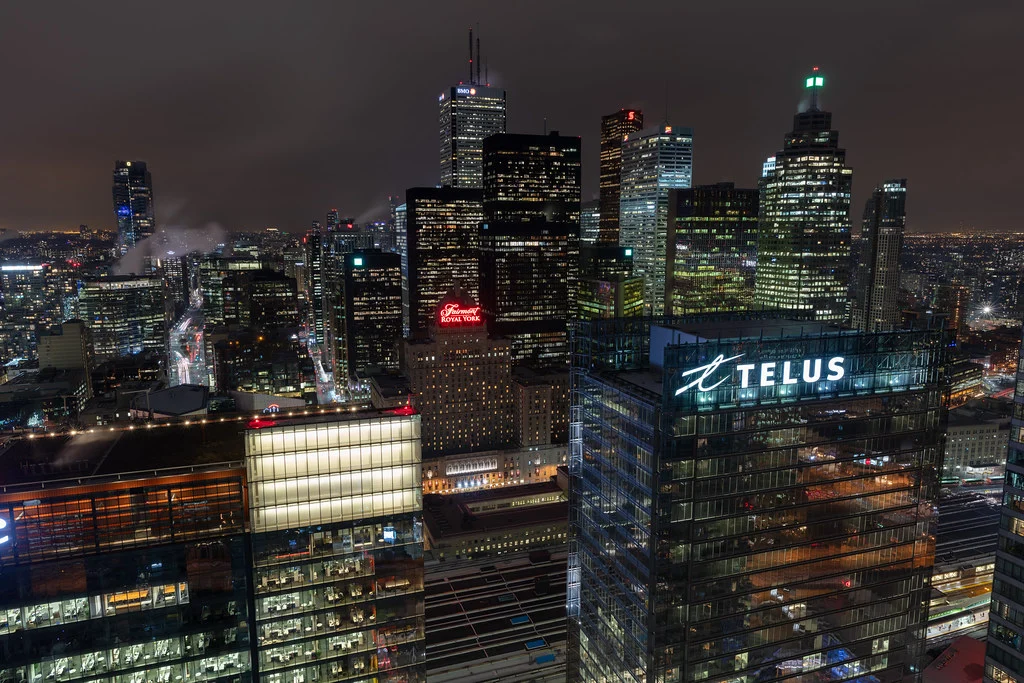
Elevation changes your night photography dramatically. Shooting down from a bridge, a hill, or a rooftop transforms a city into a tapestry of light trails, glowing buildings, and illuminated streets stretching to the horizon. These elevated vantage points create images with tremendous depth and scale.
Exposing for City Lights
Night scenes contain extreme brightness ranges. Bright signs and lights exist alongside deep shadows, and your phone must decide what to expose for. If you let the phone decide automatically, it often tries to brighten the shadows, which can wash out the atmospheric darkness that makes the scene feel like nighttime.
Tap on a midtone area (something that is not the brightest or darkest part of the scene) to set a balanced exposure. Then use the exposure slider to fine-tune. Deliberately underexposing slightly preserves the night atmosphere and prevents bright lights from becoming blown-out white blobs. You want the viewer to feel the darkness. Embrace the shadows. Not everything needs to be visible.
Light Trails and Long Exposure
Light trails from moving vehicles, spinning carnival rides, or any moving light source are among the most popular night photography subjects. They turn ordinary traffic into flowing ribbons of red and white light. Capturing them with a phone requires either the phone’s built-in long exposure mode or Pro mode with a slow shutter speed.
Using Built-In Long Exposure
Some phone camera apps offer a dedicated long exposure or light trail mode. These modes work similarly to night mode but are specifically designed to blend motion over time. The phone captures multiple frames and composites the light trails from each frame into a single image while keeping stationary elements sharp.
A tripod or completely stable surface is mandatory for light trails. Any camera movement during the capture will make the stationary elements (buildings, roads, signs) appear blurred, which ruins the effect. The magic of light trails is the contrast between sharp, still architecture and flowing, moving light.
Using Pro Mode for Long Exposure
In Pro mode, you can set the shutter speed manually. For light trails from vehicles, start with shutter speeds between two and ten seconds. Longer exposures produce longer, more continuous light trails. Shorter exposures produce shorter, more defined streaks. Experiment to find the duration that works best for the speed and density of traffic in your scene.
When setting a long shutter speed, you need to lower the ISO to avoid overexposure. In a well-lit city at night, ISO 50-100 with a shutter speed of several seconds often produces well-exposed images. The relationship between shutter speed, ISO, and exposure follows the same exposure triangle principles as any camera.
Choosing the Right Location for Light Trails
The best locations for light trail photography have steady, flowing traffic with both directions visible (creating both red taillights and white headlights), interesting background elements like buildings or bridges, and a safe vantage point slightly above the road. Overpasses, pedestrian bridges, and elevated sidewalks are ideal. Curves in the road create more dynamic, sweeping trail patterns than straight roads.
Astrophotography with Your Phone
Photographing the stars with a phone was impossible until recently. Now, many phones include dedicated astrophotography modes that can capture the Milky Way, bright stars, and even basic star trail effects. The results will not match a dedicated camera with a fast wide-angle lens, but they can be surprisingly impressive.
Requirements for Phone Astrophotography
Capturing stars with a phone requires specific conditions. You need genuinely dark skies, far from city light pollution. Suburban skies will show bright stars, but the Milky Way requires rural darkness. A tripod is absolutely essential because astro captures take anywhere from fifteen seconds to several minutes. And you need a clear, moonless night for the best results, as moonlight washes out fainter stars.
Some phones automatically activate an astrophotography mode when they detect they are mounted on a tripod and pointed at a dark sky. Others require you to use Pro mode and set long exposure times manually. In either case, the phone captures multiple long exposures and stacks them to produce a final image with more detail and less noise than any single exposure could achieve.
Composition for Star Photos
A sky full of stars is beautiful, but a photograph of only stars with no ground context often feels empty and lacks a sense of place. Include interesting foreground elements: a tree silhouette, a mountain ridge, a body of water, or a structure. These grounding elements give the image a sense of scale and location that makes it far more compelling.
The Milky Way core (the bright, dense band of stars) is most visible during certain months and at specific times of night, depending on your location and the time of year. Dark sky apps and websites can help you plan when and where the Milky Way will be visible. For phone astrophotography, the Milky Way core provides the most dramatic subject because it is bright enough for the phone’s sensor to resolve meaningful detail.
Star Trails on Your Phone
Star trails, the circular streaks created by Earth’s rotation during very long exposures, can be captured with a phone using either a dedicated star trail mode or a third-party long exposure app. The basic technique is to capture many consecutive exposures and stack them into a single image showing the accumulated motion of the stars.
For star trails, point your camera toward Polaris (the North Star) in the Northern Hemisphere or the South Celestial Pole in the Southern Hemisphere. Stars rotate around these points, creating concentric circular trails. The longer the total exposure time, the longer the trails. Thirty minutes produces short arcs. Two hours or more produces dramatic circles.
Battery life is a real concern for extended star trail captures. Disable any auto-sleep settings, close background apps to reduce power consumption, and consider bringing a portable battery charger to keep the phone powered during long sessions.
The Blue Hour: Night Photography’s Sweet Spot
The blue hour, the period of deep twilight just after sunset or before sunrise, is arguably the best time for night photography with a phone. The sky retains a rich blue color rather than being completely black. Artificial lights are on but the sky still provides enough ambient light to illuminate foreground details. The balance between artificial and natural light creates images with depth, color, and atmosphere that full darkness cannot match.
During the blue hour, your phone’s sensor has more light to work with than in full darkness. This means less noise, faster shutter speeds, and better overall image quality. The golden hour gets most of the attention, but the blue hour that follows is equally valuable, especially for city and architectural night photography.
The blue hour is brief, typically lasting only twenty to thirty minutes. Plan your location and composition in advance so you are ready to shoot when the light is at its best. Arriving early and scouting compositions during the golden hour gives you time to find the perfect vantage point before the blue hour begins.
Creative Night Photography Techniques
Silhouettes
Night is perfect for silhouette photography. Position your subject between the camera and a bright light source (a lit doorway, a sunset remnant on the horizon, a neon sign). Tap on the bright background to expose for the light, which renders your subject as a dark, dramatic shape against the brightness.
Strong silhouettes depend on recognizable shapes. A person’s profile, a tree’s branches, the skyline of a city, or a bicycle leaning against a railing all create instantly readable silhouettes. Avoid overlapping shapes that merge into an unrecognizable mass.
Reflections
Night reflections in water, wet pavement, glass, and polished surfaces double the visual impact of lights. Get low to emphasize reflections, ideally getting the phone close to the reflecting surface so the reflection fills a larger portion of the frame. Still water creates mirror-like reflections, while rippled water creates scattered, painterly patterns of reflected light.
Light Painting
Light painting uses a moving light source (a flashlight, a phone screen, sparklers) to “draw” in the air during a long exposure. The camera records the path of the light as a bright streak while the moving person wielding the light remains invisible (because they are in constant motion and therefore never in one spot long enough to register).
To try light painting with your phone, set up on a tripod, switch to Pro mode, and set a long shutter speed (ten to thirty seconds). Have someone move through the frame while waving a flashlight, or walk through the scene yourself after starting the timer. Experiment with different colored lights, different movement patterns, and different exposure durations.
Bokeh from Lights
Out-of-focus lights at night create beautiful bokeh circles. You can use this effect creatively by intentionally focusing on a close foreground subject while letting the background lights dissolve into soft, glowing orbs. Holiday lights, city lights at a distance, and any small point light sources become gorgeous, dreamy circles when thrown out of focus.
In Pro mode, manually focus close (foreground) while pointing at a distant scene of city lights. The entire background becomes a canvas of colored bokeh. You can also reverse this: focus on a distant subject and hold a string of small lights near the lens to create a foreground wash of bokeh around a sharp subject.
Editing Night Photos
Night photos benefit enormously from careful editing, but they also need a different approach than daytime images. The goal is to enhance the night atmosphere while bringing out detail in the areas that matter.
Start with white balance. Auto white balance often pushes night photos toward a neutral tone, but nights have their own color palette. City lights are warm orange. LED lights are cool white or blue. Neon signs add splashes of color. Let these color temperatures coexist rather than neutralizing everything.
Shadows in night photos should remain dark. The temptation is to brighten the shadows to reveal hidden detail, but this eliminates the darkness that makes the image feel like nighttime. Keep the overall image darker than a daytime photo would be. Selectively brighten only the areas where you want the viewer to focus.
Noise reduction matters more for night photos than for any other type. High ISO settings and long exposures produce visible noise, especially in shadow areas. Apply noise reduction judiciously. Removing noise in the shadows while preserving sharpness in the lit areas gives the best balance. Our mobile editing apps guide covers the tools for this in detail.
For further editing techniques specific to night images, see our photo editing for beginners guide.
Common Mistakes
Using the flash at night. The built-in phone flash illuminates a small area immediately in front of the camera with harsh, flat light while leaving everything beyond a few feet in complete darkness. It destroys the atmosphere of any night scene. Disable the flash for night photography and work with available light instead.
Not stabilizing the phone. Night mode captures take several seconds. Holding the phone freehand, especially one-handed, introduces shake that reduces sharpness. Even bracing against a wall or resting the phone on a surface produces significantly better results than handheld shooting. A tripod is the best option.
Brightening everything in editing. Night photos are supposed to be dark. That is what makes them feel like night. Over-brightening shadows eliminates the mood and makes the image look like an underexposed daytime photo rather than a properly exposed night photo. Embrace the darkness and keep shadows deep.
Ignoring the blue hour. Shooting too early (when the sky is too bright) or too late (when the sky is completely black) misses the sweet spot of night photography. The blue hour, when the sky is deep blue and artificial lights are already on, produces the most balanced, atmospheric night images. Plan to be on location during this brief window.
Using the wrong lens in low light. The telephoto and ultra-wide lenses on most phones have smaller apertures and sensors than the main lens. In low light, they produce noticeably noisier, softer images. Default to the main (1x) lens for night photography unless you have a specific compositional reason to use a different lens.
Moving the phone during night mode capture. Night mode displays a countdown or progress indicator while it captures. Moving the phone before this completes, even slightly, degrades the result. Wait until the capture indicator confirms the shot is finished before lowering the phone.
Try This: Practical Exercises
Exercise 1: Blue Hour vs. Full Dark. Find an interesting urban scene and photograph it twice: once during the blue hour (about 20-30 minutes after sunset) and once in full darkness (about 90 minutes after sunset). Compare the two images. Notice how the blue hour version has a rich sky and more balanced lighting, while the full dark version has more contrast between lights and deep black sky. Both are valid approaches. Learn which you prefer for different subjects.
Exercise 2: Light Trail Practice. Find a safe vantage point overlooking a road with steady traffic. Mount your phone on a tripod or stable surface. Shoot multiple frames at different exposure times (if using Pro mode) or let night mode work automatically. Review the results and note how different traffic speeds and exposure times produce different trail patterns.
Exercise 3: Handheld vs. Tripod Comparison. Photograph the same night scene in night mode three ways: handheld, braced against a wall, and on a tripod. Compare the sharpness, noise levels, and overall quality. This exercise clearly demonstrates why stability matters and helps you judge when handheld is “good enough” versus when a tripod is necessary.
Exercise 4: Reflection Hunting. After rain, go for an evening walk specifically looking for reflections. Puddles, wet pavement, car hoods, shop windows, and any wet surface that catches lights. Shoot from different angles and heights. Get the phone low to the reflecting surface for maximum reflection size. This trains your eye to see the creative potential in night conditions.
Exercise 5: Exposure for Mood. Find a well-lit night scene and photograph it at five different exposure levels: very dark, slightly dark, auto exposure, slightly bright, and very bright. Compare how exposure affects the mood of the scene. Notice that the darker versions feel more atmospheric and “night-like” while brighter versions lose the feeling of nighttime. This exercise teaches you that proper night exposure is not about making things bright.
Taking Night Photography Further
Night photography with a phone is an excellent starting point for exploring what becomes possible when you push the limits of capture. If you find yourself wanting even more control over long exposures, sharper results in near-total darkness, or the ability to capture detailed images of the Milky Way, a dedicated camera opens up those possibilities. Our smartphone vs. camera comparison explores when upgrading makes sense.
For a broader look at smartphone photography techniques that apply in all conditions, start with our fundamentals guide. And for optimizing your phone’s camera settings specifically for night shooting, our settings guide covers the details.
The night is one of the most rewarding times to photograph. The world looks fundamentally different after dark. Colors shift, shadows deepen, lights become subjects, and ordinary places transform into extraordinary ones. Your phone is a capable tool for capturing all of this. The techniques in this guide give you the foundation to make the most of it.
Frequently Asked Questions
Can I photograph the Milky Way with my phone?
Yes, with limitations. You need a phone that supports long-exposure astrophotography modes, truly dark skies far from light pollution, a tripod, and a clear moonless night. The results will show the Milky Way band and bright stars, but with less detail and more noise than a dedicated camera with a fast wide-angle lens. It is worth trying if you are in a dark location. The results can be genuinely impressive.
Why are my night photos blurry even with night mode?
Night mode corrects for some hand shake, but it cannot eliminate all motion. If you are moving the phone during the multi-second capture, the final image will still be soft. Brace the phone against something solid, use a tripod, or enable the timer to avoid shake from tapping the shutter. Also ensure you are not moving the phone before the capture indicator shows it has finished processing.
Should I use night mode in all low-light situations?
Night mode works best for static scenes. If your subject is moving (a person walking, a pet, a dancer), night mode’s multi-frame capture will produce ghosting or blur from the subject’s movement. For moving subjects in low light, regular photo mode with a fast shutter speed (accepting more noise) often produces better results. Some phones offer a “moving subject” detection that adjusts night mode behavior automatically.
How do I photograph fireworks with my phone?
Use a tripod for stability. Switch to Pro mode if possible and set a shutter speed of one to four seconds with low ISO (100-200). The long exposure captures the full burst of the firework. In auto or night mode, the phone may try to capture a very long exposure and overprocess the result. Some phones have specific fireworks modes. Whatever mode you use, the key is keeping the phone completely still during the exposure.
Why does my phone sometimes refuse to activate night mode?
Night mode activates automatically on most phones only when the scene is dark enough to benefit from it. In moderately dim conditions (a well-lit restaurant, for example), the phone may decide that normal processing is sufficient and will not trigger night mode. You can usually force night mode on through the camera app’s interface, but be aware that in brighter conditions it may overexpose the result.
Is it worth editing night photos, or should I just rely on night mode’s processing?
Night mode processing is a great starting point, but editing can significantly improve the result. Selective noise reduction in shadow areas, color grading to enhance the night mood, and local adjustments to brighten specific subjects while keeping the overall atmosphere dark can transform a good night mode capture into something special. Shooting in RAW (via Pro mode) gives you the most editing flexibility for night images.