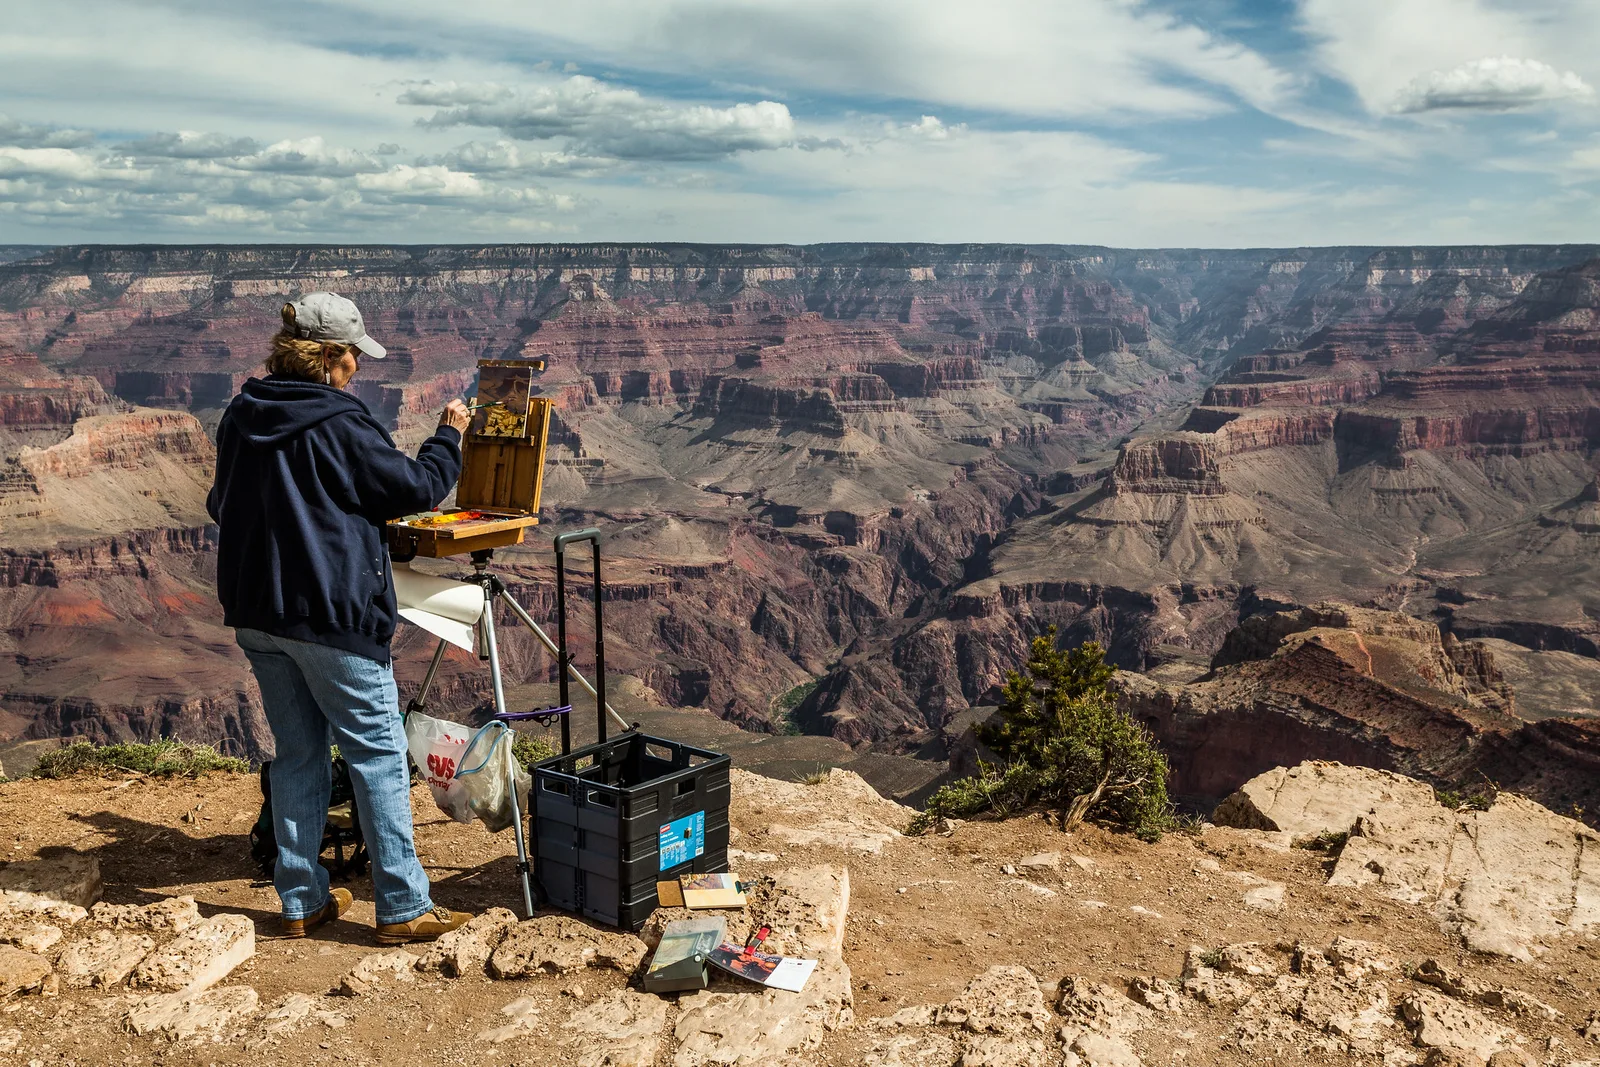
The easiest way to pose hands in a photo is to give them a job: hold something, touch something, or rest gently on something. Keep hands relaxed with fingers slightly apart and slightly curved, show the side of the hand rather than the flat back or a clenched fist, and keep them away from the lens unless you want them to look big. If hands look awkward, have the person shake them out, then place them again with a soft touch rather than a grip.
Ask almost anyone to stand in front of a camera and the first thing they say is, “What do I do with my hands?” It is a fair question. Without a job, hands tend to hang like they belong to someone else, clench into fists, or press flat against the body. Those small details can make a relaxed person look stiff in the final photo.
The good news is that hands are one of the easiest parts of posing to fix once you know a few simple ideas. You do not need to memorise dozens of poses. You need to understand why some hands look natural and others look awkward, and then give clear, kind directions.
This guide is written for beginners. It covers why hands matter, the basic rules, simple poses for standing and sitting people, how to direct hands with words, how lens choice and angle change the look of hands, and the most common mistakes. At the end there is a 10-minute exercise and a set of answers to common questions.
Why hands matter so much
Hands are expressive. People talk with them, comfort with them, and show nerves with them. Viewers notice hands almost as quickly as faces, even if they do not realise it.
That means hands can tell the story of a photo or quietly ruin it:
- Relaxed hands say the person is comfortable.
- Clenched fists or white knuckles say they are tense.
- Fingers picking at clothes say they are nervous.
- Hands busy with a task say the person is in their element.
In a portrait, a portrait being any photo where a person is the main subject, the face is usually the star. Hands are the supporting cast. Your job is to make sure they support the face rather than pull attention away from it. The broader portrait posing guide covers the whole body; this page zooms in on hands.
The golden rule: give hands a job
If you only remember one thing from this page, remember this: hands look natural when they are doing something. A hand that holds a cup, rests on a railing, or tucks hair behind an ear has a reason to be there. A hand that is just hanging has none, and the person feels it.
Jobs for hands fall into three easy groups:
- Hold. A cup, a book, a jacket, a bag strap, flowers, a tool, a musical instrument, a camera.
- Touch. The collar, a sleeve, the hair, the chin, a partner’s arm, a tree trunk, the edge of a table.
- Rest. In a pocket, on a hip, on a knee, on the lap, on a railing, across the other arm.
Look at the painter in the photo at the top of this page. You barely notice the hands as “posed” because they are simply working. That is the effect you want. When someone has a real task, their hands fall into natural shapes on their own.
For people who have a hobby or a job, bring it into the photo. A chef with a knife, a gardener with soil, a musician with an instrument: the hands become part of the story, and the person relaxes because they are doing something familiar.
Basic rules for natural-looking hands
Show the side, not the flat back or palm
A hand photographed flat on, with the back of the hand or the palm facing the camera, looks large and paddle-like. Turn the hand so the camera sees the edge, the side with the little finger, or a gentle three-quarter view. The hand looks slimmer and more graceful.
Soft fingers, slightly apart
Fingers pressed tightly together look stiff. Fingers spread wide look like a startled cartoon. Aim for the middle: fingers relaxed, slightly separated and slightly curved, as if the person is holding an invisible egg very gently.
Touch, do not grab
When a hand touches something, it should look light. A hand resting on a face should barely make contact. If someone presses into their cheek, the skin squashes and it looks uncomfortable. If they grip a railing hard, the knuckles go white. Ask for “a feather touch” and watch the tension disappear.
Bend the joints
Straight arms and straight fingers look rigid. A little bend in the elbow, the wrist and the fingers makes everything look more relaxed. A good rule: if it bends, bend it a little.
Keep both hands doing similar amounts
Two hands doing very different, busy things can look chaotic. Often the best look is one hand doing something and the other resting quietly. Or both hands working together on one task, like holding a mug.
Avoid cutting at the joints
When you frame a photo, try not to put the edge of the frame right across the wrist, knuckles or fingertips. Cutting fingers off at the knuckle looks like a mistake. Either include the whole hand or crop clearly through the forearm. The same idea applies to elbows and knees.
Simple hand poses for standing people
These are easy starting points. Try them, then adjust to what feels natural for the person in front of you.
- Hands in pockets. A classic. Ask for just the fingers in the pockets with thumbs out, or the thumbs hooked in with the fingers out. Fully buried hands can make arms look like they end at the wrist.
- One hand on the hip. Rest it lightly with the fingers pointing slightly down and back, not spread flat. Keep a gap between the arm and the body so the arm does not look squashed.
- Arms loosely crossed. Crossed arms can look closed off, so keep it relaxed: hands resting on the upper arms rather than tucked into armpits, and a smile helps.
- Holding a jacket or bag strap. Gives one or both hands an easy job.
- Leaning. Against a wall or railing, with one hand resting on it.
- Fixing a sleeve, cuff or collar. A natural movement that is great for headshots and fashion looks.
- Hands lightly together in front. One hand loosely holding the other wrist at about hip height. Avoid the “fig leaf” look of hands clasped low in the middle.
Simple hand poses for seated people
Sitting gives hands more places to go, which makes it easier.
- Hands on the lap. One resting on top of the other, relaxed, with the sides toward the camera.
- Elbow on knee. Leaning forward slightly with forearms on the knees and hands loosely together. Friendly and engaged.
- Elbow on a table, chin near hand. The hand should frame the chin or jaw, not hold the head up. Ask for the hand to barely touch.
- Holding a cup or book. Instantly relaxed.
- One arm over the back of a chair. Casual and confident.
- Hands around the knees. Sitting on the ground with knees up and arms loosely wrapped around them.
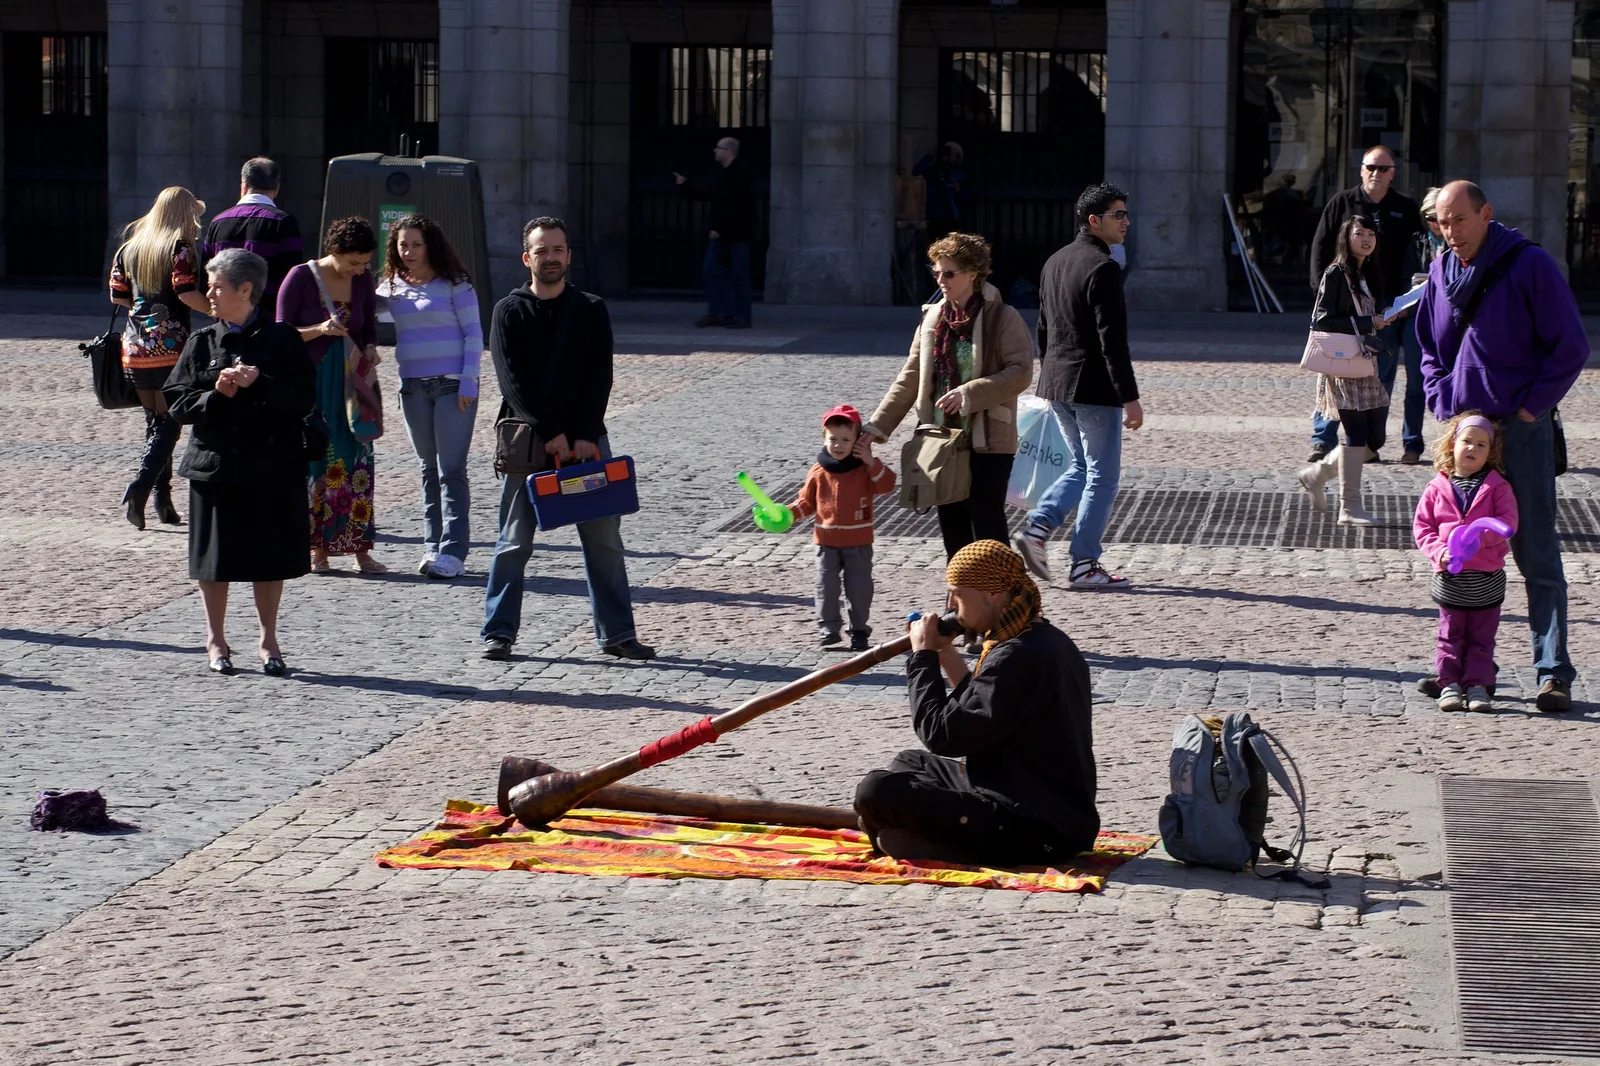
Seated poses with an instrument or tool work especially well, as you can see in the didgeridoo photo below. The hands have a clear task and the pose explains itself.
Hands near the face
Hands near the face can look elegant or awkward, with very little difference between the two. They are popular in headshots, beauty portraits and moody portraits.
Tips for hands near the face:
- Use the fingertips or the side of the hand, not the palm.
- Touch lightly, without pushing the skin.
- Keep the hand slightly behind or to the side of the face, not in front of it.
- Make sure the hand does not hide the mouth or jawline unless that is the point.
- Watch the brightness. Hands closer to the light than the face can end up brighter than the face, which pulls the eye away.
A useful idea from studio photographers: hands near the face should be “attached to the thought”. Touching the chin can suggest thinking. Tucking hair behind an ear suggests a gentle moment. Hands on the cheeks can show joy or surprise. If the gesture fits the mood, it looks natural.
How to direct hands with words
Knowing good hand poses is only half the job. The other half is explaining them to a real person, usually someone who feels nervous. Clear, friendly directions make a huge difference.
Show, do not just tell
The fastest way to direct hands is to do the pose yourself. Say, “Can you copy me?” and put your own hand in your pocket or on your hip. People mirror you naturally, and it saves long explanations.
Use simple words
Avoid technical words or vague requests like “be more natural”. Try instead:
- “Just let your fingertips touch your collar.”
- “Hold the mug with both hands like you are warming them.”
- “Slide your thumb into your pocket.”
- “Pretend your hand is holding a tiny bird.”
Shake it out
When hands go stiff, and they will, ask the person to shake their hands out loosely for a couple of seconds, then put them back. This simple reset releases tension and often gets a laugh, which also helps the face.
Ask before touching
Never move someone’s hands without asking first. Most of the time, showing the pose yourself is enough. If you do need to adjust something, ask, “Is it okay if I move your hand a little?” and keep it brief and respectful.
Praise what works
When a pose looks good, say so. “That’s great, keep your hand right there.” Encouragement keeps people relaxed, and a relaxed person has relaxed hands.
How lens and angle change hands
Things closer to the camera look bigger. This is called perspective, and it affects hands a lot.
- Hands closer to the lens than the face look huge. If someone reaches toward the camera, their hand can look larger than their head. That is fun for a dramatic shot but unflattering for a classic portrait.
- Wide-angle lenses exaggerate this. A wide-angle lens shows a lot of the scene and makes close things look much bigger. Stepping back and zooming in makes hands and faces look more in proportion.
- Longer focal lengths flatten things. A short telephoto lens, or simply zooming in from further away, keeps hands and face at a similar size.
Focus matters too. With a shallow depth of field, which means only a thin slice of the photo is sharp, hands in front of the face may be blurry while the eyes are sharp. That can look lovely, but if you want the hands sharp too, keep them at a similar distance from the camera as the face, or use a slightly smaller aperture. The guide to aperture explains how.
Hands in candid and street photos
You do not pose people in candid photos, but the ideas still help you choose the moment. Candid means natural and unposed. Watch for hands doing something interesting, whether you are shooting candids or street portraits: a musician’s fingers, a vendor counting change, an artist with a brush, someone gesturing mid-story. The candid photography guide covers how to catch those moments.
Hands can even be the whole subject. Close-up photos of hands at work, kneading bread, tying a knot, playing an instrument, can tell a story without showing a face at all. They are also a good option when someone is shy about having their face photographed.
Hands in group and couple photos
With more people, hands multiply quickly, and so do problems. A few tips:
- Give each pair of hands a simple place: a pocket, a shoulder, a waist, a held hand.
- Avoid hands spread flat across someone’s back or shoulder like a starfish. A lighter touch with the fingers together looks better.
- For couples and at weddings, holding hands, a hand on the partner’s chest or arm, or arms around each other give hands a clear job.
- Check the edges of the group for “floating” hands, a hand on a shoulder where you cannot see whose arm it belongs to.
The group photography tips and couple photography guides go further.
Hands in the light
Light affects hands just like it affects faces. Hands nearer the window or the sun than the face may come out brighter than the face, and bright areas draw the eye. If a hand is stealing attention, move it slightly away from the light or turn it so less of it faces the light.
Soft light, like window light (see natural light photography) or open shade, is kind to hands as well as faces. It smooths skin texture and avoids harsh shadows between the fingers. Hard midday sun can make hands look bony and veiny, especially on older people. If you are outside in strong sun, look for shade first.
Checking hands before you press the shutter
Beginners tend to look only at the face through the viewfinder. Train yourself to do a quick sweep of the frame before each shot, a habit sometimes called “checking the edges”. For hands, ask:
- Are both hands visible, or clearly and intentionally hidden?
- Do the hands have a job?
- Are the fingers relaxed, or is anything clenched or pressed flat?
- Am I cutting off fingers at the edge of the frame?
- Is a hand closer to the lens and looking oversized?
- Is a hand brighter than the face?
It takes a few seconds and saves many photos. After a few sessions it becomes automatic.
Common mistakes
- Leaving hands with no job. Arms hang stiffly and the person looks unsure. Give them something to hold, touch or rest on.
- Clenched fists. They read as tension. Ask the person to shake their hands out and relax.
- Flat paddle hands. The flat back of the hand toward the camera looks big. Turn the hand to show the edge.
- Pressing hands into faces. Squashed cheeks look uncomfortable. Ask for a feather touch.
- Cropping at the knuckles. Fingers cut off by the frame edge look like a mistake. Include the whole hand or crop through the forearm.
- Hands too close to a wide lens. They look giant. Step back and zoom in, or move the hands back.
- Over-posing. Twisting every finger into place makes people stiff. Give a simple job and let the hands settle naturally.
- Moving someone’s hands without asking. Always ask first, or show the pose yourself.
Try this: a 10-minute hands practice
You can do this with a friend, or alone as a self-portrait with your phone on a timer.
- Minute 1 to 2: Take a photo of your subject standing with hands just hanging. This is your “before”.
- Minute 3 to 4: Give the hands a “hold” job: a cup, a phone, a jacket. Take three photos.
- Minute 5 to 6: Try a “touch” job: fingertips on the collar, a hand lightly near the chin. Remind them: feather touch. Take three photos.
- Minute 7 to 8: Try a “rest” job: thumbs in pockets, hand on hip, hands on lap if sitting. Take three photos.
- Minute 9: Ask them to reach toward the camera and take one photo to see how big the hand looks. Then step back and zoom in and take another.
- Minute 10: Compare everything with your “before” photo. Which hands look most relaxed? Which job felt easiest for the person?
Most people are surprised how much better the “job” photos look. Keep your favourites as a mini pose library to use next time.
Frequently asked questions
What should people do with their hands in photos?
Give them a job: hold something, lightly touch something, or rest them somewhere. Hands with a task look natural; hands with nothing to do look stiff.
How do I make hands look smaller in photos?
Turn them so the camera sees the edge rather than the flat back or palm, keep them a little further from the lens than the face, and avoid wide-angle lenses up close.
Should hands be in pockets in photos?
Pockets are fine, but keep part of the hand visible. Thumbs in with fingers out, or fingers in with thumbs out, looks better than hands buried to the wrist.
How do I pose hands near the face?
Use fingertips or the side of the hand, touch very lightly, keep the hand to the side rather than in front of the face, and make sure it does not cover the mouth.
Why do hands look awkward in my photos?
Usually because they have nothing to do, are tense, or are facing the camera flat on. Shake them out, give them a job and turn them slightly.
Do I need to pose hands in candid photos?
No. In candid photos, you watch for the moment when hands are doing something interesting and take the picture then.
Wondering how to pose the rest of the body, not just the hands? The portrait posing guide covers stance, angles and expression.
Would you rather catch people naturally instead of posing them? Try the candid photography guide.