Old signs are some of the most rewarding subjects a photographer can find. Faded motel signs, hand-painted shop names, rusting gas station poles and ghostly lettering on brick walls carry the character of a place and the history of the people who made them. They do not move, they are often in public view and they turn up everywhere from city streets to empty highways.
This guide covers where to find good signs, how to frame them tightly or with context, the light and angles that suit them, the problems that come with photographing lettering and how to build a collection. Lit signs at night have their own challenges, which are covered in the guide to neon sign photography.
Why signs make good pictures
A sign is designed to be seen. It has bold shapes, strong colors and clear graphics, so it already has the visual punch that many subjects lack. On top of that, signs tell stories.
- They show place. A motel sign says highway. A painted sign on a brick wall says old town. The style of lettering hints at when and where it was made.
- They show time. Peeling paint, rust and missing letters show the years a sign has stood. A faded sign beside a newer one shows change.
- They carry design. Hand lettering, arrows, stars and swooping shapes reflect the craft and taste of the people who made them.
- They can be funny. Odd wording, a misspelling or a scene that contradicts the sign can make a picture that makes people smile.
Signs are also a gentle way into street and travel photography. They let you practice composition, light and framing without the pressure of photographing people.
Where to find interesting signs
Good signs are everywhere once you start looking, but some places have more than others.
- Old highways and back roads. Former main routes are full of motels, diners and gas stations whose signs date from busier times. A road trip on older roads can turn up dozens.
- Small town main streets. Look up above shop windows for painted names, old banks and theater signs.
- The sides of old brick buildings. Faded advertisements painted on walls, sometimes called ghost signs, survive for many years after the business has gone.
- Markets and older neighborhoods. Hand-painted signs, chalkboards and handmade notices are common where small businesses cluster.
- Industrial areas. Warehouses and factories have stenciled numbers, safety notices and big painted names.
- Your own neighborhood. Street signs, house numbers and shop windows are worth a walk with fresh eyes.
Abandoned businesses often have the most weathered signs. Photograph them from public land and do not enter fenced or posted property. The guide to urban exploration photography covers safety and permission.
Two ways to frame a sign
Most good sign pictures fall into one of two kinds: tight pictures that make the sign itself the subject, and wider pictures that show it in its setting.
Tight and straight
When the lettering or design is the point, fill the frame with the sign and shoot it square on.
- Stand directly in front. Center yourself on the sign so its edges stay parallel to the frame. Even a small angle makes rectangles look like wedges.
- Keep the camera level. If the sign is high, step back and use a longer lens rather than tilting the camera up, which makes the edges lean.
- Leave a small margin around the edges so nothing important is cut off. You can crop later.
- Look for details. A single letter, a rusty bolt or a chip of old paint can make a strong close-up.
This approach works well for collections, where many signs are shown the same way. The guide to symmetry covers the head-on approach in more detail.
Wide with context
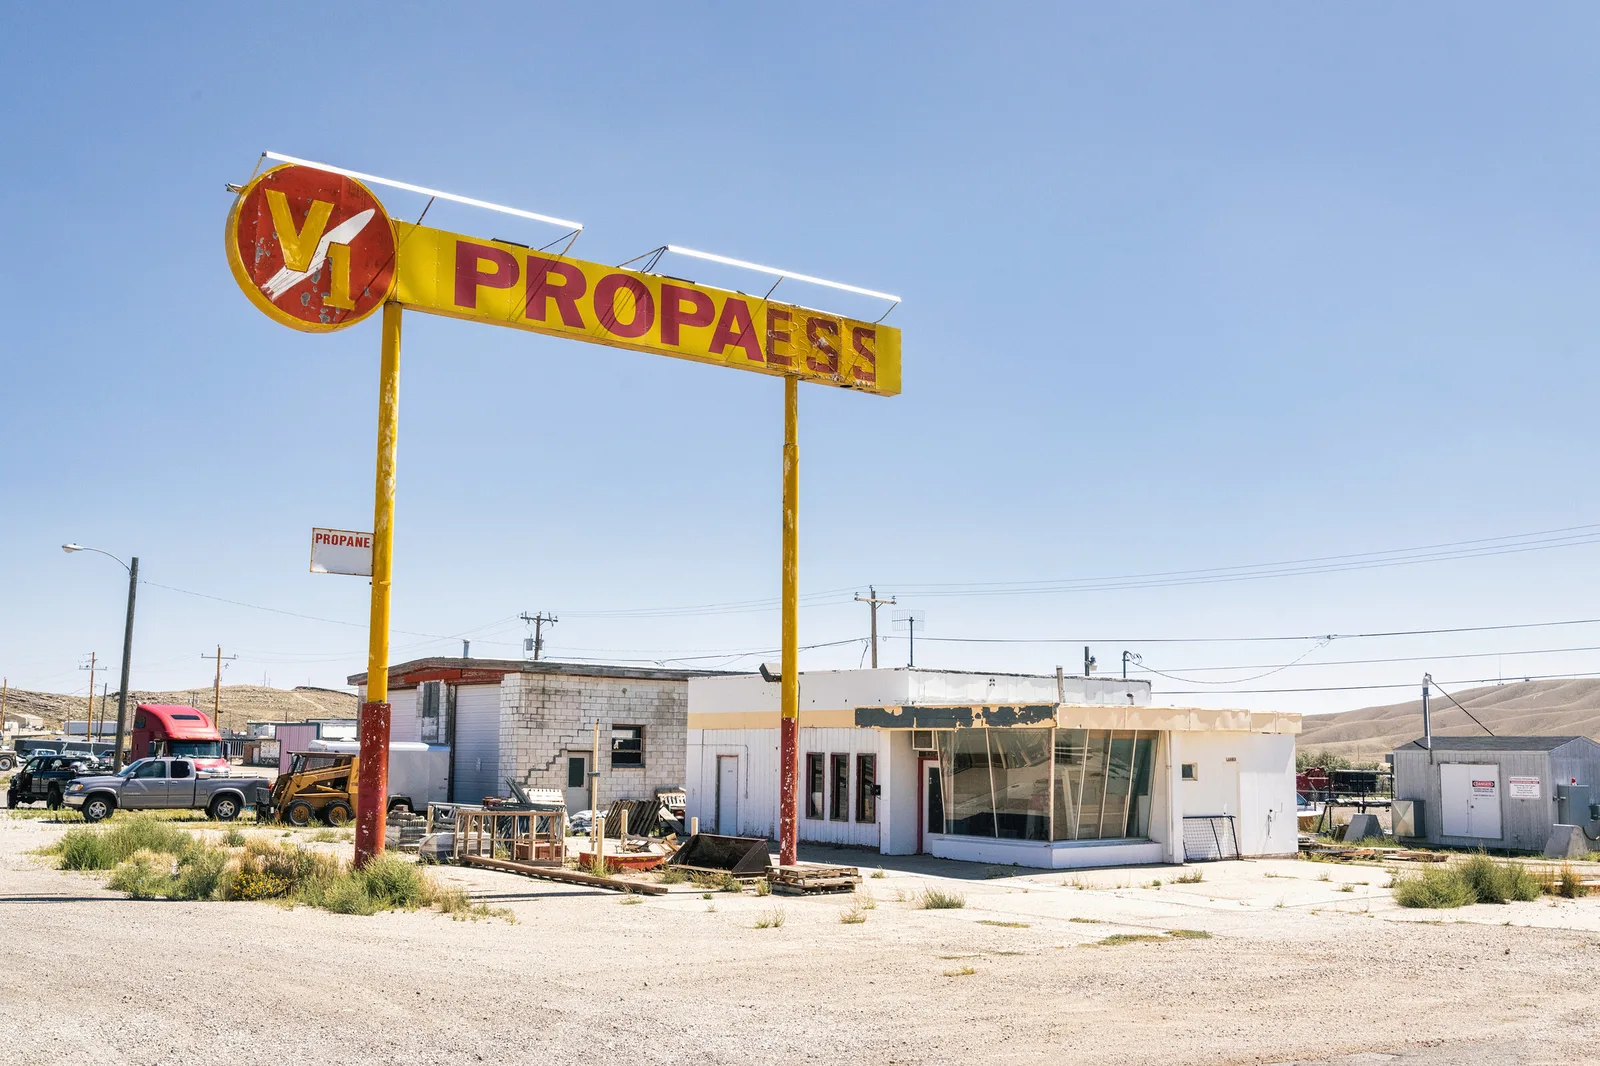
When you want to show where the sign is, step back and include its surroundings. The photo at the top of this page shows a tall sign above an empty roadside building, which says more about the place than the sign alone.
- Include the building or road the sign belongs to.
- Use the sky. A tall sign against a clean blue or dramatic sky stands out. Crouch low so the sign rises above the clutter.
- Add a person or car for scale and life, if one passes naturally.
- Watch the edges for distracting poles, wires and modern signs that fight for attention.
Want more ideas for showing what makes a place unique? The guide to sense of place in photography explains how details and context work together.
Reading the story in a sign
The best sign pictures are about more than lettering. They hint at a story: who built the business, how long it lasted and what the place was like when the sign was new. A little thought before you press the shutter helps you show that story.
- Look for signs of age. Rust streaks, sun-bleached colors, missing letters and bullet holes all tell the viewer how long the sign has been standing.
- Look for change. A painted name half covered by a newer sign, or an old sign above a modern shop, shows a place in transition. Frame both together.
- Look for absence. A sign advertising a motel, cafe or service that no longer exists is quietly moving. An empty pole where a sign once hung can say as much as the sign itself.
- Look for what the sign promises. Words such as “vacancy,” “open” or “welcome” take on new meaning in front of a closed or empty building.
- Look for the human touch. Hand-painted lettering with small wobbles, handwritten notices taped to doors and homemade signs show the people behind a place.
Pairing a sign with its setting often makes the story clearer. A tall roadside sign above a closed building, like the one at the top of this page, needs no caption to suggest what happened there.
Curious how simple details can add up to a narrative? The guide to visual storytelling explains how pictures suggest a story.
Light for signs
Signs are flat, so the light affects them differently from landscapes or faces.
- Overcast light shows color and lettering evenly, without harsh shadows or glare. It is ideal for tight pictures of painted signs.
- Low side light brings out texture: peeling paint, raised letters and rough brick. Early morning and late afternoon are good times for weathered signs. The guide to texture explains why.
- Bright sun from behind you makes colors rich and skies deep blue, which suits wide pictures of tall signs against the sky. A polarizing filter deepens the blue further.
- Dusk is the best time for lit signs, when there is still color in the sky to balance the glow.
Midday sun can be harsh, but signs are one of the few subjects that work then. Hard shadows of letters and frames can even become part of the design. The guide to shooting in harsh daylight has more ideas.
Dealing with glare, reflections and shadows
Glossy painted signs, metal and glass all reflect light, and reflections can hide lettering.
- Change your angle a little. Moving a step to one side often moves a reflection off the important part of a sign.
- Use a polarizing filter to cut glare on painted surfaces and glass. Turn it while watching the reflections fade.
- Wait for a cloud. A passing cloud softens light and removes hot spots.
- Watch for your own shadow when the sun is behind you and the sign is low. Step aside or shoot from a slight angle.
- Shop windows reflect the street. Cup your hand around the lens or press it close to the glass. The guide to photographing through glass covers this.
Keeping lines straight
Few things spoil a sign picture faster than lettering that leans or edges that slope. Straight lines matter even more here than in most subjects, because the eye expects lettering to be level.
- Turn on the grid in your camera or phone and line up the edges of the sign with it.
- Check the horizon in wide pictures. A tilted road or roofline makes the whole scene look off.
- Avoid tilting up. Pointing the camera upward makes tall signs and buildings lean back. Step back and use a longer focal length, or leave space at the bottom to crop later.
- Fix small errors in editing. Most editing apps can straighten and correct converging lines. See the guide to cropping for straightening.
Tall signs and buildings that lean back are covered in more depth in the guide to perspective distortion.
Settings for sharp signs
Signs do not move, so settings are simple.
- Aperture: f/5.6 to f/8 keeps a flat sign sharp from edge to edge. For a wide scene with a sign and its surroundings, f/8 to f/11 gives more depth.
- Shutter speed: fast enough to hold steady, such as 1/125 or quicker with a normal lens.
- ISO: as low as the light allows for clean color.
- Focus: on the lettering itself.
- Exposure: bright white signs can fool the meter into underexposing. Check the histogram and add a little exposure compensation if whites look gray.
Building a sign collection
Signs make an excellent long-term project, because each one adds to a growing set. A collection of a single kind, all framed the same way, can be more striking than any single picture.
- Pick a theme. Motel signs, hand-painted shop names, single letters, arrows, numbers, signs with stars.
- Shoot them consistently. Same angle, similar framing and similar light make a set look unified.
- Record where each sign is. Old signs disappear when businesses close or buildings change. A note of the place makes the collection a record.
- Return to the same signs over the years to show change.
- Look for numbers too. House numbers, route markers and painted prices on old storefronts make a lively collection on their own, and they are easy to find on any walk.
- Make an alphabet. Find each letter of the alphabet in a different sign. It is a fun challenge that trains your eye.
Looking for more long-term ideas like this? The list of photography project ideas has dozens of themes to follow over weeks or months.
Editing sign photos
- Straighten and correct perspective first, so lettering is level and edges are square.
- Crop to remove distracting edges, or to make a tight sign fill the frame.
- Keep color honest. Faded signs look best with their real, softened color. Too much saturation makes old paint look new and fake.
- Add a little texture or clarity to bring out peeling paint and rust, without overdoing it.
- Try black and white for strong graphic lettering and weathered surfaces.
Respect and safety
Photographing signs from public places is usually welcome. Some simple courtesy keeps it that way.
- Do not climb on property, fences or signs.
- Stay off busy roads and use safe places to stand.
- Ask shop owners if you want to photograph inside or set up a tripod in front of their door.
- If someone asks what you are doing, explain. Many owners are proud of their old signs and happy to share their history.
Common mistakes
- Leaning lettering. The camera was tilted or off center. Fix: stand square on, keep the camera level and use the grid.
- Glare hiding the words. Fix: move a step to the side or use a polarizing filter.
- Too much clutter. Wires, poles and modern signs compete with the old one. Fix: change position, crouch low against the sky or frame tighter.
- Overcooked color. Fix: keep saturation modest so faded paint still looks old.
- Only tight shots. The pictures show signs but not where they are. Fix: make one wide picture with context for every close-up.
- Grey whites. Fix: check the histogram and add exposure compensation for bright signs.
Try this: a 10-minute sign hunt
Take a short walk on any street with shops.
- Minutes 1 to 3: Find three different signs and photograph each one straight on, filling the frame.
- Minutes 4 to 6: Choose the best one and make a wide picture that includes the building or street.
- Minutes 7 to 8: Move in close and photograph a single letter or detail of that sign.
- Minutes 9 to 10: Find one sign with interesting texture, such as rust or peeling paint, and photograph it in side light if you can.
Compare the results. You will see how the same subject can be a design, a detail or a picture of a place.
Frequently asked questions
Is it legal to photograph signs?
In most places, photographing signs visible from public land is fine for personal use. Commercial use of logos and trademarks can be more complicated, so check local rules if you plan to sell the pictures.
What lens is best for sign photography?
A standard zoom covers most signs. A longer lens helps with tall signs, because you can step back and keep the camera level. A wide lens suits signs in their full setting.
How do I photograph a sign high above the street?
Step back across the street and zoom in, keeping the camera level so the sign does not lean. If you must tilt up, correct the perspective in editing.
What time of day is best for old signs?
Overcast light shows color evenly. Low morning or evening sun brings out texture, and dusk is best for lit signs.
What is a ghost sign?
A ghost sign is an old advertisement painted on a building wall, now faded but still visible. They are popular subjects for collections.
Can I photograph signs with a phone?
Yes. Phones are ideal for quick sign pictures on walks and trips. Turn on the grid to keep lettering level, tap the sign to set focus and exposure, and step back and zoom a little rather than tilting the phone up at tall signs.
How do I make a sign stand out from a busy street?
Change your position until the sign sits against a plain background, such as the sky or a blank wall. A longer lens lets you isolate it from clutter, and a wider aperture can soften the background behind a low sign.
Should I shoot signs in color or black and white?
Color usually suits signs, because color is part of their design and their age. Black and white works well for strong graphic lettering, weathered textures and painted wall signs whose colors have faded away.
For terms such as polarizing filter, histogram, exposure compensation and texture, see the photography glossary.