A solar eclipse is one of the most dramatic events you can witness and photograph. The moon passes directly between the Earth and the sun, gradually blocking sunlight until, during a total eclipse, day turns to twilight for a few breathtaking minutes. The corona blazes around the black disk of the moon, stars appear in the daytime sky, and the temperature drops. Photographing this event successfully requires specific gear, careful planning, and a deep respect for safety. This guide covers everything you need to capture stunning eclipse images, from partial phases through totality and back again.
Eclipse photography sits at the intersection of several disciplines: astrophotography, night photography, long exposure photography, and time-lapse photography. It demands precise technical settings that change rapidly during the event, and it rewards photographers who plan thoroughly and practice beforehand. Whether you are shooting with a professional DSLR and a 600mm telephoto or capturing the experience on a smartphone, this guide will help you get the best possible results.
What Makes Eclipse Photography Unique
During a total solar eclipse, you go from photographing one of the brightest objects in the sky (the uneclipsed sun) to one of the dimmest (the solar corona), with everything in between happening over one to three hours. No other photography subject demands this range of exposure adjustments within a single session.
The partial phases require a solar filter that blocks 99.999% of sunlight. Remove it too early and you risk permanent damage to your camera sensor and your eyes. Remove it too late and you miss the diamond ring effect and the corona. Totality itself lasts only a few minutes at most, and during that brief window you need to capture multiple phenomena at vastly different exposure settings. There is no time to experiment. You need to know your settings in advance and execute them efficiently.
Eclipse photography also has an emotional component that surprises first-timers. When totality arrives, the instinct to stare at the sky with your own eyes is overwhelming. Many experienced eclipse photographers recommend automating as much of the capture process as possible so you can actually experience the event, not just photograph it.
Safety First: Protecting Your Eyes and Your Camera
Never look at the sun without proper solar protection. Never point your camera at the sun without a solar filter attached to the front of the lens. These two rules override everything else in this guide. Violating either one can cause permanent, irreversible damage.
Eye Safety
Looking at the sun, even briefly, can cause solar retinopathy, a condition where the intense light burns the retina. This damage can be permanent. Regular sunglasses are nowhere near dark enough. You need certified solar viewing glasses (ISO 12312-2 standard) or a handheld solar viewer. Inspect your solar glasses before each use. If the filter material is scratched, punctured, or peeling away from the frame, discard them immediately.
The only time it is safe to look at the sun without solar protection is during the brief period of totality, when the moon completely covers the sun’s disk. The moment any sliver of the sun reappears, you must put your solar glasses back on immediately. If you are photographing an annular eclipse or a partial eclipse, there is no safe moment to view without protection because the sun is never fully covered.
Camera Sensor Safety
Your camera sensor faces the same risk as your eyes, amplified by the lens focusing sunlight into a concentrated point. An unfiltered telephoto lens pointed at the sun acts like a magnifying glass, concentrating enough heat to melt the shutter curtain, damage the sensor, or burn internal baffling. Mirrorless cameras are especially vulnerable because the sensor is exposed to light continuously during live view and electronic viewfinder use.
Always attach a proper solar filter to the front of your lens during all partial phases. Solar filters for cameras are typically made of optical-density (ND) 5.0 solar film or solar filter glass, which transmits only 1/100,000th of the sun’s light. Do not substitute neutral density filters, even very strong ones like ND 3.0 or ND 4.0. They do not block enough infrared and ultraviolet radiation. Do not stack multiple ND filters as a substitute. Only purpose-built solar filters are safe for pointing your lens at the sun.
Remove the solar filter only during totality (when the sun’s disk is 100% covered by the moon). Replace it the instant totality ends and the first bead of sunlight reappears. Practice removing and replacing the filter quickly before eclipse day so you can do it without fumbling.
Viewfinder Safety
If you are using an optical viewfinder (DSLR), never look through it while the camera is pointed at the sun without a solar filter on the lens. The viewfinder concentrates sunlight just like looking through a telescope without a filter. Use live view instead, or ensure your solar filter is securely attached before looking through the viewfinder. Electronic viewfinders (mirrorless cameras) display a digital image and do not focus sunlight into your eye, but the sensor is still being exposed, so the solar filter is still mandatory during partial phases.
Essential Gear for Eclipse Photography
Solar Filter
This is the single most important piece of gear. A solar filter attaches to the front of your lens and reduces the sun’s brightness to a safe, photographable level. Two main types are available:
- Solar film filters: Sheets of Baader AstroSolar film or similar material mounted in a cell that fits over the front of your lens. Lightweight, inexpensive, and produce excellent results. Make sure the cell fits snugly so wind cannot blow it off.
- Glass solar filters: Precision optical glass with a solar coating. More durable and slightly sharper, but significantly more expensive.
Whichever type you choose, make sure it fits your lens diameter securely. Some photographers use tape or a lanyard as a safety measure to prevent the filter from falling off during the event.
Telephoto Lens
The sun and moon each occupy about 0.5 degrees of the sky. On a full-frame sensor:
- 200mm: The sun fills about 1.8mm of the sensor. Small but workable with cropping.
- 400mm: About 3.6mm. A good minimum for detailed eclipse shots.
- 600mm: About 5.4mm. Excellent detail of the corona and prominences.
- 800mm+: Fills a significant portion of the frame. Outstanding detail but harder to track.
On a crop-sensor camera, multiply these sizes by your crop factor (typically 1.5x or 1.6x), making crop sensors advantageous for eclipse photography. For a deeper understanding of how focal length affects your images, see our focal length guide.
Sturdy Tripod
A solid tripod is essential. You will be shooting over two to three hours, adjusting the camera’s aim as the sun moves across the sky. Any vibration is magnified by a telephoto lens. A ball head or geared head works well. A fluid video head is even better for the smooth repositioning you will need throughout the eclipse.
Remote Shutter Release or Intervalometer
Pressing the shutter button directly causes vibration that ruins sharpness at long focal lengths. Use a wired or wireless remote shutter release. Even better, use an intervalometer that can fire the shutter automatically at set intervals. This is essential for time-lapse sequences and invaluable during totality when you want to automate exposure bracketing so you can experience the event with your own eyes.
Additional Useful Gear
- Spare batteries and memory cards: A multi-hour shoot drains batteries and fills cards fast. Bring at least two spares of each.
- Lens hood: Remove it when using a solar filter (it can interfere with the filter cell). Replace it during totality to reduce flare.
- Second camera: If possible, set up a second camera on a wide-angle lens to capture the landscape and sky during totality. Trying to switch lenses during a two-minute window is a recipe for disaster.
- Headlamp with red light: Useful if the dramatic darkening during totality makes it hard to see your camera controls.
Camera Settings for Each Eclipse Phase
An eclipse moves through distinct phases, each requiring different settings. The key is preparation: know what settings you will use for each phase and practice switching between them before eclipse day. Shoot in RAW format throughout the entire event for maximum flexibility in post-processing.
Partial Eclipse (Solar Filter On)
During the partial phases, the moon gradually covers and then uncovers the sun’s disk. Your solar filter must be on your lens for the entire duration of the partial phases. With the filter attached, the sun appears as a bright orange or white disk against a dark background.
Use manual mode. Set your aperture between f/8 and f/11 for maximum lens sharpness. Start with ISO 100 or 200. Adjust your shutter speed until the sun’s disk is well exposed (bright but not clipped), typically between 1/250s and 1/1000s depending on your filter’s density. Check your histogram to confirm. The sun’s disk should be bright with the histogram peak sitting in the right third without touching the right edge.
Focus manually using live view at maximum magnification. The edge of the sun’s disk provides a sharp contrast boundary for precise focusing. Once focused, consider taping the focus ring in place with gaffer tape. For tips on nailing critical focus, see our guide on how to take sharp photos.
| Setting | Partial Phase Value | Why |
|---|---|---|
| Mode | Manual (M) | Auto modes are fooled by the dark frame surrounding the bright sun |
| Solar Filter | ON (mandatory) | Protects sensor and enables proper exposure of the sun’s surface |
| Aperture | f/8 to f/11 | Lens sharpness sweet spot |
| ISO | 100 to 200 | Sun is extremely bright even through the filter |
| Shutter Speed | 1/250s to 1/1000s | Adjust until the sun’s disk is properly exposed on histogram |
| Focus | Manual, via live view magnification | Lock focus on the sun’s edge and tape the ring |
| White Balance | Daylight | Consistent color; adjustable in RAW post-processing |
| File Format | RAW | Maximum latitude for exposure and color correction |
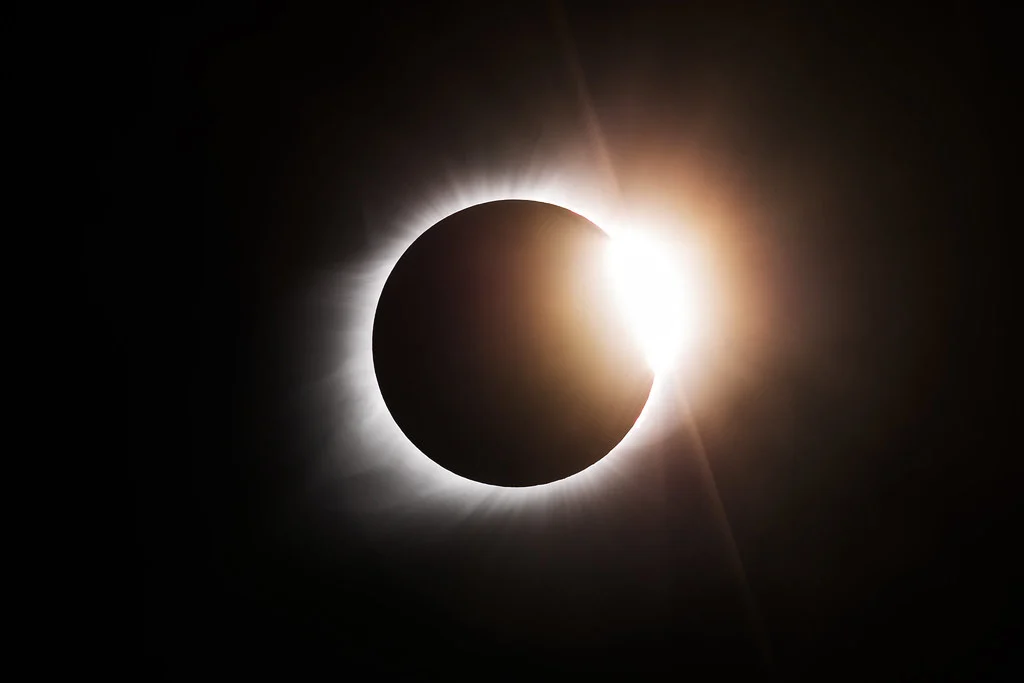
The Diamond Ring Effect
In the seconds just before and just after totality, a single bright point of sunlight streams through a valley on the moon’s limb while the rest of the sun is blocked. This creates a brilliant “diamond” on a ring of faint corona light. It is one of the most spectacular moments of the eclipse.
Remove your solar filter just before the diamond ring appears at the start of totality. The filter is too dark to capture this phenomenon. Watch through the camera’s live view as the last thin crescent of sun shrinks. When only a tiny sliver remains, remove the filter. The diamond ring appears within seconds.
Settings for the diamond ring: ISO 100 to 400, aperture f/8 to f/11, shutter speed 1/500s to 1/2000s. The diamond is very bright, so faster shutter speeds prevent it from overwhelming the fainter corona ring. Bracket your exposures if your camera supports auto-bracketing.
Baily’s Beads
Baily’s beads appear in the seconds surrounding the diamond ring effect. Multiple beads of sunlight shine through valleys and craters along the moon’s uneven edge, appearing as a string of brilliant dots along the moon’s limb for just a few seconds.
Settings are similar to the diamond ring: ISO 100 to 400, f/8 to f/11, shutter speed 1/1000s to 1/4000s. Shoot in continuous burst mode to capture as many frames as possible. Each frame will be slightly different as the beads shift and vanish.
Totality: The Corona
Totality is the main event. The moon completely covers the sun’s photosphere, revealing the corona: the sun’s outer atmosphere, a pearly white halo of plasma streamers extending outward in all directions. The corona has an enormous brightness range, from the bright inner corona near the sun’s edge to the faint outer corona that can extend several solar diameters outward.
Your solar filter must be off during totality. It blocks too much light to photograph the corona. This is the one and only time during the eclipse when shooting without the filter is appropriate.
No single exposure can capture the full dynamic range of the corona. The inner corona may be 1,000 times brighter than the outer corona. The solution is exposure bracketing: shooting a range of exposures from fast (bright inner corona) to slow (faint outer streamers).
A recommended bracketing sequence at f/8, ISO 200:
| Shutter Speed | What It Captures |
|---|---|
| 1/2000s | Prominences (bright pink loops of plasma at the sun’s edge) |
| 1/1000s | Chromosphere (thin red layer just above the sun’s surface) |
| 1/500s | Bright inner corona |
| 1/250s | Inner corona detail |
| 1/125s | Middle corona |
| 1/60s | Middle corona detail and structure |
| 1/30s | Outer corona becoming visible |
| 1/15s | Outer corona streamers |
| 1/8s | Extended outer corona |
| 1/4s | Faint outer corona at maximum extent |
| 1/2s | Very faint outer corona (may show earthshine on the moon) |
| 1s | Maximum corona extent (risk of trailing at longer focal lengths) |
If your camera has auto-exposure bracketing (AEB), set it to capture as wide a range as possible and fire multiple bracketed bursts. Alternatively, shoot in aperture priority mode during totality and dial the exposure compensation from -3 to +3 in rapid succession.
Use your metering modes knowledge here: spot metering on the inner corona gives you a sense of the exposure range. But during totality, time is too precious for careful metering. Pre-plan your bracket sequence and execute it mechanically.
Prominences
Solar prominences are loops and arcs of plasma that extend from the sun’s surface, appearing as bright red or pink features along the moon’s edge during totality. They require shorter exposures than the corona: 1/1000s to 1/2000s at f/8, ISO 200. If you are bracketing through the full range, your fastest exposures will capture them. Prominences add dramatic color to eclipse images and are visible even with moderate focal lengths (300mm and above).
After Totality: Filter Back On
The instant totality ends and the first bead of sunlight appears, replace your solar filter immediately. Do not wait. Do not try to capture “just one more shot” without the filter. The reappearing sun is just as dangerous to your sensor and eyes as it was during the initial partial phase. This is the moment where many photographers damage their equipment because they are caught up in the excitement. After replacing the filter, resume your partial-phase settings and document the moon’s retreat across the sun’s disk.
Planning and Location Scouting
Eclipse photography rewards planning more than almost any other genre. The event happens once, at a specific time, along a specific path, and lasts only minutes. There are no second chances.
Choosing Your Location
For a total solar eclipse, you must be within the path of totality to see and photograph the corona, diamond ring, and Baily’s beads. Even a position just outside the path means you only see a partial eclipse with no corona. The path of totality is typically about 100 to 160 kilometers wide. The closer you are to the center line, the longer totality lasts.
- Weather prospects: Cloud cover is the eclipse photographer’s worst enemy. Research historical weather data for potential locations. A clear site 300 kilometers away is better than a closer location with a 60% chance of clouds.
- Foreground interest: If you plan wide-angle shots, choose a location with interesting foreground elements that will add context to the darkened sky.
- Accessibility and crowds: Popular viewing locations fill up with thousands of people. Arrive very early. Traffic congestion after the eclipse can add hours to your departure.
- Backup locations: Have at least one alternate site you can reach if weather deteriorates. Plan the drive the day before so you know the route.
Planning Apps and Practice
Smartphone apps like PhotoPills and The Photographer’s Ephemeris show the exact position of the sun at any time and location. Use them to determine the sun’s altitude during totality, plan compositions that include foreground elements, and calculate when each phase begins at your location.
In the days before the eclipse, practice with your complete setup. Photograph the sun with the solar filter attached. Practice finding the sun in your viewfinder (harder than you think because the filter darkens everything except the sun’s disk). Practice removing and replacing the filter quickly. Practice switching between your partial-phase settings and your totality bracket sequence. Time yourself. During totality, every second matters.
Wide-Angle vs. Telephoto Approaches
There are two fundamentally different ways to photograph an eclipse. The best strategy is to do both simultaneously with two cameras.
The Telephoto Approach
A telephoto lens (300mm to 800mm) fills the frame with the eclipse itself, capturing the corona’s delicate streamers, prominences, Baily’s beads, and the diamond ring in dramatic detail. The trade-off is a very narrow field of view. You see the eclipse but not the context: the darkened landscape, the horizon glow, the stars that appear during totality. Keeping the sun centered requires frequent tripod adjustments throughout the event.
The Wide-Angle Approach
A wide-angle lens (14mm to 35mm) captures the entire scene: the eclipsed sun, the darkened landscape, the 360-degree sunset glow along the horizon, and any visible planets or stars. This approach conveys the feeling of being there in a way that a tight telephoto shot cannot.
During totality, set the wide-angle camera on a tripod with a moderate aperture (f/4 to f/5.6), ISO 400 to 1600, and a shutter speed of 1 to 4 seconds. Bracket your exposures since the brightness difference between the corona and the landscape is substantial. If you only have one camera and must choose, the telephoto shots will be more technically impressive while the wide-angle shots will be more emotionally evocative.
Capturing the Environment During Totality
The eclipse is not just about the sun and moon. During totality, the world around you transforms in remarkable ways.
As totality approaches, the light takes on an eerie, flat quality unlike anything in normal experience. Shadows sharpen as the sun becomes a thin crescent, and shadow bands (rippling waves of light and dark) sometimes appear on flat surfaces in the final minute before totality. During totality, the sky around the horizon glows with sunset-like colors in every direction because beyond the moon’s shadow the sun is still shining. The result is a 360-degree twilight glow that is worth photographing with a wide-angle lens (ISO 800, f/4, 1 to 2 seconds).
If you are in a public viewing area, the crowd’s reaction is one of the most powerful parts of the experience. People gasp, cheer, cry, and embrace. Capturing these reactions adds a deeply human dimension to your documentation. Be mindful of photography ethics when photographing people in emotional moments. Animals also react to totality: birds return to roost, crickets start chirping, and livestock may head toward barns.
Creating a Time-Lapse of the Entire Eclipse
A time-lapse that compresses the full eclipse into 30 to 60 seconds is one of the most compelling ways to present the event. It shows the moon’s progress across the sun’s disk, the dramatic darkening during totality, and the return to normal light.
Use an intervalometer to fire the shutter every 15 to 30 seconds throughout the eclipse. The biggest challenge is the exposure range: partial phases with a solar filter require one set of settings, totality without the filter requires completely different settings. The best approach is a dedicated camera for the time-lapse, separate from your detail camera. Use a wide-angle lens on a tripod, framing the sun’s path and the landscape below.
For the solar filter transition, some photographers use a handheld solar filter positioned in front of the lens rather than attached to it, allowing quick removal and replacement. Others accept the brightness discontinuity and smooth it in post-processing. For a thorough walkthrough of time-lapse technique, see our time-lapse photography guide.
Composites: Combining Multiple Phases
One of the most iconic eclipse images is the composite showing the sun at multiple stages, arranged in a sequence across the sky. These combine telephoto shots of the partial phases (taken at regular intervals through the solar filter) with a totality shot at the center, all composited onto a wide-angle background of the landscape. To create this, you need frames from both cameras and careful planning so the sun’s positions correspond correctly between the telephoto and wide-angle frames.
Editing Eclipse Photos
Eclipse images benefit enormously from careful post-processing. The corona’s dynamic range far exceeds what a single exposure can capture, making HDR techniques essential.
Processing the Corona
The bracketed exposures you captured during totality can be combined using HDR software to reveal detail across the corona’s full range. Import the frames into Photoshop, Photomatix, or a dedicated HDR program. Align the layers (the sun may have shifted between frames), then blend to reveal both the bright inner corona and the faint outer streamers.
In Lightroom, merge bracketed exposures using Photo Merge > HDR, then fine-tune with the tone curve and local adjustments. A specialized technique involves radial gradient filters applied from the center outward, gradually increasing exposure and clarity to reveal structural detail in the corona streamers.
Processing Partial Phase and Transitional Shots
Partial phase images taken through a solar filter are straightforward to process. Adjust white balance to render the sun as a natural warm orange or white depending on your filter type. Increase contrast slightly to define the moon’s silhouette against the sun’s disk. See our photo editing guide for foundational techniques.
Diamond ring and Baily’s beads images often produce the most dramatic single frames. Reduce highlights to bring back detail in the bright points while lifting shadows to reveal the faint corona ring. Be careful not to over-process: the beauty of these moments is in the contrast between the blinding bright point and the delicate corona.
Common Mistakes and How to Avoid Them
- Forgetting to remove the solar filter during totality: With the filter on, totality frames will be completely black. Practice the removal motion. Set an alarm for the predicted start of totality.
- Forgetting to replace the solar filter after totality: Even more dangerous. The instant the first bead of sunlight appears, the filter must go back on. Damage to your sensor can happen in seconds.
- Spending all of totality looking at the LCD: Pre-plan your settings, automate your bracketing, and look up. Trust your preparation.
- Not practicing beforehand: Eclipse day is not the time to learn your bracketing system or test whether the solar filter fits. Practice at least twice.
- Using insufficient solar filtration: ND filters, welding glass below shade 14, and stacked polarizers are not safe substitutes. Only use filters designed for solar observation.
- Overpacking focal length: At 800mm on full frame, the corona may extend beyond the frame. Consider 400mm to 600mm for a better balance of detail and context.
- Ignoring image stabilization: Turn it off when using a tripod. IS/VR systems can introduce vibration on a stable platform.
- Autofocus hunting: Switch to manual focus before totality and leave it there. Consider back-button focus so the shutter button never triggers autofocus.
- Running out of battery or storage: Bracketed exposures generate thousands of frames. Bring spare batteries and cards. Swap during partial phases, not during totality.
- No backup plan for clouds: Have a secondary site 30 to 60 minutes away. Check weather forecasts obsessively in the days before the eclipse.
Smartphone Eclipse Photography
Modern smartphones can capture compelling eclipse images, especially wide-angle totality shots. Never point your smartphone at the sun without a solar filter over the camera lens. A piece of solar filter film held securely over the phone’s lens works during partial phases. Remove it during totality only.
- Lock focus and exposure: Tap and hold on the sun (through the filter) to prevent the camera from constantly readjusting.
- Use pro/manual mode: Control ISO and shutter speed during totality for better results.
- Capture video during totality: A video including audio of the crowd’s reaction can be more powerful than still images from a phone.
- Use a phone tripod mount: Even a small mount improves sharpness dramatically during totality’s longer exposures.
- Skip the digital zoom: It just crops and reduces quality. Shoot at the default focal length and crop later.
Photographing Annular and Partial Eclipses
Not every solar eclipse is total. Annular eclipses leave a bright ring of sunlight visible around the moon. Partial eclipses cover only part of the sun’s disk. For both types, your solar filter must remain on your lens for the entire event. There is no totality and therefore no safe moment to remove the filter. The “ring of fire” during an annular eclipse is still direct sunlight and will damage your sensor and eyes without proper filtration. Use the same partial-phase settings described above throughout.
Try This: Eclipse Photography Exercises
You do not need to wait for an eclipse to practice the skills involved.
- Solar photography practice: Attach your solar filter and photograph the sun. Practice finding it in your viewfinder, locking focus, and nailing exposure. Look for sunspots. If you can photograph them clearly, your technique is sharp enough for an eclipse.
- Speed drill: With the camera on a tripod aimed at a safe target, practice removing and replacing your solar filter 10 times. You should be able to do it in under 3 seconds.
- Bracket sequence rehearsal: Program your totality bracket sequence and run through it. Can you complete 12 exposures in under 30 seconds? If totality lasts two minutes, that gives you time for multiple passes.
- Photograph the moon at night: The moon is the same apparent size as the sun and presents many of the same challenges. Practicing moon photography builds directly applicable skills.
- Simulate the time-lapse workflow: Shoot a time-lapse of the sun moving across the sky (with a solar filter). This reveals issues with interval timing, framing, or stability before eclipse day.
- Practice star photography: During totality, bright stars and planets become visible. Night photography experience helps you recognize the exposure settings that reveal them.
- HDR processing practice: Take a bracketed series of any high-contrast scene and practice merging the exposures. The workflow is similar to corona processing.
Frequently Asked Questions
Can I photograph an eclipse with a kit lens?
Yes, but an 18-55mm lens will show the sun as a very small disk. You will not capture corona detail at this focal length. However, a kit lens is excellent for wide-angle totality shots that capture the eclipsed sun in the context of the landscape and darkened sky.
Do I need a tracking mount?
No. The sun moves slowly enough that manual repositioning every few minutes keeps it centered, even at 600mm. During totality, the sun’s movement is negligible. Tracking mounts are more useful for deep-sky astrophotography where exposures last minutes or hours.
What ISO should I use during totality?
ISO 200 to 400 at f/8 is a good baseline. Higher ISOs (800 to 1600) reveal the faintest outer corona but increase noise. Lower ISOs (100) work for the bright inner corona and prominences. Your bracket sequence should cover the full range.
Can I use a teleconverter?
Yes. A 1.4x teleconverter turns a 400mm lens into 560mm, and a 2x turns it into 800mm. The trade-offs are light loss (one or two stops) and some sharpness reduction. For eclipse photography, the light loss is manageable. Test the combination before eclipse day to confirm acceptable sharpness.
Should I photograph or just watch?
Many veteran photographers recommend that first-time eclipse viewers put the camera down during totality and simply experience it. A good compromise: automate your totality captures with pre-programmed bracket sequences so the camera shoots itself while you watch. If this is your first total eclipse, prioritize the experience. You will never get back the feeling of your first totality.
What if it is cloudy?
Thin clouds can add atmosphere to eclipse photos. Thick clouds block the view entirely. If your location is socked in, drive toward clearer skies if time permits. Even under clouds, totality brings dramatic darkening, and wide-angle environmental shots can still be powerful.
Can I damage my camera by pointing it at the eclipse?
Yes. An unfiltered telephoto lens concentrates enough energy to melt shutter curtains, burn sensor pixels, and damage lens coatings. Always use a proper solar filter during partial phases. The only safe time to shoot without the filter is during the brief minutes of totality when the sun’s photosphere is completely blocked.
How do I create a sequence composite?
Shoot the partial phases at regular intervals (every 5 to 10 minutes) through your solar filter with a telephoto lens. Capture the corona during totality. Photograph the wide-angle landscape during totality. In post-processing, layer the telephoto sun images across the wide-angle background, spacing them along the sun’s actual path. Apps like PhotoPills help pre-visualize this alignment.
Final Thoughts
Eclipse photography combines the technical precision of astrophotography with the time pressure of event photography. The window for the most dramatic shots is measured in seconds, not minutes. Success depends almost entirely on preparation: knowing your gear, practicing your workflow, planning your settings for each phase, and scouting your location in advance.
But do not let the technical demands overshadow the experience itself. A total solar eclipse is one of nature’s most awe-inspiring spectacles. Prepare thoroughly, automate what you can, and when totality arrives, look up.
Safety reminder: Never look at the sun without certified solar viewing glasses. Never point a camera at the sun without a proper solar filter on the lens. The only exception is the brief period of totality during a total eclipse, when the sun’s disk is 100% covered by the moon. When in doubt, keep your filter on and your solar glasses on. No photograph is worth risking your vision or your equipment.