Window light is the most accessible portrait lighting in photography. Every home, office, and studio has at least one window, and the light that pours through it is naturally soft, directional, and flattering for human faces. Centuries of painters relied on window light to illuminate their subjects, and the quality they prized is the same quality photographers seek today: a gentle gradation from highlight to shadow that reveals form, texture, and emotion. You do not need special equipment to start. A camera, a subject, and a window are enough. This guide teaches you how to read window light, position your subject for different moods, modify the light with simple tools, dial in your camera settings, and avoid the most common mistakes beginners make when shooting indoors.
Why Window Light Is the Best Starting Point for Portrait Photography
Professional portrait photographers often cite window light as their first teacher. Before learning flash, before investing in studio equipment, nearly every working portrait photographer spent time studying what a single window could do.
Window light is predictable. Unlike outdoor light, which shifts with cloud cover and your position relative to the sun, a window provides a consistent direction and quality of light you can observe, study, and repeat. You can return to the same window at the same time tomorrow and get nearly identical results. This consistency makes it far easier to learn cause and effect.
Window light is also inherently flattering. A window acts as a large, soft light source relative to a human face. The physics of light quality dictate that larger light sources produce softer shadows, and most windows are large enough to wrap light gently around facial features. This softness is forgiving of skin imperfections and creates the dimensional, sculpted look that portrait clients love.
It is free and requires zero setup. No light stands to position, no power cables, no sync issues. You can focus entirely on your subject’s expression, pose, and the relationship between light and shadow. This simplicity lets beginners build a strong foundation in portrait lighting patterns before adding the complexity of artificial light.
Finally, the skills transfer directly to studio work. A window is functionally identical to a large softbox or scrim placed to the side of your subject. Once you understand how to shape and position a subject relative to a window, you will find studio lighting intuitive rather than intimidating.
Understanding Window Light Quality
Not all window light is created equal. The quality of light coming through a window depends on several factors, and understanding each one gives you creative control over your portraits.
Direction of Light
The direction of natural light entering a window depends on the sun’s position. When the sun is on the same side of the building, direct sunlight streams through, creating hard beams with strong shadows. When the sun is on the opposite side or hidden by clouds, the window receives indirect sky light, which is far softer. Direct sunlight through a window is not necessarily bad, but it requires different handling than diffused indirect light.
Softness and the Size of the Window
The apparent size of your light source relative to your subject is the primary factor determining how soft or hard the shadows will be. A floor-to-ceiling picture window three feet from a face creates extremely soft, wrapping light. A small bathroom window ten feet away produces harder, more defined shadows. This is the same principle behind choosing modifiers in a studio lighting setup: the larger and closer the source, the softer the light.
If you only have a small window, you can still achieve soft light by moving your subject as close to it as possible. Conversely, if you want more dramatic, contrasty light from a large window, simply move your subject further away. Distance is your primary control when you cannot change the window itself.
Time of Day
The quality of window light changes throughout the day as the sun moves. Early morning and late afternoon light tends to be warmer and more directional, especially through east- or west-facing windows. The warm tones are naturally flattering for skin, producing portraits with a mood similar to golden hour photography outdoors.
Midday light is brighter, cooler, and more neutral. A north-facing window at midday provides steady, even illumination excellent for headshots and commercial work. On an overcast day, midday window light from any direction becomes beautifully soft and consistent.
Light Falloff
Window light obeys the inverse square law. When your subject is two feet from the window, the light on the near cheek may be two or three stops brighter than on the far cheek. This rapid falloff creates dramatic, moody portraits. At eight feet, the difference might be less than one stop, resulting in flatter illumination. Understanding this falloff lets you control the mood simply by adjusting your subject’s distance from the window.
Window Orientation and Its Effect on Your Portraits
The compass direction your window faces has a significant impact on the type of light you receive and when you receive it. Knowing this helps you plan your shoots and choose the best window in your space.
North-facing windows (in the Northern Hemisphere) never receive direct sunlight. They provide consistent, soft, cool, indirect light throughout the entire day. This is the most prized window orientation for portrait and still life photographers because the light quality remains stable for hours, giving you ample time to work without chasing changing conditions. Many professional studios are designed around large north-facing windows for exactly this reason.
South-facing windows receive the most direct sunlight throughout the day. In winter, the low sun sends warm beams deep into the room. In summer, the sun is higher and direct light may only reach the area immediately inside the window. South-facing windows are excellent for dramatic portraits with direct sun, and they provide strong indirect light when diffused with curtains.
East-facing windows receive direct morning sunlight. The light arrives warm and at a low angle, gradually climbing and brightening through the morning before transitioning to indirect light by afternoon. East-facing windows are ideal for early morning portrait sessions when you want that warm, gentle quality.
West-facing windows are the opposite: indirect light in the morning and direct warm sunlight in the afternoon and evening. West-facing windows can produce gorgeous late-afternoon portraits with rich golden tones, though the direct sun can be intense and may require diffusion.
If you are setting up a home studio or choosing a room for indoor portraits, a north-facing window (or an east-facing window for morning sessions) will give you the most consistently flattering light with the least effort.
Subject Positioning for Window Light Portraits
Where you place your subject relative to the window is the most important creative decision you will make. Small changes in position produce dramatically different lighting patterns on the face. Here are the core positions every portrait photographer should master.
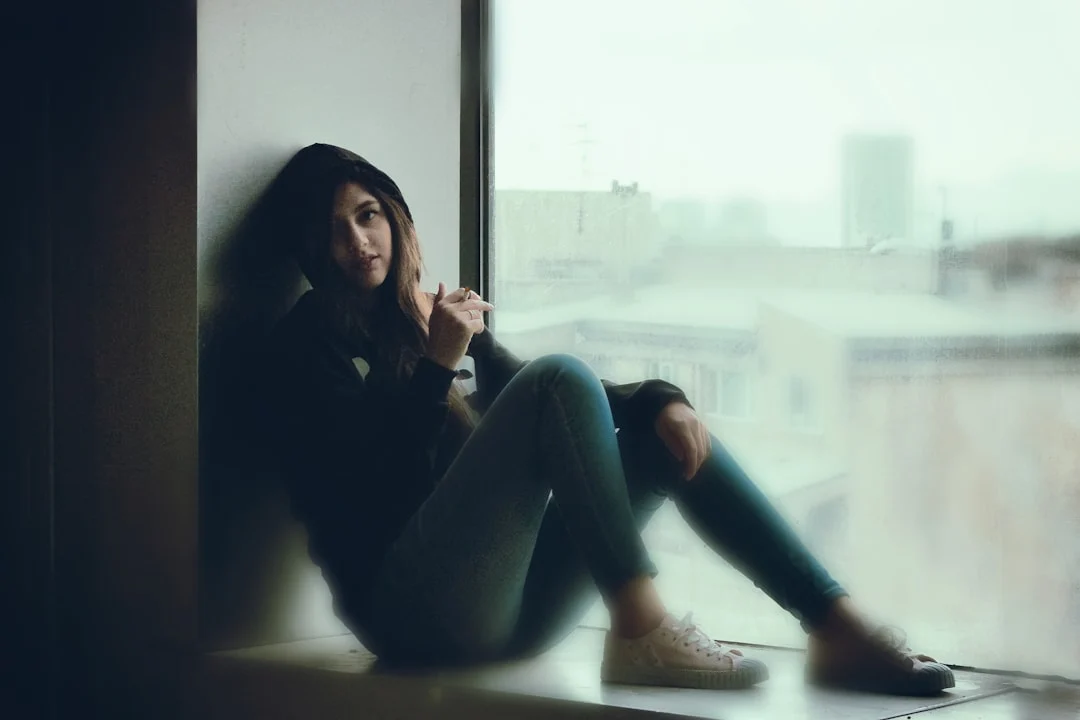
45-Degree Angle (The Classic Position)
Position your subject roughly 45 degrees from the window with their face angled slightly toward the light. This creates the most universally flattering portrait lighting pattern. The near side is fully illuminated, the far side receives gentle shadow that adds depth, and the nose casts a small, natural shadow. Sometimes called “loop lighting,” it works for nearly every face shape and is the safest starting point when you are unsure what will work best.
Side Light (90-Degree Angle)
Place your subject facing the camera with the window to their left or right, so light hits at a 90-degree angle. This creates split lighting, where half the face is illuminated and the other half falls into shadow. Split lighting is dramatic and moody, emphasizing texture and facial structure. It works beautifully for artistic portraits and character studies. Without a reflector, the shadow side may go completely dark, which can be a powerful creative choice.
Rembrandt Lighting
Named after the Dutch painter who used window light in his portraits, Rembrandt lighting is achieved by positioning your subject at roughly 45 degrees from the window and having them turn their face slightly away from the light. The defining characteristic is a small triangle of light on the shadowed cheek, formed where the nose shadow and cheek shadow meet. This triangle should be no larger than the eye and no longer than the nose. Rembrandt lighting is one of the most admired lighting patterns in portraiture, adding depth, drama, and a painterly quality.
Backlighting
Place your subject between the camera and the window, so the light comes from behind them. This creates a glowing rim of light around the hair and shoulders while the face falls into shadow. To prevent the face from going completely dark, use a reflector in front of the subject to bounce light back, or expose for the face and let the window blow out to white. Backlit window portraits have a luminous, airy quality that is popular in lifestyle, maternity, and fine art portraiture.
Facing the Window Directly
When your subject faces the window straight on, both sides receive equal illumination. This produces even lighting with minimal shadows, similar to butterfly lighting in a studio. It is excellent for beauty shots and any situation where you want clean skin tones without shadows. Less dramatic than angled positions, but the most forgiving for skin imperfections.
Using Curtains and Diffusion to Control Window Light
When direct sunlight pours through a window, it creates hard, bright, contrasty light that can produce harsh shadows on faces and blown highlights on skin. Diffusion solves this problem by spreading the light over a larger area, effectively making the light source bigger and softer.
Sheer white curtains are the simplest and most effective diffuser. When you draw a white sheer across a sun-filled window, the entire curtain becomes the light source. The light softens dramatically, harsh shadows melt into smooth gradients, and brightness decreases by roughly one to two stops. Sheer curtains are inexpensive and transform a harsh window into a studio-quality soft light source.
Translucent diffusion fabric can be taped or hung over a window frame for the same effect. Professional photographers sometimes use diffusion panels or even a bedsheet. The material should be white or neutral and translucent enough to scatter light evenly.
Frosted or textured glass windows act as permanent diffusers. If your location has frosted bathroom windows or textured glass panels, these can produce exceptionally beautiful, even light without any additional modification.
You can also control the effective size of your window by partially closing blinds, shutters, or blackout curtains. Narrowing the opening creates a smaller light source with harder, more defined shadows. Opening fully maximizes softness. This simple adjustment gives you a range of light quality from a single window.
Using Reflectors to Fill Shadows
A reflector is the most important tool you can add to a window light portrait setup. Window light is directional, which means the side of your subject facing away from the window will fall into shadow. A reflector placed on the shadow side bounces light back onto the face, filling those shadows and reducing the overall contrast of the image.
White foam board is the easiest and cheapest reflector. A large piece (roughly 20 by 30 inches or larger) placed two to four feet from your subject on the shadow side produces subtle, natural-looking fill. Many professional photographers prefer foam board to commercial reflectors because the fill it produces is gentle and believable.
White walls and ceilings act as built-in reflectors. In a small room with white walls, window light bounces around the space and fills shadows naturally. This is why small white rooms often produce better window light portraits than large rooms with dark walls.
Commercial reflectors (the collapsible circular kind) work well too. White gives the most natural fill. Silver is stronger and slightly cooler, useful when the window light is weak. Gold adds warmth that complements morning or afternoon light. Start with a white reflector placed close to your subject and move it further away to reduce the fill effect.
The amount of fill is a creative choice. Heavy fill (reflector close, strong reflected light) produces a bright, open, commercial look. Minimal or no fill allows the shadows to go deep and dark for a moodier result. Neither is right or wrong. Start by adjusting the reflector distance and observe how the shadow side of the face changes in real time.
Camera Settings for Window Light Portraits
Window light indoors is dimmer than outdoor light, which means your camera settings need to compensate. Here is how to approach each setting for the best results.
Aperture
Open your aperture wide. For window light portraits, f/1.4 to f/2.8 is a common range. A wide aperture lets in more light and creates a shallow depth of field that separates your subject from the background with beautiful bokeh. If you need more of the face in focus (for example, when the near eye and far eye are at different distances from the camera), stop down to f/2.8 or f/4 and raise your ISO to compensate.
Shutter Speed
Keep your shutter speed at or above 1/125th of a second for sharp portraits. This is fast enough to freeze minor subject movement like breathing and subtle head turns. If your subject is very still and you are using a stabilized lens or body, you can sometimes get away with 1/60th. If the light is too dim to maintain 1/125th at your desired aperture, raise your ISO rather than dropping the shutter speed.
ISO
Do not be afraid to raise your ISO. Modern cameras produce clean, usable images at ISO 800, 1600, and even 3200. Window light portraits often require ISO 400 to 1600 depending on the brightness of the window and your aperture choice. A slightly noisy image with correct exposure and sharp focus is always better than a clean image that is underexposed or blurry. Check your histogram to make sure you are not underexposing, as indoor portraits are one of the most common situations where beginners keep the ISO too low.
White Balance
White balance for window light depends on conditions. On a cloudy day, the Cloudy or Shade preset warms up the cool bluish light. On a sunny day with warm direct light, the Daylight preset works well. If the room has mixed lighting (tungsten lamps mixed with window light), turn off the interior lights and rely solely on the window to eliminate color casts. If you shoot in RAW, you can adjust white balance precisely in post-processing.
Metering and Focus
Use spot or center-weighted metering and meter off your subject’s face. Evaluative or matrix metering can be fooled by the bright window in the background, causing the camera to underexpose the face. If the face appears too dark, switch to spot metering or use exposure compensation (+1 to +2 stops) to brighten the exposure.
For focus, use single-point autofocus locked onto the subject’s nearest eye. At wide apertures like f/1.4 to f/2, precise eye focus is critical. If your camera has eye-detection autofocus, enable it.
Focal Length
A focal length between 50mm and 105mm (full-frame equivalent) is ideal. An 85mm is the classic choice for head-and-shoulder portraits, while a 50mm works well for half-body and environmental shots that include the room. A 35mm can work for documentary or lifestyle portraits, but be careful not to place the subject’s face near the edges of the frame where lens distortion is worst.
Common Window Light Portrait Setups
Here are three foundational setups that cover the majority of window light portrait situations. Master these three and you will be prepared for nearly any indoor portrait session.
The Classic Soft Portrait
Position your subject two to four feet from a large window with diffused or indirect light. Angle them roughly 45 degrees from the window so one side of the face receives full light and the other is gently shadowed. Place a white reflector on the shadow side. Shoot from directly in front or slightly from the lit side. This produces a clean, dimensional portrait with soft shadows and natural fill that works for any subject, from professional headshots to family portraits.
The Dramatic Side-Lit Portrait
Position your subject further from the window (six to ten feet) with the light hitting them from the side at 90 degrees. Do not use a reflector. The increased distance causes stronger falloff, and the lack of fill lets the shadow side go dark. Expose for the highlights on the lit side. This produces a dramatic, chiaroscuro-style portrait with deep contrast that works beautifully in black and white. Close other curtains or blinds so the window remains the only light source.
The Backlit Silhouette and Glow
Place your subject directly in front of the window, facing the camera. For a full silhouette, expose for the window so the subject becomes a dark shape defined by outline. For a softer version, overexpose slightly so the window blows out to white and light wraps around the edges. Add a reflector in front (below camera height, angled upward) to bounce light onto the face. This creates a dreamy, high-key look popular for maternity, couples, and fine art portraits.
Shooting in Different Rooms
The room you choose matters as much as the window. Different rooms in a home or building offer different qualities of light, and understanding these differences helps you choose the best location for each portrait.
Living rooms often have the largest windows, providing the softest light. The downside is that multiple windows on different walls can create competing light directions. Close the curtains on all windows except the one you are using as your primary light source.
Bedrooms are often ideal. They typically have one or two windows on a single wall, providing clean directional light. The smaller room size means more light bouncing off walls and ceiling, which provides natural fill. White or light-colored bedrooms are especially good.
Kitchens can work well, especially with a large window over the sink or counter. Reflective countertops and white cabinets act as subtle reflectors, and kitchens make great settings for lifestyle portraits.
Bathrooms are underrated. Small bathrooms with a single window and white walls create an almost studio-like environment. Frosted bathroom windows provide built-in diffusion. The small space limits your working distance, so a 35mm or 50mm lens works better than a telephoto.
Hallways and doorways can channel window light into a narrow beam, creating a spotlight effect that isolates the subject against a darker background. Position your subject in a doorway that leads toward a window, and shoot from the darker side. This framing adds depth and creates a natural vignette.
In any room, pay attention to wall color. White and light gray walls bounce light back, acting as fill reflectors. Dark walls absorb light, increasing contrast. Colored walls can cast a tint onto your subject. A room with red walls will bounce warm reddish light onto the shadow side of the face. If you cannot change the wall color, use a white reflector on the shadow side to override the colored bounce.
Window Light for Different Subjects
Headshots and Professional Portraits
For headshot photography, window light produces a clean, natural look that works well for business profiles and social media portraits. Use a large window with indirect light, position the subject at a 30- to 45-degree angle, and use a reflector to fill the shadow side. A neutral background works best. If the room is busy, open your aperture to blur the background. Keep the composition tight, following the rule of thirds with the subject’s eyes along the upper horizontal line.
Babies and Newborns
Window light is the preferred lighting for newborn photography because it is silent, produces no heat, and does not startle sleeping babies with sudden flashes. Position the baby near a large window with diffused light on a soft surface like a bed or beanbag. Angle the baby so window light falls gently across the face, revealing tiny details of eyelashes, fingers, and skin texture. Keep the room warm and work patiently. Use f/2 to f/2.8 to isolate the baby with shallow depth of field, and shoot from slightly above, at their level, or at a steep overhead angle for variety.
Self-Portraits
Window light is excellent for self-portrait photography because the consistent light direction means you can set up once and get reliable results. Use a tripod with a timer or remote shutter release, and mark your standing spot with tape on the floor. Pre-focus on that spot using manual focus. You can experiment freely with positions, angles, and moods without needing anyone to adjust lights.
Still Life and Product Photography
Although this guide focuses on portraits, window light is equally valuable for still life and product work. The same principles apply: position the subject near a window, use a reflector to fill shadows, and adjust the angle for the desired mood. Flowers, food, and small products all photograph beautifully. The advantage is that your subject never moves, so you can take your time perfecting the composition without worrying about patience.
Editing Window Light Portraits
Window light portraits typically require less editing than images shot in challenging mixed lighting or heavy artificial setups. The light is already beautiful. Your job in post-processing is to refine, not rescue.
Exposure adjustment. If you exposed for the subject’s face, the window or bright areas may be overexposed. In Lightroom or your preferred editing software, pull back the highlights to recover detail in bright areas and lift the shadows slightly to open up the darker side of the face. Be careful not to over-lift shadows, as this can flatten the beautiful dimensionality that window light creates.
White balance fine-tuning. If you shot in RAW, adjust the white balance slider until the skin tones look natural. A small shift in color temperature can dramatically improve the feel of the portrait. Push slightly warm for inviting portraits, or keep it neutral for a clean, modern look.
Contrast and tone curve. A subtle S-curve adjustment deepens the darks and brightens the highlights, enhancing the natural contrast. A gentle lift in the bottom of the curve (raising the black point) creates a faded, film-like look that is popular in lifestyle and fine art styles.
Color grading. Adding a touch of warmth to highlights and a hint of blue or teal to shadows creates a cinematic, polished look. Keep adjustments minimal. The natural beauty of window light is the foundation, and heavy grading can work against the organic quality that makes these portraits appealing.
Skin retouching. The soft quality of window light is forgiving, so heavy retouching is rarely needed. Minor blemish removal and subtle skin smoothing are usually sufficient. Avoid over-smoothing, which makes skin look plastic.
Common Mistakes in Window Light Portraits
- Standing too far from the window. The most common mistake is placing the subject in the middle of the room. Window light loses intensity and softness rapidly with distance. If your portraits look dark or flat, move your subject closer. Two to four feet is a good starting point.
- Leaving room lights on. Overhead lights and lamps create mixed color temperatures and competing light directions. Turn off all artificial lights and rely solely on the window for a single, clean light source.
- Shooting with the window in the frame. Including the bright window creates massive exposure challenges. Either recompose to exclude the window, or accept that it will blow out to white and expose for the face.
- Ignoring the background. Beautiful light on a face is undermined by a cluttered background. Before shooting, look behind your subject and remove anything distracting.
- Using too small a window. A tiny window far from your subject produces hard, spotlight-like light. Get your subject as close as possible to maximize the apparent size of the source.
- Forgetting to check the histogram. Indoor lighting can fool your meter and your eyes. A portrait that looks fine on the LCD may be underexposed on a calibrated monitor. Check your histogram regularly.
- Fighting the shadows. Some beginners try to eliminate all shadows, producing flat, lifeless portraits. Shadows give window light portraits their depth, dimension, and mood. Learn to embrace them.
- Shooting at too slow a shutter speed. Low indoor light tempts beginners to drop shutter speed below safe limits. Keep it at 1/125th or faster. If the light is too dim, open the aperture or raise the ISO.
Try This: Window Light Portrait Exercises
- One window, five positions. Photograph a subject in all five positions from this guide: 45-degree, 90-degree side light, Rembrandt, backlit, and facing the window directly. Compare the results side by side to see how drastically the mood changes while the light source stays the same.
- Reflector on, reflector off. Set up a 45-degree window portrait and take one photo with a white reflector on the shadow side and one without. Compare the two to learn exactly how much effect a reflector has.
- Distance experiment. Photograph the same subject at two feet, four feet, six feet, and eight feet from the window. Adjust only ISO to maintain exposure. Study how the contrast between the lit and shadow sides of the face changes with distance.
- Curtain diffusion test. On a sunny day, take one photo with curtains open (hard direct light) and one with sheer white curtains drawn (diffused). Compare the shadows, skin texture, and mood to see the power of diffusion firsthand.
- Time-of-day study. Photograph the same subject at the same window in the early morning, at midday, and in the late afternoon. Document how the color, direction, and quality of light change. This reveals how much variety a single window can produce.
- Room-to-room comparison. Photograph the same subject near the best window in each room of your home. Notice which rooms produce the softest light and the best natural fill. After this exercise, you will know exactly which room to use for different moods.
Frequently Asked Questions
Do I need a special lens for window light portraits?
No. A 50mm f/1.8 is an affordable, excellent choice. An 85mm f/1.8 is the classic portrait focal length and works beautifully if you have room to back up. Even a kit zoom lens at 50-55mm and f/5.6 can produce good results if you position your subject close to the window and raise your ISO to compensate.
Can I shoot window light portraits with a smartphone?
Yes. The same principles of positioning, distance, and light direction apply. Place your subject near the window, angle them for flattering light, and use portrait mode for background blur. The main limitation is that phones have fixed wide-angle lenses, so you will need to be closer to your subject, and the depth of field simulation is not as natural as optical bokeh from a dedicated camera with a fast lens.
What if my only window is small?
Small windows produce harder, more directional light, which works well for dramatic portraits. Move your subject as close as possible to maximize the apparent size of the light source. You can hang a white sheet on the frame to spread the light. In a small room with light walls, even a small window produces workable portrait light because the walls act as secondary reflectors.
Should I shoot in manual mode or aperture priority?
Either works. Aperture priority with exposure compensation is the quickest approach: set your aperture, let the camera choose the shutter speed, and dial in +0.7 to +1.3 stops of exposure compensation to prevent underexposing the face. Manual mode gives you full control and is better when you want consistent exposures across a series. Take a test shot, check the histogram, and adjust until the skin tones look right.
How do I avoid a color cast from the room?
Turn off all artificial lights so the window is your only source. If the walls are a strong color, place a white reflector between the wall and your subject to prevent colored bounce from reaching the face. Shooting in RAW gives you flexibility to correct any remaining color issues in post-processing.
What time of day is best for window light portraits?
It depends on the window orientation. North-facing windows are consistent all day. East-facing windows are best in the morning. West-facing windows peak in the late afternoon. For the softest light regardless of orientation, overcast days are ideal because cloud cover turns any window into a source of gentle, even illumination. South-facing windows on sunny days may bring harsh direct light at midday, so use sheer curtains or shoot when the sun is lower.
Can window light work for group portraits?
Yes, but you need a large window and careful positioning. The challenge is that window light falls off with distance, so subjects further from the window will be darker. Arrange the group in a line parallel to the window so everyone is at roughly the same distance from the light source. Stop down to f/4 or f/5.6 to keep everyone in focus, raise your ISO, and use a reflector on the far side if needed.
Do I need to shoot in RAW format?
Strongly recommended. RAW files preserve far more highlight and shadow detail than JPEG, which is critical when dealing with the high dynamic range of a bright window and a shadowed room. RAW also lets you adjust white balance precisely in post-processing. If your camera supports RAW+JPEG, use that setting so you have both formats available.
Continue Learning
Window light portrait skills build directly on core photography concepts and connect to many other areas of practice. Explore these guides to deepen your understanding:
- Natural Light Photography covers the full range of outdoor and indoor natural light techniques beyond window light.
- Portrait Lighting Patterns explains the classic lighting patterns (loop, Rembrandt, split, butterfly) in detail so you can identify and create them with window light or any other source.
- Photography Lighting provides a comprehensive foundation in how light behaves and how to control it.
- Studio Lighting Setup is the natural next step once you have mastered window light and want to start adding artificial light sources.
- Portrait Photography covers the broader art of portrait making, including posing, composition, and connecting with your subject.
- Photo Editing for Beginners teaches the fundamentals of post-processing that will help you polish your window light portraits.