Canyons are some of the most rewarding places to photograph and some of the most humbling. Standing at the rim, the scene is vast, layered and full of color, yet the first pictures often come out flat, hazy or confusing. The secret is to work with the canyon’s shape: catch the light when it rakes across the walls, give the eye something to measure size against, and choose how much of that enormous space to show.
This guide explains how light behaves in canyons, the difference between shooting from the rim and from inside, how to handle the huge range between sunlit rock and deep shadow, and how to show depth and scale. The desert photography guide covers dunes, heat and dry country in general; this page goes deeper into canyons themselves, wide and narrow.
Why canyons are hard to photograph
A canyon is a hole in the ground. That sounds obvious, but it explains most of the trouble. Your eye moves around the scene, adjusting to bright rims and dark depths and reading the distance from layer to layer. A camera records it all at once, from one viewpoint, in one exposure.
Three things tend to go wrong:
- Depth collapses. Distant walls, middle walls and the floor merge into one busy texture, so the picture loses the feeling of looking down into something.
- Contrast overwhelms the sensor. Sunlit rock on the rim can be many stops brighter than the shaded floor, so either the highlights burn out or the shadows turn to black.
- Scale disappears. Without anything familiar in the frame, a wall a thousand feet tall can look like a pile of rocks a few yards away.
Everything that follows is a way to solve one of these three problems.
Rim views, inner canyons and slot canyons
Canyons come in very different shapes, and each asks for a different approach.
From the rim
Overlooks give the classic view: layer after layer of walls, buttes and side canyons fading into the distance. Here the canyon behaves like any big landscape. The light on the walls, the haze in the air and the way ridges overlap decide whether the picture works. Most visitors see a canyon this way, and it is where most beginners should start.
From the floor
Walking along a canyon bottom, you look up at walls instead of down at them. The sky becomes a strip between two edges, and the most interesting subjects are often close: a cottonwood against a wall, a stream bed, a pattern of desert varnish streaking the rock. The light is softer and changes more slowly, because direct sun reaches the floor for only part of the day.
Slot canyons
Slots are narrow passages carved by water, sometimes only an arm’s width across. Direct sun rarely touches the bottom. Instead, light enters high above, bounces from wall to wall and arrives warm and soft. Exposures are long, dust hangs in the air and the walls curve in every direction. Slots reward patience and a tripod more than any other canyon type, and many popular ones can only be visited with a permit or a guide.
When the light works
The single biggest improvement in most canyon photographs comes from being there at the right time. The direction of light matters more here than almost anywhere else, because canyon walls are full of ledges, layers and ridges that only show their shape when light strikes them from the side.
- Sunrise and sunset at the rim. Low sun lights one wall and leaves the opposite wall in shadow, so ridges separate clearly from each other. The rock glows red and orange in the warm light of the golden hour.
- The minutes before sunrise and after sunset. Soft, even light from the sky lets you hold detail in both rim and floor. Colors turn pastel and the distant layers fade gently into blue.
- Midday on the rim. High sun fills in the shadows and flattens the layers. Use this time to scout, or to look for close details.
- Midday inside narrow canyons. This is the exception. Sun has to climb high before it can reach into a slot or a deep side canyon, so late morning to early afternoon often gives the best bounced light.
Pay attention to which way a canyon faces. A wall facing east catches the first sun; a wall facing west lights up in the evening. Overlooks have a best time of day just as people have a best side, and a quick look at a map will tell you which. The sun and moon planning guide explains how to work out where the sun will rise and set at any spot.
Cloudy days are not wasted. Broken cloud throws moving patches of light across the canyon, and waiting for a beam to land on a single butte can turn an ordinary view into a striking one. Storms bring dramatic skies, though they also bring danger, as the safety section below explains.
Exposure for bright rims and deep shadows
The range of brightness in a canyon can be larger than any camera can hold in one frame. At sunrise the rim may be blazing while the floor is still in night. You have a few ways to handle it.
- Protect the highlights. Bright, sunlit rock is the part people look at first. Use exposure compensation to bring the exposure down until the brightest rock holds color, and check the histogram to make sure nothing important is pressed against the right edge.
- Shoot raw. A raw file keeps far more shadow detail than a JPEG, so a frame that looks too dark on the screen can often be brightened later without falling apart.
- Bracket when the range is extreme. Take three or five frames a stop or two apart and blend them later. Bracketing is especially useful in slot canyons, where a beam of sunlight and dark shaded walls share the same frame.
- Change the composition. Sometimes the best answer is to leave out the part that does not fit. Frame only the sunlit walls, or only the shaded ones, and the problem disappears.
Deep shadows are not always a problem. A dark band of shadow between two sunlit ridges is what gives a canyon picture its depth. Let some areas go dark on purpose, and the bright layers will stand out more.
Not sure how much brightness your camera can hold in one frame? Dynamic range explains what a sensor can record and why scenes like this overflow it.
Showing depth: layers, haze and overlap
Depth in a canyon picture comes from layers. When ridges overlap, each one a little paler and bluer than the one in front, the eye reads distance without effort. That fading comes from the air itself: the farther away a wall is, the more haze sits between you and it.
- Look for overlap. Move along the rim until walls stack in front of each other instead of sitting side by side. A few steps can turn a flat panorama into a deep, layered view.
- Use side light. When one side of every ridge is lit and the other is in shade, each layer gets its own edge.
- Include a near, middle and far. A rock, tree or ledge close to the camera, a wall in the middle distance and a far rim make three steps for the eye. The guide to foreground, midground and background explains how to build those layers.
- Let a river or road lead in. A river at the bottom of a canyon traces the depth for you, and a winding road down a wall does the same. Both act as leading lines.
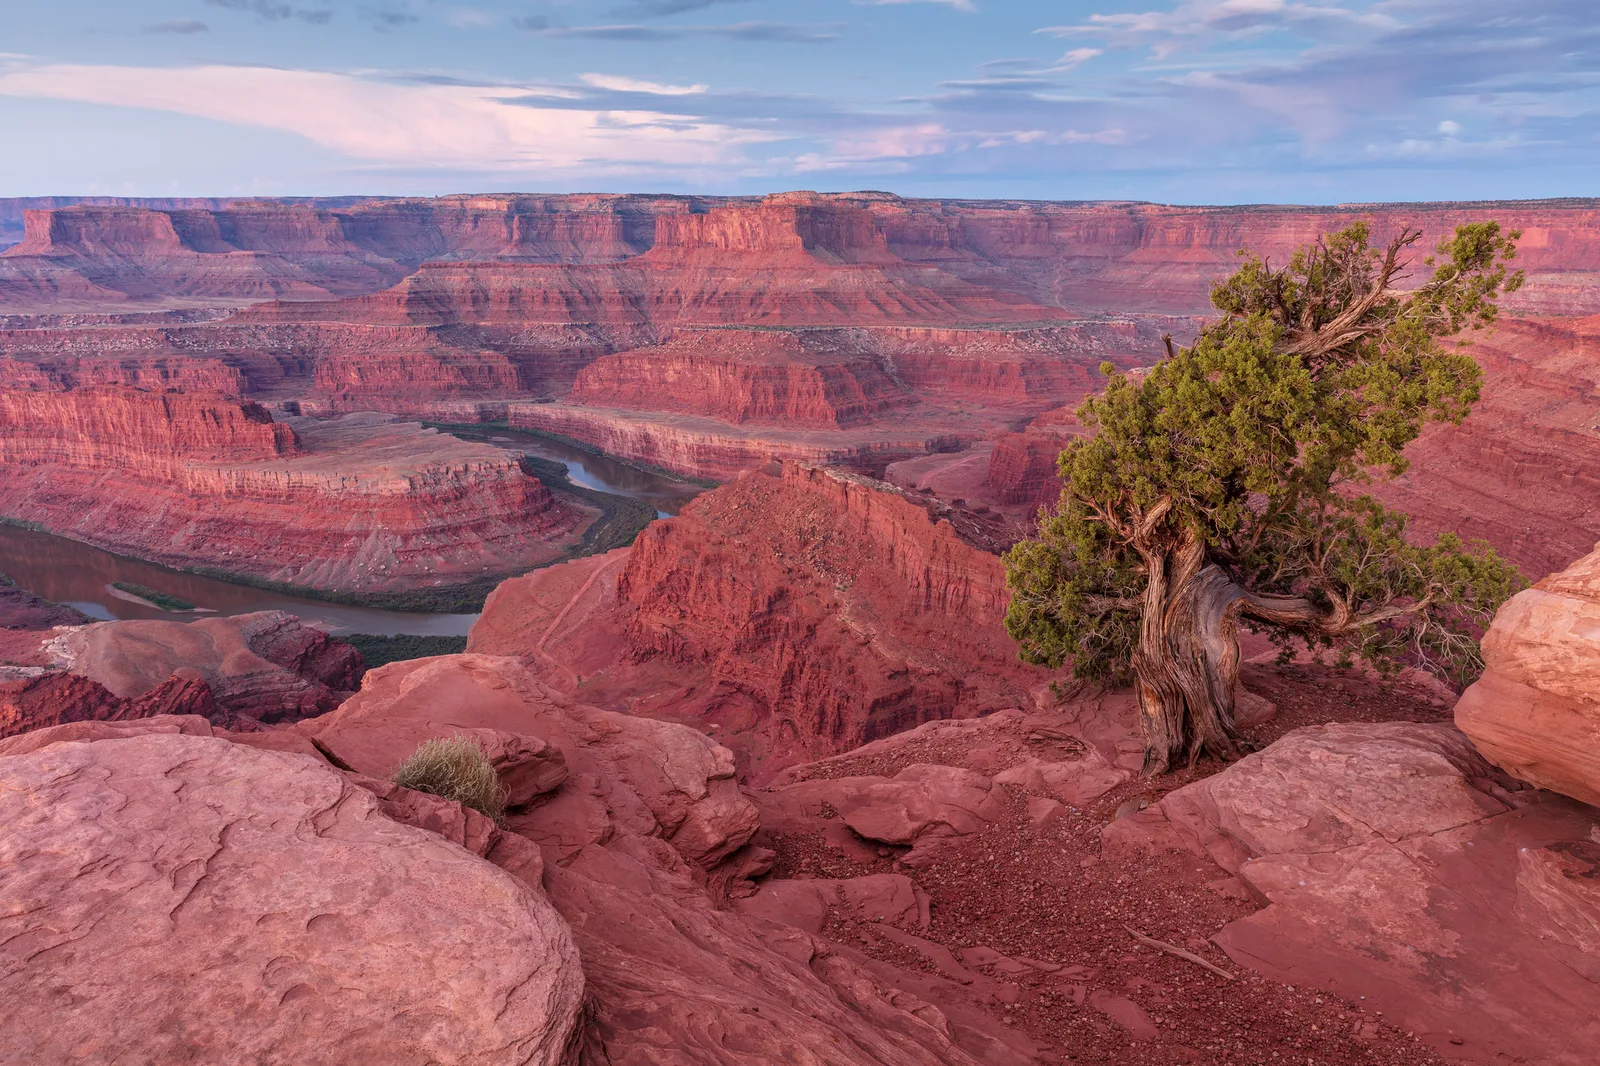
The photo at the top of this page shows how a near subject helps. The juniper anchors the front of the frame, the walls behind it step back in layers, and the river bend far below tells you just how deep the canyon is.
Showing scale
Size is the hardest thing to convey in a canyon. The trick is to include something whose size everyone already knows.
- Trees and shrubs. A juniper or cottonwood on a ledge tells the eye roughly how big the ledge is, and the wall behind it grows by comparison.
- Roads, trails and vehicles. A thin road switchbacking down a wall, or a tiny car on it, makes the scale clear at a glance.
- A distant figure. A hiker far away on a trail is the most direct measure of all. Keep them small and anonymous so the canyon stays the subject.
- Familiar textures. Boulders, river rapids and individual trees on a far slope all help, as long as they are recognizable.
A longer lens can make scale even more dramatic. When you zoom in on a tiny figure beneath a towering wall, the wall fills the frame and the figure looks smaller still. The page on scale in photography covers more ways to show size.
Lenses and settings
You do not need special gear to photograph a canyon. Any camera or phone can make a good picture here, as long as you choose your framing with care.
Wide angle
A wide-angle lens takes in the whole sweep from the rim, and it is the natural choice for slots and narrow canyons, where walls tower on both sides. Be careful at overlooks: a very wide lens makes distant walls tiny. A wide view works best when something interesting sits close to the camera.
Telephoto
Many of the strongest canyon pictures are made with a longer lens. Zooming in on overlapping ridges, a single lit butte or a pattern of layers on a far wall simplifies the scene and stacks the distances. This compression makes far walls look closer together, which suits the layered structure of a canyon.
A starting point for settings
| Situation | Starting settings | Notes |
|---|---|---|
| Rim view, sunrise or sunset | f/8 to f/11, lowest ISO, tripod | Expose for the lit rock; bracket if the floor is very dark |
| Rim view, handheld in daylight | f/8, ISO 100 to 400, 1/250 or faster | Look for side light and overlapping ridges |
| Telephoto detail of far walls | f/8, shutter at least 1/focal length | Watch for haze and heat shimmer |
| Canyon floor in shade | f/8, ISO 400 to 800, tripod if needed | Set white balance by hand to keep warm tones |
| Slot canyon | f/8 to f/11, lowest ISO, tripod, several seconds | Keep sky out of the frame; bracket for beams |
An aperture around f/8 keeps most canyon scenes sharp from near to far without the softening that comes from stopping down too much. If you include a very close foreground, f/11 helps, and focusing about a third of the way into the scene is a good habit. A polarizing filter can cut haze slightly and deepen a blue sky, but rotate it carefully with a wide lens, or one part of the sky will turn darker than the rest.
Color and white balance in canyons
Sandstone is warm by nature, and the light that bounces between canyon walls gets warmer with each bounce. That is part of the magic, and it is easy to lose. Auto white balance often tries to neutralize the orange glow, leaving walls that look gray or pink.
If your canyon pictures look cold, set white balance to daylight or sunny instead of auto. In shade, the cloudy or shade setting adds warmth back. If you shoot raw, you can adjust white balance afterward with no loss of quality, so try a few versions and choose the one that matches what you remember.
Be careful not to push color too far. Red rock already looks dramatic, and extra saturation quickly turns it into something that looks like plastic. A gentle touch with contrast and a small lift in the shadows usually does more for a canyon picture than heavy color.
Is the haze on the far walls hiding detail you want to keep? Dehaze explains how to cut atmospheric haze in editing without making the sky look strange.
Staying safe at the edge and below it
Canyons are beautiful and unforgiving. A good picture is never worth a fall, a flood or heatstroke.
- Stay back from the edge. Rims are often crumbly, sandy or slick, and the urge to step closer while looking through a viewfinder is strong. Set up a step or two back, and never walk backward while framing.
- Respect flash floods. Rain far upstream can send a wall of water through a narrow canyon under a clear sky. Check the forecast for the whole area, and stay out of slots and narrow washes when storms are possible.
- Carry water and plan for heat. Hiking down into a canyon is easy; climbing out in the afternoon heat is not. Allow twice as long for the return.
- Protect your gear from dust. Fine sand drifts in the air in slots. Change lenses before you go in, keep a cloth handy and use a lens hood to shield the front glass.
- Follow local rules. Stay on trails, keep off fragile soil crusts and check whether permits are needed for the place you plan to visit.
For packing light and staying comfortable on longer walks, the hiking photography guide has practical advice.
Common mistakes
- Shooting everything at midday from the rim. The layers flatten into one texture. Fix: return for the first or last hour of sun, or look for shaded details instead.
- Going wide and getting tiny walls. The canyon looks small and distant. Fix: add a strong foreground or switch to a longer focal length and isolate part of the view.
- Burned-out rims. The brightest rock turns white. Fix: reduce exposure until the histogram pulls away from the right edge, and bracket if the shadows matter too.
- No sense of size. Viewers cannot tell whether a wall is ten feet or a thousand. Fix: include a tree, trail, road or distant person.
- Gray rock. Auto white balance removed the warmth. Fix: use the daylight or shade setting, or correct the raw file.
- A white strip of sky in slot canyon pictures. It pulls the eye away from the glowing walls. Fix: tilt down or change position until the sky leaves the frame.
Try this: a 10-minute layer hunt
Next time you are at a canyon overlook, try this before you take any wide shots.
- Minutes 1 to 2: Stand still and find where the light is coming from. Notice which walls are lit and which are in shade.
- Minutes 3 to 5: Zoom in as far as your camera or phone allows and make five frames of overlapping ridges only, with no sky.
- Minutes 6 to 8: Walk a few steps along the rim and find something close to include: a tree, a rock, a ledge. Make three frames with it in the foreground.
- Minutes 9 to 10: Find one thing that shows scale, such as a road or a distant hiker, and make a final frame that includes it.
Compare the results. Most people find that the zoomed-in layers and the frames with a clear foreground say more about the canyon than the first wide view.
Frequently asked questions
What is the best time of day to photograph a canyon?
From the rim, the first and last hour of sunlight, when low sun lights the walls from the side and shows every layer. Inside narrow canyons, late morning to early afternoon is often better, because sun must be high to bounce down into them.
What lens is best for canyon photography?
Both ends are useful. A wide lens suits slots and views with a strong foreground, while a telephoto isolates layers and lit buttes on far walls. If you can bring only one, a standard zoom covers most situations.
How do I make a canyon look deep in a photo?
Show overlapping layers, include something close to the camera, and let a river, road or trail lead the eye into the distance. Side light gives each layer its own edge.
Why do my canyon photos look hazy?
Distant walls are seen through miles of air, which adds haze. Shoot early or late when the air is often clearer, use a longer lens on nearer walls, and reduce haze gently in editing.
Do I need a tripod?
For rim views in good light, no. For sunrise, sunset, bracketing and especially slot canyons, where exposures can last several seconds, a tripod makes a big difference. The guide on how to use a tripod covers setting one up on uneven ground.
Can I photograph canyons with a phone?
Yes. Use the main lens rather than the ultra-wide for most views, tap on the bright rock to set exposure, and try the zoom on distant layers. The same rules about light and scale apply.
For terms such as bracketing, dynamic range, lens compression and white balance, see the photography glossary.