Spring is a season of transformation, and that transformation happens fast. For more, see our tips for every season guide. Within weeks, bare branches push out blossoms, fields turn from brown to green, migratory birds return, and newborn animals appear in meadows and forests. The light softens. Rain falls. Mist rolls through valleys at dawn. For photographers, spring offers a combination of color, life, and atmosphere that no other season can match. But capturing it well means understanding the specific qualities of spring light, working with unpredictable weather, and knowing where to look as the world wakes up.
Spring photography sits between the starkness of winter and the lush fullness of summer. It shares some qualities with fall photography in that it is a transitional season defined by rapid change. But while autumn is about decline, warm colors, and long golden light, spring is about emergence, cool pastels, and freshness. The mood is different. The color palette is different. The subjects are different. This guide covers everything you need to photograph spring effectively, from blossoms and wildlife to storms and portraits, with practical advice on settings, editing, and avoiding common mistakes.
What Makes Spring Unique for Photography
Every season has its visual signature. Winter offers minimalism and stark contrast. Fall delivers warm tones and rich golden light. Summer brings harsh midday sun and deep greens. Spring is defined by soft pastels, rapid daily change, and the tension between lingering winter and arriving warmth. Understanding these qualities is the foundation of strong spring photography.
The color palette of spring is unlike any other time of year. Blossoms arrive in whites, pinks, lavenders, and pale yellows. New leaves emerge in a bright, almost electric green that darkens as summer approaches. Wildflowers carpet meadows in purples, blues, and oranges. These pastel and vivid tones are fleeting. The specific shade of spring green that appears on a newly leafed tree lasts perhaps two weeks before deepening into the darker green of summer foliage. Photographing spring means working quickly, because the visual window for each stage is narrow.
Spring light has a quality that differs from other seasons. The sun climbs higher each day, and the golden hour that stretched for an hour or more in winter gradually shortens. But spring mornings often bring mist, fog, and dew that soften and diffuse the early light in ways that create naturally atmospheric images. Overcast spring days are frequent, and the soft, even illumination they provide is ideal for flowers, forests, and close-up work. The interplay between natural light and the atmosphere of spring is one of the season’s greatest assets for photographers.
The pace of change is what separates spring from every other season. In fall, the color change happens over weeks and you can plan around peak foliage. In spring, a warm stretch of three or four days can push a tree from bare branches to full bloom, and another few days of wind and rain can strip the petals entirely. This urgency rewards photographers who pay attention and act quickly. Check your local parks and natural areas regularly throughout the season. The subjects that are available today may be gone by the weekend.
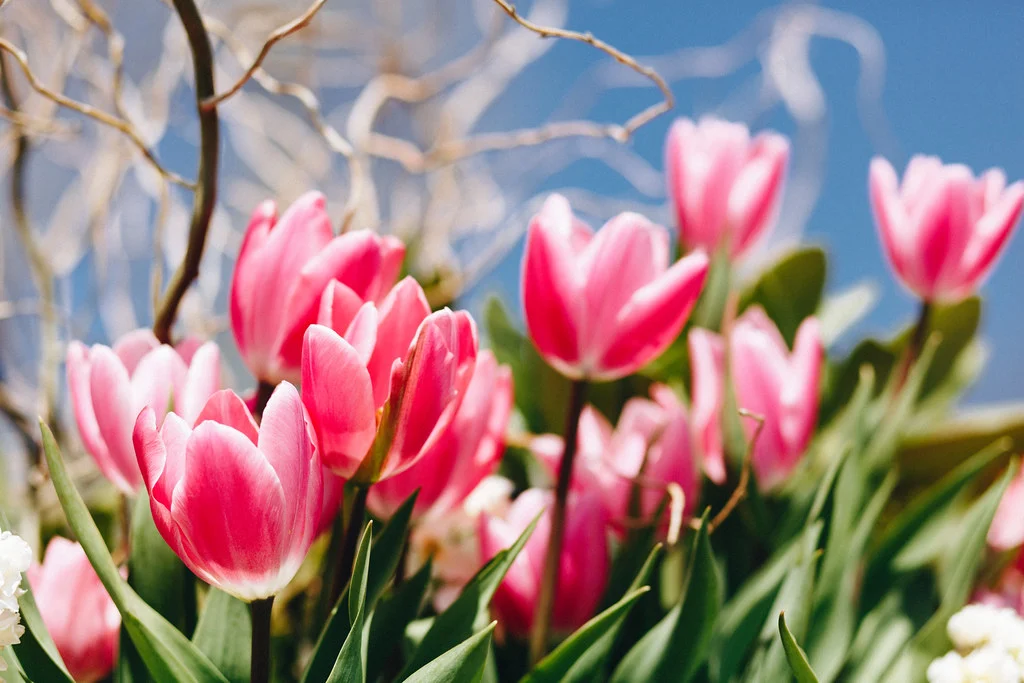
Cherry Blossoms and Spring Flowers
Flowers are the defining subject of spring photography, and cherry blossoms sit at the top of that list. Cherry blossom season draws photographers worldwide to parks, gardens, and tree-lined streets for a spectacle that lasts, at most, about two weeks. The appeal is obvious: thousands of soft pink and white blossoms, often against blue skies, create a visual abundance that photographs beautifully. But abundance alone does not make a good photograph. Compositional discipline matters here as much as it does in fall foliage.
When photographing cherry blossoms and other flowering trees, resist the urge to shoot only wide shots of entire trees in full bloom. Those images record the scene, but they rarely stand out. Instead, look for specific branches or clusters that form interesting shapes against the sky. A single branch arcing across the frame with blue sky behind it has more visual impact than a full tree shot from across the street. Use a longer focal length to isolate sections of the canopy and compress the layers of blossoms into a soft, dense tapestry of pink.
Backlight transforms blossoms. When the sun is behind the flowers, petals become translucent and glow with an inner light that front-lit conditions cannot produce. Position yourself so the sun shines through the blossoms toward your camera. You will likely need to add exposure compensation of +1 to +1.5 stops to keep the flowers bright and prevent silhouetting. The direction of light you choose for flower photography makes a dramatic difference in the final image.
Shallow depth of field is one of the most effective tools for spring flower photography. Open your aperture to f/2.8 or wider and focus on a single blossom or small cluster in the foreground. The out-of-focus blossoms behind your subject create a wash of soft color, beautiful bokeh that becomes a visual element in its own right. This technique works equally well for magnolias, dogwoods, crabapples, and any spring-flowering tree or shrub.
Beyond trees, spring brings wildflowers that offer different photographic opportunities. Fields of bluebells, lupines, poppies, and daisies provide wide landscape subjects where the flowers themselves become the landscape. For these scenes, get low. A camera positioned just above the flower tops, shooting across the field, creates a sense of immersion that a standing-height shot cannot match. Include a strong element in the background, a mountain, a barn, a lone tree, to anchor the composition and prevent the image from becoming a formless sea of color.
For close-up flower work, macro photography techniques reveal details invisible to the casual observer. Water droplets on petals after a rain shower, the intricate architecture of a flower’s center, the texture of pollen on a visiting bee. Use a dedicated macro lens or close-up filters to fill the frame with these details. Early morning, when dew is still present and the air is calm, is the ideal time for macro flower photography. Wind is the enemy of close-up work, and spring mornings before the breeze picks up provide the still air you need for sharp images. Refer to the flower photography guide for more detailed techniques on composition and lighting for blooms.
Rain and Stormy Weather Photography
Spring is the rainiest season in many regions, and rather than waiting for clear skies, experienced photographers embrace the rain. Wet conditions produce some of the most atmospheric and visually interesting images of the year. Rain saturates colors, making greens deeper and flowers more vivid. It creates reflections on roads, sidewalks, and puddles that add depth and visual interest to scenes that would look ordinary when dry. Overcast rainy skies provide soft, even lighting with no harsh shadows, which is ideal for detail-oriented subjects.
Photographing in the rain requires gear protection. A dedicated rain cover or rain sleeve for your camera and lens is the best solution. In a pinch, a clear plastic bag with a hole cut for the lens, secured with a rubber band, provides basic protection. Weather-sealed camera bodies and lenses can handle moderate rain without additional protection, but extended shooting in heavy rain warrants a proper cover. Keep a microfiber cloth accessible for wiping water drops off the front element of your lens. A lens hood helps deflect rain away from the glass.
The moments just before and just after a spring storm are often the most dramatic for photography. As storm clouds approach, the contrast between dark sky and brightly lit foreground creates high-drama scenes. If the sun breaks through as a storm passes, the combination of dark clouds, shafts of light, and wet surfaces produces some of the most striking images possible. Rainbows appear when sunlight hits rain at the right angle, usually when you are facing away from the sun as a storm clears. Be ready. These moments last minutes, sometimes seconds. For detailed techniques on capturing these conditions, see the weather photography guide.
Spring thunderstorms bring additional photographic opportunities. Lightning, dramatic cloud formations, and the moody atmosphere of approaching storms all create powerful images. For lightning, use a tripod and a long exposure (10 to 30 seconds) at a moderate aperture (f/8 to f/11) in low light conditions, such as dusk or nighttime. The camera captures whatever lightning strikes occur during the exposure. Always prioritize safety: never photograph lightning from an exposed position or near tall isolated objects. Stay in a vehicle or sturdy building and shoot through a window or from a covered porch.
Do not overlook the details that rain creates. Droplets hanging from flower petals and leaf edges, rivulets of water streaming down a window, splashing puddles, the pattern of rain on a pond surface. These close-up subjects are exclusively available during and immediately after rain. Rain photography at the macro level reveals a world of beauty that dry conditions simply cannot offer. Use a fast shutter speed (1/500 second or faster) to freeze individual raindrops, or a slower shutter speed to show rain as streaks, depending on the effect you want.
Newborn Wildlife and Birds
Spring is nesting season, and wildlife photography opportunities multiply as animals raise their young. Ducklings following their mother across a pond, fawns standing on wobbly legs in a meadow, fox kits playing at the entrance to a den, songbirds feeding chicks in a nest. These subjects are among the most emotionally compelling in all of photography, and spring is the only time of year to capture them.
The most important principle for spring wildlife photography is to keep your distance. Nesting birds and animals with young are particularly vulnerable to disturbance. If a parent bird begins alarm calling, flies in agitated patterns near a nest, or a mammal is watching you intently, you are too close. Back away. Use a long telephoto lens, 300mm at minimum and 400mm to 600mm when possible, to photograph wildlife from a distance that does not alter their behavior. The welfare of the animal always takes priority over the photograph.
Early morning is the most active time for spring wildlife. Birds are singing and foraging to feed hungry chicks. Deer and other mammals are moving and grazing before retreating to cover during the warmer midday hours. Arrive at your location before sunrise and be settled in position, quiet and still, before the activity begins. Movement and noise are the two things most likely to spook wildlife. The best wildlife photographers are patient ones who let the animals come to them rather than pursuing the animals.
For bird photography in spring, focus on behavior rather than simple portraits. A bird carrying nesting material in its beak tells a story. A parent feeding a chick shows the urgency of the breeding season. A territorial male singing from a prominent perch reveals personality. These behavioral moments create images with narrative depth that static portraits lack. Anticipate the action: watch the bird’s patterns, notice which perch it returns to, observe the path it takes to the nest. Position yourself accordingly and wait.
Spring migration brings species through areas where they are not present at other times of year. Check local birding reports and nature groups to learn which migratory species are passing through and where they are stopping. Wetlands, shorelines, and parks along major flyways can produce remarkable diversity during peak migration weeks. A morning at a productive wetland during spring migration might yield dozens of species that are only present for a brief window.
Spring Landscapes: Green Fields, Waterfalls, and Mist
Spring landscape photography is defined by the return of green. After months of brown, gray, and white, the first flush of new growth transforms the landscape almost overnight. The particular shade of spring green, bright, fresh, almost luminous, is distinctly different from the deeper green of summer. Capturing this quality requires attention to both timing and light.
Overcast days are often the best conditions for photographing the spring landscape. Soft, diffused light eliminates the harsh shadows and bright highlights that can distract from the natural color of new growth. Forest interiors, in particular, photograph best under overcast skies when the light is even and gentle. Bright sunshine filtering through a forest canopy creates extreme contrast between sun-dappled spots and deep shade, which is difficult to expose correctly. A cloudy day solves this problem entirely.
Waterfalls reach peak flow in spring as snowmelt and rain swells streams and rivers. This is the time of year when falls that are a trickle in summer become thundering cascades. For waterfall photography, use a tripod and a slow shutter speed (1/4 second to several seconds) to create the classic silky water effect. A neutral density filter may be necessary in daylight to achieve slow enough shutter speeds. The surrounding new growth, bright green ferns, mossy rocks, and fresh leaves, provides a lush frame for the moving water that is uniquely spring.
Morning mist is one of spring’s most photogenic atmospheric conditions. Cool nights followed by warming mornings create fog that settles into valleys, hovers over rivers, and drifts through forests. These conditions are fleeting. The mist often burns off within an hour or two of sunrise. Arrive early and be in position before the sun crests the horizon. As the first light filters through the mist, the combination of warm light and cool fog creates layers of depth and atmosphere that transform ordinary landscapes into something ethereal. Use a moderate telephoto to compress the layers and emphasize the depth of the fog.
Rolling green hills and fields take on their most vibrant color in mid to late spring, before the summer sun bleaches the grass. Look for scenes that combine the bright green of new grass with other elements: a winding fence line, a solitary tree, a path disappearing over a hill. These anchor points give the viewer’s eye somewhere to settle in what might otherwise be a featureless expanse of green. Apply the rule of thirds to place these focal points at strong positions within the frame, and use leading lines like paths, streams, and fence rows to draw the viewer into the scene.
Urban spring landscapes have their own appeal. Cherry tree-lined streets, park gardens bursting with tulips, and the contrast between blooming trees and city architecture create scenes that celebrate the arrival of the season in a different context. Look for color contrast between the soft pastels of spring blossoms and the harder textures and neutral tones of buildings, bridges, and street elements. The juxtaposition tells a more interesting story than flowers alone.
Spring Portraits Outdoors
Spring provides some of the best natural backdrops for portrait photography. Flowering trees create canopies of soft color that work beautifully as out-of-focus backgrounds. Fields of wildflowers place your subject in a vibrant, organic setting. The soft, diffused light of overcast spring days flatters skin tones and eliminates the squinting and harsh shadows that direct sun creates.
When using blossoms as a portrait backdrop, depth of field management is critical. Open your aperture wide (f/1.8 to f/2.8) and position your subject several feet in front of the flowering tree or bush. The blossoms in the background blur into a soft wash of color that frames the subject without competing for attention. The quality of the bokeh matters here: smooth, creamy blur enhances the portrait, while busy or harsh blur distracts from it. A longer focal length at a wider aperture generally produces the smoothest background blur.
Time your portrait sessions carefully. The golden hour light of early morning and late afternoon is warm and flattering, but spring’s overcast days provide equally good portrait light throughout the entire day. On cloudy days, you can schedule a portrait session at noon and still get soft, even illumination. Open shade under a tree or building provides another excellent option for spring portraits. The light is soft, the color temperature is cool and neutral, and the background beyond the shade is often brightly lit, creating natural separation between subject and background.
Spring winds can be a challenge for portraits. Flyaway hair, squinting subjects, and shaking backgrounds all result from gusty spring days. If wind is strong, position your subject with their back to the wind so their hair blows away from their face rather than across it. Use a fast shutter speed (1/500 second or faster) to freeze wind-blown hair and clothing. Alternatively, embrace the wind: a flowing dress or scarf in motion can add energy and dynamism to a portrait that a still image cannot.
Environmental portraits that show the subject interacting with the spring setting tell a richer story than posed headshots. A person walking through a field of wildflowers, pausing to smell a blossom, sitting on a bench under a flowering tree, or standing in a gentle rain. These candid and semi-candid moments feel more natural and seasonal. Give your subject a simple direction (“walk slowly toward me” or “look at the flowers in your hand”) and photograph the genuine reactions that follow.
Camera Settings for Spring Conditions
Spring presents a range of lighting conditions that shift rapidly, sometimes within a single shoot. Cloud cover rolls in and out, sun breaks through briefly before disappearing, and the brightness level can change by several stops in minutes. Knowing how to adapt your settings keeps you shooting instead of fumbling with dials.
For spring flowers in overcast light, start with aperture priority mode. Set your aperture based on how much depth of field you want. For individual blooms with a blurred background, use f/2.8 or wider. For a field of flowers where you want front-to-back sharpness, use f/8 to f/11. Let the camera handle shutter speed, and keep an eye on it to ensure it stays fast enough to avoid camera shake or subject blur from wind. If the shutter speed drops too low (below about 1/focal length for handheld shooting), raise your ISO. Modern cameras handle ISO 800 to 1600 with minimal noise, so do not hesitate to increase it when the light demands it.
For wildlife and birds, you need fast shutter speeds to freeze movement. Start at 1/1000 second for birds in flight and 1/500 second for perched birds and mammals. Use a wide aperture (f/4 to f/5.6, depending on your lens) to let in as much light as possible and to blur distracting backgrounds. Auto ISO with a minimum shutter speed setting is highly effective for spring wildlife: set your camera to auto ISO with a minimum shutter speed of 1/1000 second and a maximum ISO of 6400 or 12800. The camera will raise ISO as needed to maintain your shutter speed as light changes.
For spring landscapes, use a tripod when possible and shoot at your lens’s sharpest aperture, typically f/8 to f/11. Keep ISO at its base setting (usually 100) for maximum image quality. If you are pursuing the sharpest possible image, use a remote shutter release or the camera’s self-timer to eliminate vibration from pressing the shutter button. For waterfalls and streams, a polarizer filter reduces glare on wet rocks and enhances color in the surrounding vegetation.
White balance deserves attention in spring. The cool, blue-toned light of overcast days can make spring scenes feel cold and lifeless. If shooting JPEG, try a slightly warm white balance setting (cloudy or shade preset) to counteract the blue cast and preserve the warmth of spring colors. If shooting RAW, you can adjust white balance freely in post-processing, but setting it approximately correct in camera makes the LCD preview more accurate, which helps you evaluate your images in the field.
Exposure compensation is frequently needed in spring. Bright blossoms against a dark background will cause the camera to overexpose the flowers. A backlit scene may cause underexposure. Get in the habit of checking your histogram after the first few frames in any new scene. The histogram tells you definitively whether you are losing detail in highlights or shadows. Small adjustments of +/- 0.3 to 1.0 stops of exposure compensation are routine in spring shooting.
Dealing with Variable Spring Weather
Spring weather is notoriously unpredictable. A forecast of sunshine can turn to rain within an hour. Temperature swings of 15 degrees or more between morning and afternoon are common. Wind arrives without warning. This variability is both the challenge and the opportunity of spring photography.
Prepare for multiple conditions on every spring outing. Carry a rain cover for your camera even on clear days. Dress in layers you can add or remove. Bring a microfiber cloth for wiping water off your lens. Keep a plastic bag large enough to hold your camera in your bag at all times. Spring weather changes fast, and being unprepared means either getting your gear wet or missing the opportunity that the weather change creates.
Condensation is a concern in spring, though less extreme than in winter. When you move from a cool morning outdoors into a warm car, moisture can condense on your lens and camera body. This is especially common on humid spring mornings. If you see fogging on your lens, let the camera acclimate gradually rather than wiping the element repeatedly. Placing the camera in a sealed bag before entering a warm environment, the same technique used in winter, prevents condensation from forming on the gear.
Wind is arguably the most persistent challenge in spring photography. It shakes flowers, ruffles feathers on birds you are trying to photograph, and can make tripod-mounted shots less sharp. Several strategies help. Shoot at faster shutter speeds than you normally would. Use your body or a reflector as a windbreak for close-up subjects. Look for sheltered spots, a south-facing wall, the lee side of a building, a forest interior, where wind is reduced. Plan your macro and flower sessions for early morning, when wind is typically calmest.
Temperature changes throughout a spring day affect what subjects are available. Cool mornings produce dew and mist, which are photographic assets. As the day warms, insects become active and flowers open more fully. Late afternoon warmth brings out butterflies and bees. By evening, the cooling air may bring mist again. Each temperature phase offers different subjects and moods. Planning your shooting day around these temperature cycles, rather than just around the light, is a spring-specific strategy that pays off.
Editing Spring Photos: Color and Mood
Spring photos have a distinct look in post-processing that differs from the warm saturation of fall or the cool minimalism of winter. The goal in editing spring images is usually to enhance freshness, preserve the delicate pastel tones of blossoms, and maintain the bright, clean quality of new growth. Here is how to approach editing spring images effectively.
Start with white balance. Spring images often benefit from a slightly warm white balance to counteract the cool cast of overcast days, but do not push it so far that you lose the freshness of the season. Unlike fall photos, where a warm white balance enhances the golden tones, spring images can feel unnatural if pushed too warm. Aim for a neutral to slightly warm tone that preserves the cool greens and soft pinks of the season.
Be careful with saturation. Spring colors are naturally pastel and delicate, and heavy saturation destroys that quality. Cherry blossoms pushed too far in saturation turn from soft pink to neon magenta. New spring leaves pushed too far become radioactive green. Use the vibrance slider rather than saturation, as vibrance boosts muted tones without pushing already-saturated colors further. Small adjustments of +10 to +20 vibrance are usually sufficient for spring images.
The HSL (Hue, Saturation, Luminance) panel in Lightroom or similar software is your most powerful tool for spring color control. You can shift the hue of greens slightly toward yellow for a warmer, more golden spring look or toward cyan for a cooler, fresher feel. Adjusting the luminance of specific colors, making greens brighter and pinks slightly darker, for example, adds depth to spring images without increasing overall saturation. Targeted color adjustments preserve the nuance that makes spring colors appealing.
For misty and foggy spring morning images, reduce clarity slightly (by -5 to -15) to enhance the soft, ethereal quality of the atmosphere. Raising the black point (lifting the far left of the tone curve) adds a faded, dreamy quality that suits misty conditions. Do not overdo this effect. A small adjustment creates atmosphere. Too much creates a flat, lifeless image.
Spring rain photos often benefit from a slight boost in contrast and clarity to enhance the wet textures and reflections. Wet surfaces have a natural sheen and depth that editing can emphasize. Increase clarity by +10 to +20, add a slight S-curve to the tone curve for enhanced contrast, and consider a subtle vignette to draw the eye inward. The color in rain-soaked spring scenes is already naturally saturated from the wet surfaces, so additional saturation adjustments are rarely needed.
Smartphone photos from spring outings can benefit from the same editing principles. Most phone editing apps include white balance, saturation, and clarity adjustments. The key is restraint. Apply small corrections rather than dramatic filters. The goal is to enhance what your phone captured, not transform it into something artificial.
Common Mistakes in Spring Photography
Oversaturating pastels. Spring colors are delicate by nature. Cherry blossoms are soft pink, not hot pink. New leaves are fresh green, not lime green. When you push saturation too hard in editing, you destroy the very quality that makes spring colors appealing. Let the subtlety of the palette speak for itself. If your spring photos look like they were taken in a candy store, dial the saturation back.
Ignoring backgrounds. Spring brings so much visual richness in the foreground that it is easy to forget what is behind your subject. A beautiful cherry blossom branch photographed against a parking lot loses its magic. Before pressing the shutter, check the background. Move a few steps to eliminate distracting elements. Use a wider aperture to blur an imperfect background. Or change your angle to place the blossoms against the sky. Strong composition requires attention to every part of the frame.
Only shooting on sunny days. Some of the best spring photography happens under overcast skies or in light rain. Cloudy light saturates flower colors, eliminates harsh shadows in forest scenes, and provides flattering portrait illumination all day long. If you only shoot in sunshine, you are missing half of spring’s photographic potential. Embrace the gray days.
Shooting everything at eye level. Most spring photos are taken from standing height, looking slightly downward at flowers and out toward landscapes. This is the least interesting perspective because it is how everyone sees the world every day. Get low for flower fields. Shoot upward through blooming canopies. Find elevated viewpoints above mist-filled valleys. Varying your angle transforms ordinary spring scenes into compelling photographs.
Missing the peak moments. Spring moves fast. Cherry blossoms peak and fall within days. The specific quality of light-green new growth on trees lasts about two weeks. Wildflower blooms in a given meadow may peak for only a few days. Track the progression of spring in your area. Visit potential locations regularly to catch them at their best. Waiting for the weekend often means arriving after the peak has passed.
Neglecting the transition between seasons. Some of the most interesting spring photos happen at the boundaries: the last snow melting beside the first flowers, bare branches alongside ones in full bloom, frost crystals on a bud that is about to open. These transitional moments capture the essence of spring more powerfully than peak bloom ever can, because they show the process of change rather than just the result.
Try This: Spring Photography Exercises
Exercise 1: The Daily Bud. Choose a single flowering tree or shrub and photograph the same branch every day from the moment buds begin to swell through full bloom and petal fall. Use the same framing and angle each day. Over the course of one to three weeks, you will build a sequence that documents the entire arc of spring in a single subject. This exercise sharpens your observation, teaches you to notice small daily changes, and produces a series that works powerfully as a grid or time-lapse presentation. Pay attention to how natural light shifts across the season and affects the same subject differently each day.
Exercise 2: Spring in the Rain. Go out specifically during a spring rain and commit to shooting for at least 30 minutes. Protect your gear, but push yourself to find compelling images in wet conditions. Look for reflections in puddles, droplets on petals, wet pavement reflecting street lights or storefronts, and the soft atmosphere of rain-diffused light. Shoot both wide scenes and close-up details. This exercise breaks the habit of waiting for perfect weather and trains you to see photographic potential in conditions most people avoid. Apply the compositional techniques from the rain photography guide to structure your images.
Exercise 3: The Pastel Palette. Spend one session photographing only soft, muted colors: pale pink blossoms, light green new leaves, lavender wildflowers, soft blue sky reflected in a puddle. Avoid strong, saturated colors entirely. This constraint forces you to work with the subtlety that defines spring’s unique palette and trains your eye to see beauty in gentle tones. When editing these images, exercise maximum restraint. Let the quiet color palette define the mood. Apply the rule of thirds and leading lines to give compositional strength to these softly-colored scenes.
Exercise 4: Dawn to Dusk. Pick one spring day and photograph from before sunrise to after sunset. Notice how the light, subjects, and mood change throughout the day. Capture the morning mist, the midday overcast or bright sun, the afternoon warmth, and the evening golden light. Review your images at the end of the day and identify which conditions produced your strongest work. This exercise teaches you to read and respond to changing light, one of the most important skills in photography lighting.
Frequently Asked Questions
What is the best time of day for spring photography?
Early morning is the single best time for spring photography. Mist and dew are present, wind is calm (critical for flower and macro work), wildlife is most active, and the low-angle light is warm and atmospheric. The hour after sunrise is especially productive. That said, overcast spring days provide excellent, even light throughout the day, making midday sessions viable for flowers, forests, and portraits. Late afternoon offers warm golden light for landscapes and portraits. Each part of the day has its strengths, but if you can only shoot at one time, choose early morning.
What camera settings should I use for spring flower photography?
For individual flowers with a blurred background, use aperture priority mode with your aperture wide open (f/1.8 to f/2.8). Focus carefully on the stamen or the nearest petal edge. Keep your shutter speed fast enough to freeze any wind-induced movement (at least 1/250 second, faster in breezy conditions). For fields of flowers where you want everything sharp, use f/8 to f/11 on a tripod. In both cases, shoot in RAW for maximum editing flexibility and check your histogram to ensure you are not blowing out white or pale-colored blossoms.
How do I photograph spring blossoms on a windy day?
Increase your shutter speed to at least 1/500 second (1/1000 second or faster for close-ups). Raise your ISO as needed to maintain that speed. Use continuous autofocus mode so the camera tracks the moving subject. Alternatively, find sheltered locations where buildings, walls, or dense vegetation block the wind. Early morning, before the wind typically picks up, is the best time to schedule blossom photography. You can also use a burst shooting mode to capture multiple frames and choose the sharpest one later.
What lenses work best for spring photography?
A versatile zoom in the 24-70mm range handles most spring subjects well: landscapes, environmental portraits, and general flower scenes. A macro lens (90-105mm) is invaluable for close-up flower and insect detail. A telephoto zoom (70-200mm or longer) isolates individual blossoms from a distance and is essential for wildlife and bird photography. A fast prime lens (50mm f/1.8 or 85mm f/1.8) produces beautiful bokeh for portraits and selective-focus flower images. If you can only carry one lens, the 24-70mm zoom covers the widest range of spring subjects.
How do I capture morning mist in spring landscapes?
Arrive before sunrise at a location where cool air meets water or low ground, such as river valleys, lakeshores, and open fields near water. Use a tripod and shoot at a low ISO for maximum quality. A moderate telephoto (70-200mm) compresses the layers of mist and creates a stronger sense of depth than a wide angle. Expose for the brighter parts of the scene and let the mist provide natural atmosphere. Mist is at its thickest before sunrise and burns off quickly once the sun is above the horizon, so the window for these shots is narrow. Be in position early and shoot continuously as the light changes.
Can I get good spring photos with a smartphone?
Absolutely. Smartphone cameras excel in the bright, even light of overcast spring days and handle close-up flower photography surprisingly well. Use portrait mode for shallow depth of field effects with blossoms. Tap to focus on the specific element you want sharp. Shoot in the phone’s RAW mode if available for more editing flexibility. The main limitations are in wildlife photography (limited zoom reach) and low-light conditions (early morning mist shots). For everything else, a modern smartphone in good spring light can produce excellent results.
Continue Learning
Spring photography builds on fundamentals that apply across all seasons. To deepen your skills, explore these related guides:
- Landscape Photography for foundational techniques that apply to spring scenics
- Macro Photography for detailed flower and insect close-up techniques
- Wildlife Photography for approaching and capturing spring animals and birds
- Nature Photography for a broad overview of outdoor photography skills
- How to Photograph Flowers for dedicated flower photography techniques
- Weather Photography for capturing spring storms and dramatic skies
- Fall Photography to see how autumn’s warmth contrasts with spring’s freshness
- Winter Photography Guide for the cold-weather techniques that bookend the spring season
- Photography Composition for the compositional fundamentals that strengthen every spring image
- Lightroom for Beginners for developing your spring editing workflow
Spring rewards photographers who show up prepared and pay attention. The season moves fast, the weather changes constantly, and the best moments are fleeting. But that urgency is part of what makes spring photography so rewarding. Every week brings new subjects, new light, and new opportunities. Get out early. Embrace the rain. Watch the buds. The images are there for anyone willing to chase the season as it unfolds.